· 7 years ago · May 01, 2019, 01:44 PM
1
2
3
4
5
6
7
8
9
10
11[](http://pepy.tech/project/pysimplegui) tkinter
12[](https://pepy.tech/project/pysimplegui27) tkinter 2.7
13[](https://pepy.tech/project/pysimpleguiqt) Qt
14[](https://pepy.tech/project/pysimpleguiWx) WxPython
15[](https://pepy.tech/project/pysimpleguiWeb) Web (Remi)
16
17 
18 
19
20
21
22# PySimpleGUI
23
24
25
26## Supports both Python 2.7 & 3 when using tkinter
27
28## Supports both PySide2 and PyQt5 (limited support)
29
30## Effortlessly move across tkinter, Qt, WxPython, and the Web (Remi) by changing only the import statement
31
32## The *only* way to write both desktop and web based GUIs at the same time
33
34
35
36
37
38
39
40
41
42
43
44
45
46[Announcements of Latest Developments](https://github.com/MikeTheWatchGuy/PySimpleGUI/issues/142)
47
48[ReadTheDocs](http://pysimplegui.readthedocs.io/)
49
50[COOKBOOK!](https://pysimplegui.readthedocs.io/cookbook/)
51
52[Brief Tutorial](https://pysimplegui.readthedocs.io/tutorial/)
53
54[Latest Demos and Master Branch on GitHub](https://github.com/MikeTheWatchGuy/PySimpleGUI)
55
56[Docs in PDF Format](https://github.com/MikeTheWatchGuy/PySimpleGUI/tree/master/docs)
57
58[Repl.it Home for PySimpleGUI](https://repl.it/@PySimpleGUI)
59
60Super-simple GUI to use... Powerfully customizable
61
62Home of the 1-line custom GUI & 1-line progress meter
63
64The native GUI framework for perfectionists with deadlines
65
66Actively developed and supported (It's 2019 and still going strong)
67
68#### Note regarding Python versions
69As of 9/25/2018 **both Python 3 and Python 2.7 are supported**! The Python 3 version is named `PySimpleGUI`. The Python 2.7 version is `PySimpleGUI27`. They are installed separately and the imports are different. See instructions in Installation section for more info.
70
71# Qt Version
72
73
74Check out the new PySimpleGUI port to the Qt GUI Framework. You can learn more on the [PySimpleGUIQt GitHub site](https://github.com/MikeTheWatchGuy/PySimpleGUI/tree/master/PySimpleGUIQt). **There is a separate Readme file for the Qt version** that you'll find there.
75
76Give it a shot if you're looking for something a bit more "modern". PySimpleGUIQt is currently in Alpha. All of the widgets are operational but some may not yet be full-featured. If one is missing and your project needs it, log an Issue and you'll likely get priority support.
77
78Here is a summary of the Qt Elements
79
80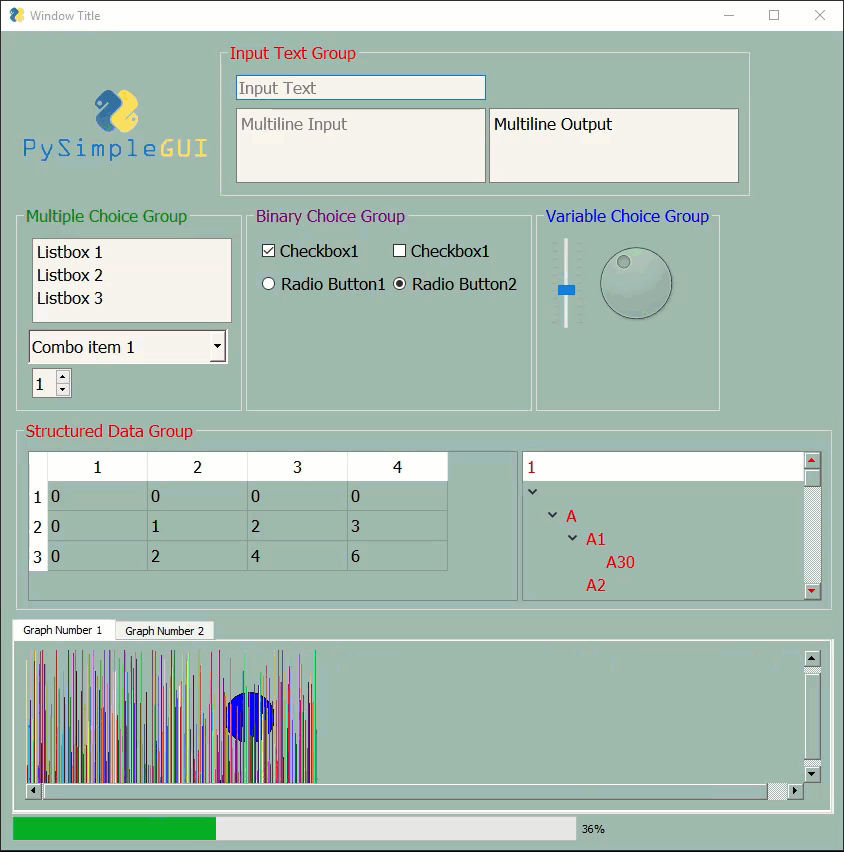
81
82Are there enough things on there to cover your GUI solution?
83
84
85## Source code compatibility
86Your source code is completely portable from one platform to another by simply changing the import statement.
87
88# WxPython Version
89
90 [PySimpleGUIWx GitHub site](https://github.com/PySimpleGUI/PySimpleGUI/tree/master/PySimpleGUIWx). **There is a separate Readme file for the WxPython version**.
91
92Started in late December 2018 PySimpleGUIWx started with the SystemTray Icon feature. This enabled the package to have one fully functioning feature that can be used along with tkinter to provide a complete program. The System Tray feature is complete and working very well.
93
94The Windowing code is coming together with Reads now operational which means Popups work. The elements are getting completed on a regular basis. 3 more were just checked in. At least 1 new element is getting completed a week.
95
96# Web Version (Remi)
97
98 [PySimpleGUIWeb GitHub site](https://github.com/PySimpleGUI/PySimpleGUI/tree/master/PySimpleGUIWeb). **There is a separate Readme file for the Web version**.
99
100New for 2019, PySimpleGUIWeb. This is an exciting development! PySimpleGUI in your Web Browser!
101
102The underlying framework supplying the web capability is the Python package Remi. https://github.com/dddomodossola/remi Remi provides the widgets as well as a web server for you to connect to. It's an exiting new platform to be running on and has temporarily bumped the WxPython port from the highest priority. PySimpleGUIWeb is the current high priority project.
103
104Read on and you'll understand even more why this is an important project...
105
106# repl.it Version
107
108***Want to really get your mind blown?*** Check out this [PySimpleGUI program](https://repl.it/@PySimpleGUI/PySimpleGUIWeb-Demos) running in your web browser.
109
110Thanks to the magic of repl.it and Remi it's possible to run PySimpleGUI code in a browser window without having Python running on your computer.
111
112The programs you write using repl.it will automatically download and install the latest PySimpleGUIWeb from PyPI onto a virtual Python environment. All that is required is to type `import PySimpleGUIWeb` you'll have a Python environment up and running with the latest PyPI release of PySimpleGUIWeb.
113
114This is an exciting new development that's opening up all kinds of possibilities for new ways to program and learn PySimpleGUI. Stayed tuned, much more to be posted about this in the near future.
115
116Educators in particular should be interested. Students can not only post their homework easily for their teacher to access, but teachers can also run the students programs online. No downloading needed. Run it and check the results.
117
118Depending on how you're viewing this document, you may or may not see an embedded browser window below that is running PySimpleGUI code.
119
120<iframe height="1000px" width="100%" src="https://repl.it/@PySimpleGUI/PySimpleGUIWeb-Demos?lite=true" scrolling="no" frameborder="no" allowtransparency="true" allowfullscreen="true" sandbox="allow-forms allow-pointer-lock allow-popups allow-same-origin allow-scripts allow-modals"></iframe>
121
122# Support
123
124PySimpleGUI is an active project. Bugs are fixed, features are added, often. Should you run into trouble, open an issue on the GitHub site and you'll receive help by someone in the community.
125
126# Platforms
127
128 It's surprising that Python GUI code is completely cross platform from Windows to Mac to Linux. No source code changes. This is true for both PySimpleGUI and PySimpleGUIQt.
129
130However, **Macs** suck. They suck on tkinter in particular. The "Look and feel" calls are disabled for Macs. Colored buttons in particular are broken. Not in the PySimpleGUI code, of course. It's mostly because Macs suck. Consider using Qt instead of tkinter on the Mac. Or, if using tkinter, bring your own button images.
131
132------------------------------------------------------------------------
133
134
135Looking for a GUI package? Are you
136
137* looking to take your Python code from the world of command lines and into the convenience of a GUI? *
138* sitting on a Raspberry **Pi** with a touchscreen that's going to waste because you don't have the time to learn a GUI SDK?
139* into Machine Learning and are sick of the command line?
140* wanting to distribute your Python code to Windows users as a single .EXE file that launches straight into a GUI, much like a WinForms app?
141* would like to run a program in the system tray?
142* a teacher wanting to teach your students how to program using a GUI?
143* a student that wants to put a GUI onto their project?
144* looking for an active project?
145
146Look no further, **you've found your GUI package**.
147
148 import PySimpleGUI as sg
149
150 sg.Popup('Hello From PySimpleGUI!', 'This is the shortest GUI program ever!')
151
152
153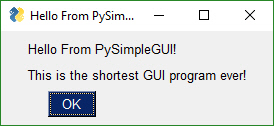
154
155
156Or how about a ***custom GUI*** in 1 line of code?
157
158 import PySimpleGUI as sg
159
160 event, (filename,) = sg.Window('Get filename example'). Layout([[sg.Text('Filename')], [sg.Input(), sg.FileBrowse()], [sg.OK(), sg.Cancel()] ]).Read()
161
162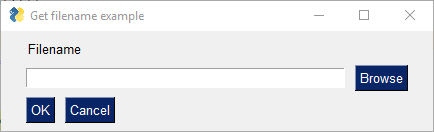
163
164
165 Build beautiful customized windows that fit your specific problem. Let PySimpleGUI solve your GUI problem while you solve your real problems. Look through the Cookbook, find a matching recipe, copy, paste, run within minutes. This is the process PySimpleGUI was designed to facilitate.
166
167Your windows don't have to look like "boring" old windows. Add a few custom graphics to your windows to polish things up.
168
169
170
171
172
173
174
175
176PySimpleGUI wraps tkinter or Qt so that you get all the same widgets as you would tkinter/Qt, but you interact with them in a more friendly way. It does the layout and boilerplate code for you and presents you with a simple, efficient interface.
177
178
179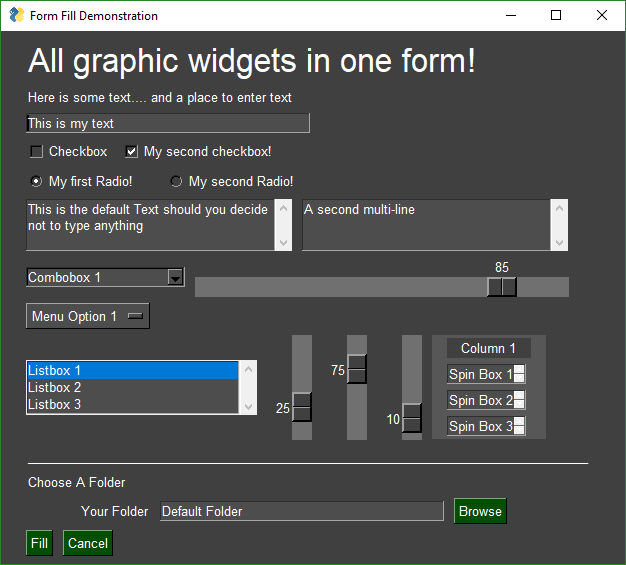
180
181Perhaps you're looking for a way to interact with your **Raspberry Pi** in a more friendly way. The same for shown as on Pi (roughly the same)
182
183
184
185
186
187
188
189In addition to a primary GUI, you can add a Progress Meter to your code with ONE LINE of code. Slide this line into any of your `for` loops and get a nice meter:
190
191 OneLineProgressMeter('My meter title', current_value, max value, 'key')
192
193 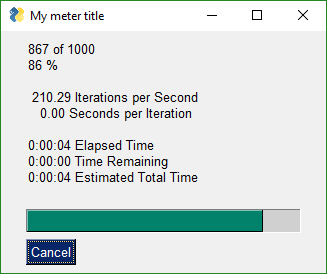
194
195It's simple to show animated GIFs.
196
197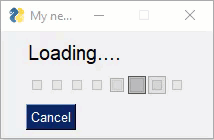
198
199
200How about embedding a game inside of a GUI? This game of Pong is written in tkinter and then dropped into the PySimpleGUI window creating a game that has an accompanying GUI.
201
202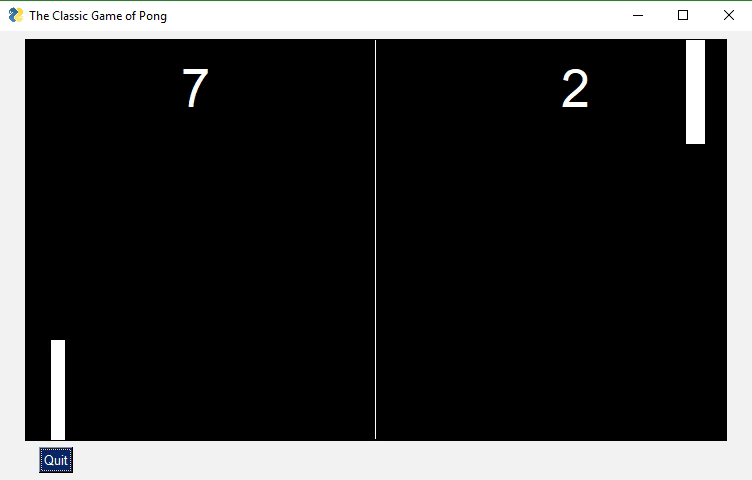
203
204
205Combining PySimpleGUI with PyInstaller creates something truly remarkable and special, a Python program that looks like a Windows WinForms application. This application with working menu was created in 20 lines of Python code. It is a single .EXE file that launches straight into the screen you see. And more good news, the only icon you see on the taskbar is the window itself... there is no pesky shell window.
206
207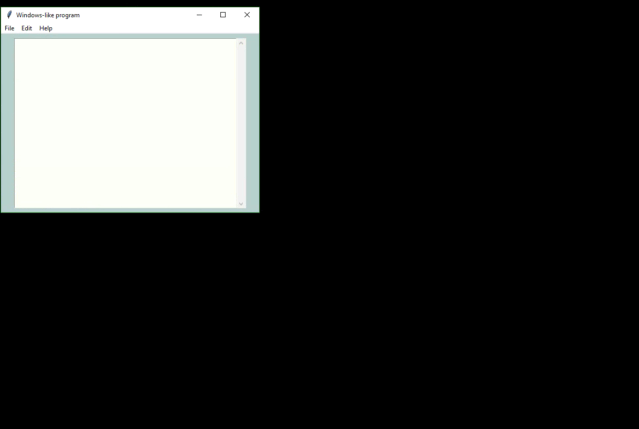
208
209
210 ## Background
211I was frustrated by having to deal with the dos prompt when I had a powerful Windows machine right in front of me. Why is it SO difficult to do even the simplest of input/output to a window in Python??
212
213There are a number of 'easy to use' Python GUIs, but they were too limited for my requirements. PySimpleGUI aims for the same simplicity found in packages like `EasyGUI`and `WxSimpleGUI` , both really handy but limited, and adds the ability to define your own layouts. This ability to make your own windows using a large palette of widgets is but one difference between the existing "simple" packages and `PySimpleGUI`.
214
215With a simple GUI, it becomes practical to "associate" .py files with the python interpreter on Windows. Double click a py file and up pops a GUI window, a more pleasant experience than opening a dos Window and typing a command line.
216
217The `PySimpleGUI` package is focused on the ***developer***.
218> Create a custom GUI with as little and as simple code as possible.
219
220This was the primary focus used to create PySimpleGUI.
221
222> "Do it in a Python-like way"
223
224was the second.
225
226## Features
227
228While simple to use, PySimpleGUI has significant depth to be explored by more advanced programmers. The feature set goes way beyond the requirements of a beginner programmer, and into the required features needed for complex GUIs.
229
230 Features of PySimpleGUI include:
231 Support for Python versions 2.7 and 3
232 Text
233 Single Line Input
234 Buttons including these types:
235 File Browse
236 Files Browse
237 Folder Browse
238 SaveAs
239 Non-closing return
240 Close window
241 Realtime
242 Calendar chooser
243 Color chooser
244 Button Menu
245 Checkboxes
246 Radio Buttons
247 Listbox
248 Option Menu
249 Menubar
250 Button Menu
251 Slider
252 Dial
253 Graph
254 Frame with title
255 Icons
256 Multi-line Text Input
257 Scroll-able Output
258 Images
259 Tables
260 Trees
261 Progress Bar Async/Non-Blocking Windows
262 Tabbed windows
263 Paned windows
264 Persistent Windows
265 Redirect Python Output/Errors to scrolling window
266 'Higher level' APIs (e.g. MessageBox, YesNobox, ...)
267 Single-Line-Of-Code Proress Bar & Debug Print
268 Complete control of colors, look and feel
269 Selection of pre-defined palettes
270 Button images
271 Horizontal and Verticle Separators
272 Return values as dictionary
273 Set focus
274 Bind return key to buttons
275 Group widgets into a column and place into window anywhere
276 Scrollable columns
277 Keyboard low-level key capture
278 Mouse scroll-wheel support
279 Get Listbox values as they are selected
280 Get slider, spinner, combo as they are changed
281 Update elements in a live window
282 Bulk window-fill operation
283 Save / Load window to/from disk
284 Borderless (no titlebar) windows
285 Always on top windows
286 Menus with ALT-hotkey
287 Right click pop-up menu
288 Tooltips
289 Clickable links
290 Transparent windows
291 Movable windows
292 Animated GIFs
293 No async programming required (no callbacks to worry about)
294
295
296An example of many widgets used on a single window. A little further down you'll find the 21 lines of code required to create this complex window. Try it if you don't believe it. Install PySimpleGUI then :
297
298>Start Python, copy and paste the code below into the >>> prompt and hit enter. This will pop up...
299>
300
301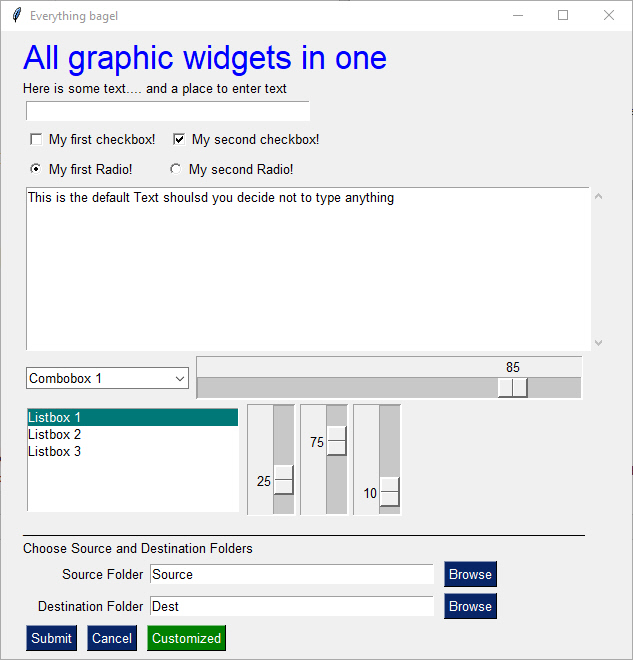
302
303
304
305 import PySimpleGUI as sg
306
307 layout = [[sg.Text('All graphic widgets in one window!', size=(30, 1), font=("Helvetica", 25), text_color='blue')],
308 [sg.Text('Here is some text.... and a place to enter text')],
309 [sg.InputText()],
310 [sg.Checkbox('My first checkbox!'), sg.Checkbox('My second checkbox!', default=True)],
311 [sg.Radio('My first Radio! ', "RADIO1", default=True), sg.Radio('My second Radio!', "RADIO1")],
312 [sg.Multiline(default_text='This is the default Text shoulsd you decide not to type anything',)],
313 [sg.InputCombo(['Combobox 1', 'Combobox 2'], size=(20, 3)),
314 sg.Slider(range=(1, 100), orientation='h', size=(35, 20), default_value=85)],
315 [sg.Listbox(values=['Listbox 1', 'Listbox 2', 'Listbox 3'], size=(30, 6)),
316 sg.Slider(range=(1, 100), orientation='v', size=(10, 20), default_value=25),
317 sg.Slider(range=(1, 100), orientation='v', size=(10, 20), default_value=75),
318 sg.Slider(range=(1, 100), orientation='v', size=(10, 20), default_value=10)],
319 [sg.Text('_' * 100, size=(70, 1))],
320 [sg.Text('Choose Source and Destination Folders', size=(35, 1))],
321 [sg.Text('Source Folder', size=(15, 1), auto_size_text=False, justification='right'), sg.InputText('Source'),
322 sg.FolderBrowse()],
323 [sg.Text('Destination Folder', size=(15, 1), auto_size_text=False, justification='right'), sg.InputText('Dest'),
324 sg.FolderBrowse()],
325 [sg.Submit(), sg.Cancel(), sg.Button('Customized', button_color=('white', 'green'))]]
326
327 event, values = sg.Window('Everything bagel', auto_size_text=True, default_element_size=(40, 1)).Layout(layout).Read()
328
329
330
331---
332### Design Goals
333
334> Copy, Paste, Run.
335
336`PySimpleGUI's` goal with the API is to be easy on the programmer, and to function in a Python-like way. Since GUIs are visual, it was desirable for the code to visually match what's on the screen. By providing a significant amount of documentation and an easy to use Cookbook, it's possible to see your first GUI within 5 minutes of beginning the installation.
337
338 > Be Pythonic
339
340 Be Pythonic... Attempted to use language constructs in a natural way and to exploit some of Python's interesting features. Python's lists and optional parameters make PySimpleGUI work smoothly.
341
342 - windows are represented as Python lists.
343 - A window is a list of rows
344 - A row is a list of elements
345- Return values are a list of button presses and input values.
346- Return values can also be represented as a dictionary
347- The SDK calls collapse down into a single line of Python code that presents a custom GUI and returns values
348- Linear programming instead of callbacks
349
350 #### Lofty Goals
351
352> Change Python
353
354The hope is not that ***this*** package will become part of the Python Standard Library.
355
356The hope is that Python will become ***the*** go-to language for creating GUI programs that run on Windows, Mac, and Linux *for all levels of developer*.
357
358The hope is that beginners that are interested in graphic design will have an easy way to express themselves, right from the start of their Python experience.
359
360There is a noticeable gap in the Python GUI solution. Fill that gap and who knows what will happen.
361
362Maybe there's no "there there". ***Or*** maybe a simple GUI API will enable Python to dominate yet another computing discipline like it has so many others. This is my attempt to find out.
363
364
365 -----
366# Getting Started with PySimpleGUI
367
368## Installing PySimpleGUI
369
370### Installing Python 3
371
372 pip install --upgrade PySimpleGUI
373
374On some systems you need to run pip3.
375
376 pip3 install --upgrade PySimpleGUI
377
378On a Raspberry Pi, this is should work:
379
380 sudo pip3 install --upgrade pysimplegui
381
382Some users have found that upgrading required using an extra flag on the pip `--no-cache-dir`.
383
384 pip install --upgrade --no-cache-dir
385
386On some versions of Linux you will need to first install pip. Need the Chicken before you can get the Egg (get it... Egg?)
387
388`sudo apt install python3-pip `
389
390If for some reason you are unable to install using `pip`, don't worry, you can still import PySimpleGUI by downloading the file PySimleGUI.py and placing it in your folder along with the application that is importing it.
391
392`tkinter` is a requirement for PySimpleGUI (the only requirement). Some OS variants, such as Ubuntu, do not some with `tkinter` already installed. If you get an error similar to:
393```
394ImportError: No module named tkinter
395```
396then you need to install `tkinter`.
397For python 2.7
398
399```
400For python 3
401```
402More information about installing tkinter can be found here: https://www.techinfected.net/2015/09/how-to-install-and-use-tkinter-in-ubuntu-debian-linux-mint.html
403
404
405### Installing for Python 2.7
406
407` pip install --upgrade PySimpleGUI27`
408 or
409` pip2 install --upgrade PySimpleGUI27`
410
411You may need to also install "future" for version 2.7
412
413 pip install future
414 or
415` pip2 install future`
416
417
418Python 2.7 support is relatively new and the bugs are still being worked out. I'm unsure what may need to be done to install tkinter for Python 2.7. Will update this readme when more info is available
419
420Like above, you may have to install either pip or tkinter. To do this on Python 2.7:
421
422`sudo apt install python-pip`
423
424`sudo apt install python-tkinter`
425
426
427
428### Testing your installation
429
430Once you have installed, or copied the .py file to your app folder, you can test the installation using python. At the command prompt start up Python.
431
432#### Instructions for Python 2.7:
433```
434python
435>>> import PySimpleGUI27
436>>> PySimpleGUI27.main()
437```
438#### Instructions for Python 3:
439
440```
441python3
442>>> import PySimpleGUI
443>>> PySimpleGUI.main()
444```
445You will see a sample window in the center of your screen. If it's not installed correctly you are likely to get an error message during one of those commands
446
447Here is the window you should see:
448
449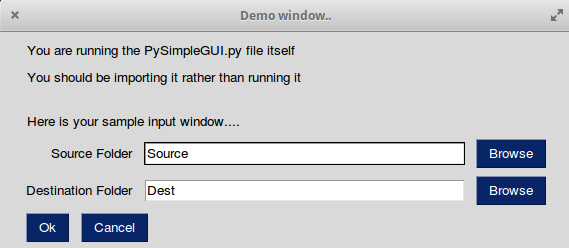
450
451
452
453### Prerequisites
454Python 2.7 or Python 3
455tkinter
456
457PySimpleGUI Runs on all Python3 platforms that have tkinter running on them. It has been tested on Windows, Mac, Linux, Raspberry Pi. Even runs on `pypy3`.
458
459### EXE file creation
460
461If you wish to create an EXE from your PySimpleGUI application, you will need to install `PyInstaller`. There are instructions on how to create an EXE at the bottom of this ReadMe
462
463
464## Using - Python 3
465
466To use in your code, simply import....
467 `import PySimpleGUI as sg`
468
469Then use either "high level" API calls or build your own windows.
470
471 sg.Popup('This is my first Popup')
472
473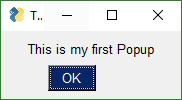
474
475
476Yes, it's just that easy to have a window appear on the screen using Python. With PySimpleGUI, making a custom window appear isn't much more difficult. The goal is to get you running on your GUI within ***minutes***, not hours nor days.
477
478## Using - Python 2.7
479
480Those using Python 2.7 will import a different module name
481 `import PySimpleGUI27 as sg`
482
483## Code Samples Assume Python 3
484
485While all of the code examples you will see in this Readme and the Cookbook assume Python 3 and thus have an `import PySimpleGUI` at the top, you can run ***all*** of this code on Python 2.7 by changing the import statement to `import PySimpleGUI27`
486
487---
488# APIs
489
490PySimpleGUI can be broken down into 2 types of API's:
491 * High Level single call functions (The `Popup` calls)
492 * Custom window functions
493
494
495### Python Language Features
496
497 There are a number of Python language features that PySimpleGUI utilizes heavily for API access that should be understood...
498 * Variable number of arguments to a function call
499 * Optional parameters to a function call
500 * Dictionaries
501
502#### Variable Number of Arguments
503
504 The "High Level" API calls that *output* values take a variable number of arguments so that they match a "print" statement as much as possible. The idea is to make it simple for the programmer to output as many items as desired and in any format. The user need not convert the variables to be output into the strings. The PySimpleGUI functions do that for the user.
505
506 sg.Popup('Variable number of parameters example', var1, var2, "etc")
507
508Each new item begins on a new line in the Popup
509
510 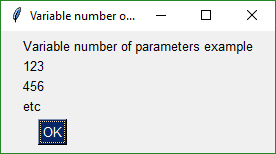
511
512
513
514#### Optional Parameters to a Function Call
515
516This feature of the Python language is utilized ***heavily*** as a method of customizing windows and window Elements. Rather than requiring the programmer to specify every possible option for a widget, instead only the options the caller wants to override are specified.
517
518Here is the function definition for the Popup function. The details aren't important. What is important is seeing that there is a long list of potential tweaks that a caller can make. However, they don't *have* to be specified on each and every call.
519
520 def Popup(*args,
521 button_color=None,
522 button_type=MSG_BOX_OK,
523 auto_close=False,
524 auto_close_duration=None,
525 icon=DEFAULT_WINDOW_ICON,
526 line_width=MESSAGE_BOX_LINE_WIDTH,
527 font=None):
528
529If the caller wanted to change the button color to be black on yellow, the call would look something like this:
530
531 sg.Popup('This box has a custom button color', button_color=('black', 'yellow'))
532
533
534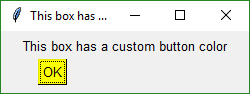
535
536
537#### Dictionaries
538
539Dictionaries are used by more advanced PySimpleGUI users. You'll know that dictionaries are being used if you see a `key` parameter on any Element. Dictionaries are used in 2 ways:
5401. To identify values when a window is read
5412. To identify Elements so that they can be "updated"
542
543---
544
545# High Level API Calls - Popup's
546
547"High level calls" are those that start with "Popup". They are the most basic form of communications with the user. They are named after the type of window they create, a pop-up window. These windows are meant to be short lived while, either delivering information or collecting it, and then quickly disappearing.
548
549## Popup Output
550
551Think of the `Popup` call as the GUI equivalent of a `print` statement. It's your way of displaying results to a user in the windowed world. Each call to Popup will create a new Popup window.
552
553`Popup` calls are normally blocking. your program will stop executing until the user has closed the Popup window. A non-blocking window of Popup discussed in the async section.
554
555Just like a print statement, you can pass any number of arguments you wish. They will all be turned into strings and displayed in the popup window.
556
557There are a number of Popup output calls, each with a slightly different look (e.g. different button labels).
558
559The list of Popup output functions are
560
561 Popup
562 PopupOk
563 PopupYesNo
564 PopupCancel
565 PopupOkCancel
566 PopupError
567 PopupTimed, PopupAutoClose
568 PopupNoWait, PopupNonBlocking
569
570The trailing portion of the function name after Popup indicates what buttons are shown. `PopupYesNo` shows a pair of button with Yes and No on them. `PopupCancel` has a Cancel button, etc.
571
572While these are "output" windows, they do collect input in the form of buttons. The Popup functions return the button that was clicked. If the Ok button was clicked, then Popup returns the string 'Ok'. If the user clicked the X button to close the window, then the button value returned is `None`.
573
574The function `PopupTimed` or `PopupAutoClose` are popup windows that will automatically close after come period of time.
575
576Here is a quick-reference showing how the Popup calls look.
577
578
579 sg.Popup('Popup') - Shows OK button
580 sg.PopupOk('PopupOk') - Shows OK button
581 sg.PopupYesNo('PopupYesNo') - Shows Yes and No buttons
582 sg.PopupCancel('PopupCancel') - Shows Cancelled button
583 sg.PopupOKCancel('PopupOKCancel') - Shows OK and Cancel buttons
584 sg.PopupError('PopupError') - Shows red error button
585 sg.PopupTimed('PopupTimed') - Automatically closes
586 sg.PopupAutoClose('PopupAutoClose') - Same as PopupTimed
587
588
589
590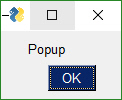
591
592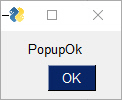
593
594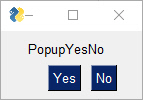
595
596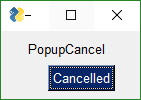
597
598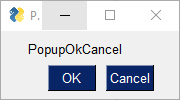
599
600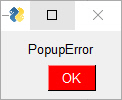
601
602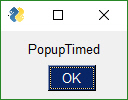
603
604
605 Popup(*args, Variable number of arguments you want to display
606 button_color=None, Color of buttons (text_color, background_color)
607 background_color=None, Color of background
608 text_color=None, Color of text
609 button_type=POPUP_BUTTONS_OK, Type of button layout
610 auto_close=False, If True window will automatically close
611 auto_close_duration=None, Number of seconds for autoclose
612 non_blocking=False, If True returns immediately
613 icon=DEFAULT_WINDOW_ICON, Icon to use on the taskbar
614 line_width=None, Width of lines in characters
615 font=None, Font to use for characters
616 no_titlebar=False, If True no titlebar will be shown
617 grab_anywhere=False, If True can move window by grabbing anywhere
618 keep_on_top=False, If True window will be on top of other windows
619 location=(None,None)): (x,y) coordinates to show the window
620
621
622The other output Popups are variations on parameters. Usually the button_type parameter is the primary one changed.
623
624The choices for button_type are:
625```POPUP_BUTTONS_YES_NO
626POPUP_BUTTONS_CANCELLED
627POPUP_BUTTONS_ERROR
628POPUP_BUTTONS_OK_CANCEL
629POPUP_BUTTONS_OK
630POPUP_BUTTONS_NO_BUTTONS
631```Note that you should not call Popup yourself with different button_types. Rely on the Popup function named that sets that value for you. For example PopupYesNo will set the button type to POPUP_BUTTONS_YES_NO for you.
632
633
634#### Scrolled Output
635There is a scrolled version of Popups should you have a lot of information to display.
636
637```python
638PopupScrolled(*args, button_color=None, yes_no=False, auto_close=False, auto_close_duration=None, size=(None, None), location=(None, None), title=None, non_blocking=False)
639```
640Typical usage:
641
642 sg.PopupScrolled(my_text)
643
644
645
646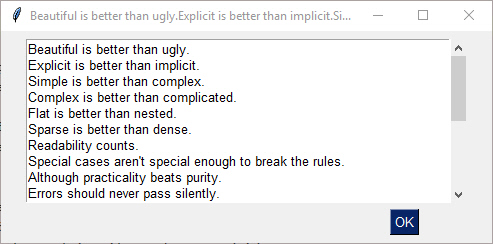
647
648
649The `PopupScrolled` will auto-fit the window size to the size of the text. Specify `None` in the height field of a `size` parameter to get auto-sized height.
650
651This call will create a scrolled box 80 characters wide and a height dependent upon the number of lines of text.
652
653sg.PopupScrolled(my_text, size=(80, None))
654
655Note that the default max number of lines before scrolling happens is set to 50. At 50 lines the scrolling will begin.
656
657If `non_blocking` parameter is set, then the call will not blocking waiting for the user to close the window. Execution will immediately return to the user. Handy when you want to dump out debug info without disrupting the program flow.
658
659### PopupNoWait
660
661The Popup call PopupNoWait or PopupNonBlocking will create a popup window and then immediately return control back to you. All other popup functions will block, waiting for the user to close the popup window.
662
663This function is very handy for when you're **debugging** and want to display something as output but don't want to change the programs's overall timing by blocking. Think of it like a `print` statement. There are no return values on one of these Popups.
664
665
666
667## Popup Input
668
669There are Popup calls for single-item inputs. These follow the pattern of `Popup` followed by `Get` and then the type of item to get. There are 3 of these input Popups to choose from, each with settings enabling customization.
670
671 - `PopupGetText` - get a single line of text
672 - `PopupGetFile` - get a filename
673 - `PopupGetFolder` - get a folder name
674
675Use these Popups instead of making a custom window to get one data value, call the Popup input function to get the item from the user. If you find the parameters are unable to create the kind of window you are looking for, then it's time for you to create your own window.
676
677### PopupGetText
678
679Use this Popup to get a line of text from the user.
680
681```PopupGetText(message,The message you wish to display with the input field
682 default_text='', Text to initially fill into the input field
683 password_char='', Passwork character if this is a password field
684 size=(None,None), Size of the window
685 button_color=None, Color to use for buttons (foreground, background)
686 background_color=None, Background color for window
687 text_color=None, Text color for window
688 icon=DEFAULT_WINDOW_ICON, Icon to display on taskbar
689 font=None, Font to use for text
690 no_titlebar=False, If True no titlebar will be shown
691 grab_anywhere=False, If True can grab anywhere to move the window
692 keep_on_top=False, If True window will stay on top of other windows
693 location=(None,None)) Location on screen to display window
694```
695 import PySimpleGUI as sg
696
697 text = sg.PopupGetText('Title', 'Please input something')
698 sg.Popup('Results', 'The value returned from PopupGetText', text)
699
700 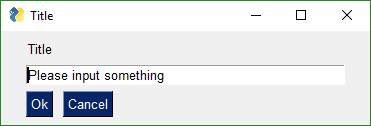
701
702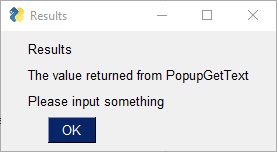
703
704### PopupGetFile
705
706Gets a filename from the user. There are options to configure the type of dialog box to show. Normally an "Open File" dialog box is shown
707```PopupGetFile(message, Message to show in the window
708 default_path='', Path browsing should start from
709 default_extension='', Which filetype is the default
710 save_as=False, Determines which dialog box stype to show
711 file_types=(("ALL Files", "*.*"),), Which filetypes are displayed
712 no_window=False, if True no window is displayed except the dialog box
713 size=(None,None), Size of window
714 button_color=None, Color of buttons
715 background_color=None, Color of window background
716 text_color=None, Color of text in window
717 icon=DEFAULT_WINDOW_ICON, Icon to show on taskbar
718 font=None, Font to use
719 no_titlebar=False, If True does not display a titlebar
720 grab_anywhere=False, if True can grab window anywhere to move it
721 keep_on_top=False, if True window will be on top of others
722 location=(None,None)) Location on screen to show window
723```
724If configured as an Open File Popup then (save_as is not True) the dialog box will look like this
725
726
727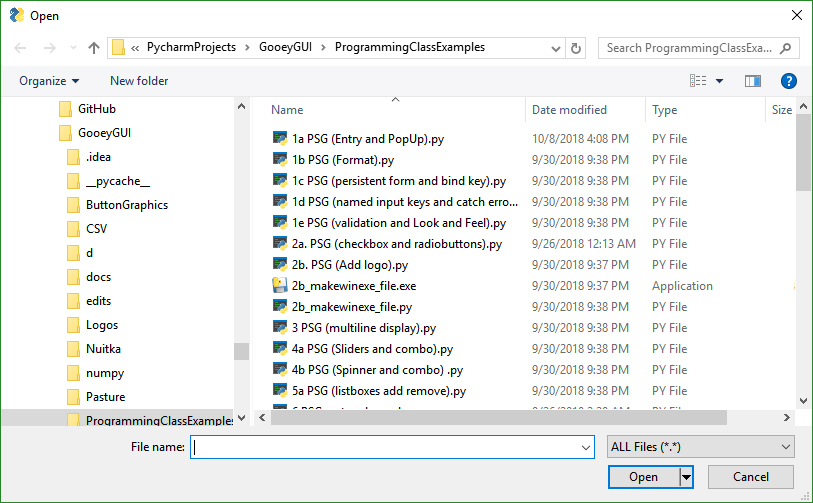
728
729
730
731If you set the parameter save_As to True, then the dialog box looks like this:
732
733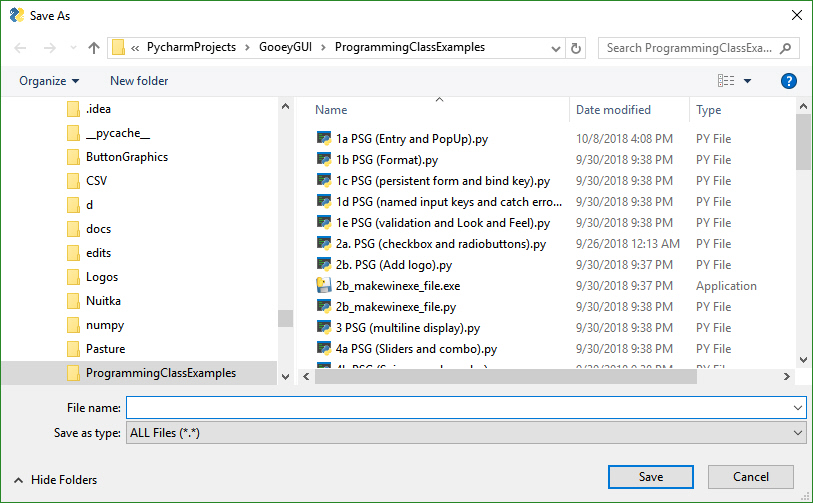
734
735If you choose a filename that already exists, you'll get a warning popup box asking if it's OK. You can also specify a file that doesn't exist. With an "Open" dialog box you cannot choose a non-existing file.
736
737A typical call produces this window.
738
739 text = sg.PopupGetFile('Please enter a file name')
740 sg.Popup('Results', 'The value returned from PopupGetFile', text)
741
742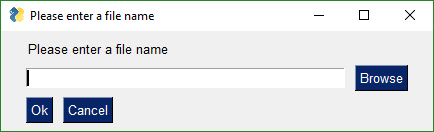
743
744
745
746### PopupGetFolder
747
748The window created to get a folder name looks the same as the get a file name. The difference is in what the browse button does. `PopupGetFile` shows an Open File dialog box while `PopupGetFolder` shows an Open Folder dialog box.
749
750```python
751PopupGetFolder(message, Message to display in window
752 default_path='', Path to start browsing
753 no_window=False, If True no window will be shown
754 size=(None,None), Size of window
755 button_color=None, Color of buttons
756 background_color=None, Background color of window
757 text_color=None, Color of window text
758 icon=DEFAULT_WINDOW_ICON, Icon to show on taskbar
759 font=None, Font to use for window
760 no_titlebar=False, If True no titlebar will be shown
761 grab_anywhere=False, If True can grab anywhere on window to move
762 keep_on_top=False, If True window will be on top
763 location=(None, None)) Location on screen to create window
764```
765This is a typpical call
766
767 text = sg.PopupGetFolder('Please enter a folder name')
768 sg.Popup('Results', 'The value returned from PopupGetFolder', text)
769
770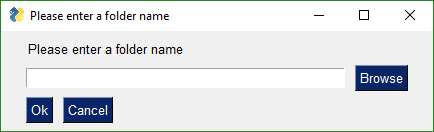
771
772
773### PopupAnimated
774
775 
776
777The animated Popup enables you to easily display a "loading" style animation specified through a GIF file that is either stored in a file or a base64 variable.
778
779```python
780def PopupAnimated(image_source,
781 message=None,
782 background_color=None,
783 text_color=None,
784 font=None,
785 no_titlebar=True,
786 grab_anywhere=True,
787 keep_on_top=True,
788 location=(None, None),
789 alpha_channel=.8,
790 time_between_frames=0)
791```
792image_source - The GIF file specified as a string filename or a base64 variable
793message - optional text message to be displayed under the animation
794background_color - the background color to use for the window and all of the other parts of the window
795text_color - color to use for optional text
796font - font to use for the optional text
797no_titlebar - no titlebar window setting
798location - location to show the window
799alpha_channel - alpha channel to use for the window
800time_between_frames - amount of time in milliseconds to use between frames
801
802***To close animated popups***, call PopupAnimated with `image_source=None`. This will close all of the currently open PopupAnimated windows.
803
804
805# Progress Meters!
806We all have loops in our code. 'Isn't it joyful waiting, watching a counter scrolling past in a text window? How about one line of code to get a progress meter, that contains statistics about your code?
807
808
809```python
810OneLineProgressMeter(title,
811 current_value,
812 max_value,
813 key,
814 *args,
815 orientation=None,
816 bar_color=DEFAULT_PROGRESS_BAR_COLOR,
817 button_color=None,
818 size=DEFAULT_PROGRESS_BAR_SIZE,
819 border_width=DEFAULT_PROGRESS_BAR_BORDER_WIDTH):
820```
821Here's the one-line Progress Meter in action!
822
823```python
824for i in range(1,10000):
825 sg.OneLineProgressMeter('My Meter', i+1, 10000, 'key','Optional message')
826```
827That line of code resulted in this window popping up and updating.
828
829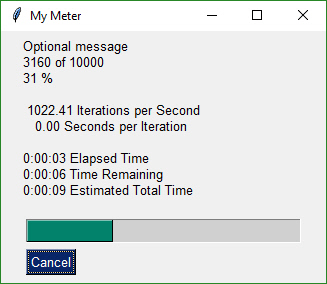
830
831A meter AND fun statistics to watch while your machine grinds away, all for the price of 1 line of code.
832With a little trickery you can provide a way to break out of your loop using the Progress Meter window. The cancel button results in a `False` return value from `OneLineProgressMeter`. It normally returns `True`.
833
834***Be sure and add one to your loop counter*** so that your counter goes from 1 to the max value. If you do not add one, your counter will never hit the max value. Instead it will go from 0 to max-1.
835
836# Debug Output
837Another call in the 'Easy' families of APIs is `EasyPrint`. It will output to a debug window. If the debug window isn't open, then the first call will open it. No need to do anything but stick a 'print' call in your code. You can even replace your 'print' calls with calls to EasyPrint by simply sticking the statement
838
839 print = sg.EasyPrint
840
841at the top of your code.
842
843There are a number of names for the same EasyPrint function. `Print` is one of the better ones to use as it's easy to remember. It is simply `print` with a capital P.
844
845```python
846 import PySimpleGUI as sg
847
848 for i in range(100):
849 sg.Print(i)
850```
851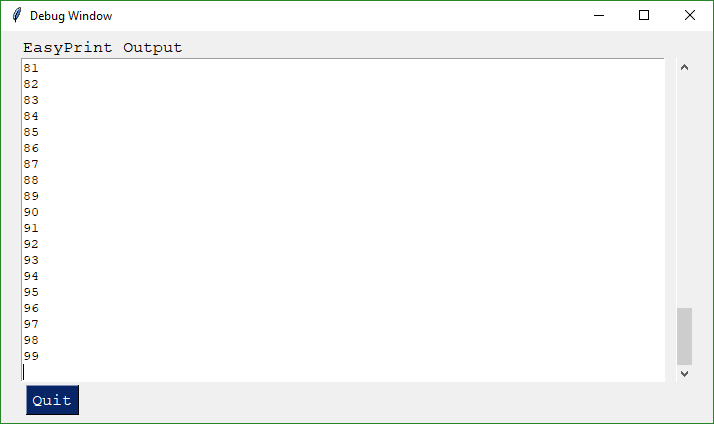
852
853Or if you didn't want to change your code:
854
855```python
856 import PySimpleGUI as sg
857
858 print=sg.Print
859 for i in range(100):
860 print(i)
861```
862Just like the standard print call, `EasyPrint` supports the `sep` and `end` keyword arguments. Other names that can be used to call `EasyPrint` include `Print`, `eprint`, If you want to close the window, call the function `EasyPrintClose`.
863
864You can change the size of the debug window using the `SetOptions` call with the `debug_win_size` parameter.
865
866There is an option to tell PySimpleGUI to reroute all of your stdout and stderr output to this window. To do so call EasyPrint with the parameter `do_not_reroute_stdout` set to True. After calling it once with this parameter set to True, all future calls to a normal`print` will go to the debug window.
867
868If you close the debug window it will re-open the next time you Print to it.
869
870---
871# Custom window API Calls (Your First window)
872
873This is the FUN part of the programming of this GUI. In order to really get the most out of the API, you should be using an IDE that supports auto complete or will show you the definition of the function. This will make customizing go smoother.
874
875This first section on custom windows is for your typical, blocking, non-persistent window. By this I mean, when you "show" the window, the function will not return until the user has clicked a button or closed the window. When this happens, the window will be automatically closed.
876
877Two other types of windows exist.
8781. Persistent window - rather than closing on button clicks, the show window function returns and the window continues to be visible. This is good for applications like a chat window.
8792. Asynchronous window - the trickiest of the lot. Great care must be exercised. Examples are an MP3 player or status dashboard. Async windows are updated (refreshed) on a periodic basis.
880
881It's both not enjoyable nor helpful to immediately jump into tweaking each and every little thing available to you.
882
883## The window Designer
884
885The good news to newcomers to GUI programming is that PySimpleGUI has a window designer. Better yet, the window designer requires no training, no downloads, and everyone knows how to use it.
886
887
888
889It's a manual process, but if you follow the instructions, it will take only a minute to do and the result will be a nice looking GUI. The steps you'll take are:
8901. Sketch your GUI on paper
8912. Divide your GUI up into rows
8923. Label each Element with the Element name
8934. Write your Python code using the labels as pseudo-code
894
895Let's take a couple of examples.
896
897**Enter a number**.... Popular beginner programs are often based on a game or logic puzzle that requires the user to enter something, like a number. The "high-low" answer game comes to mind where you try to guess the number based on high or low tips.
898
899**Step 1- Sketch the GUI**
900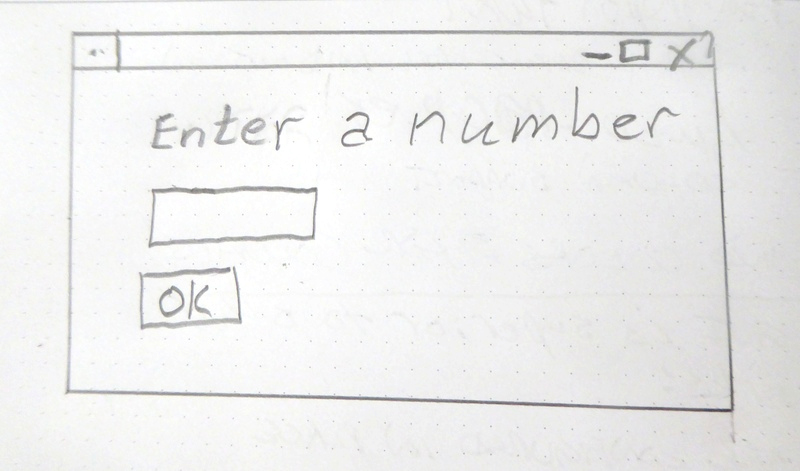
901
902**Step 2 - Divide into rows**
903
904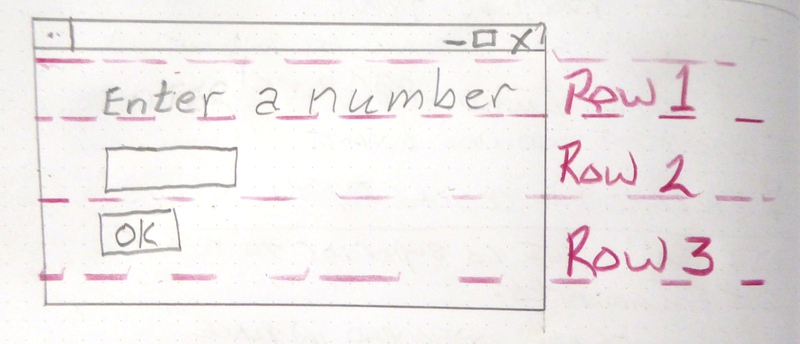
905
906Step 3 - Label elements
907
908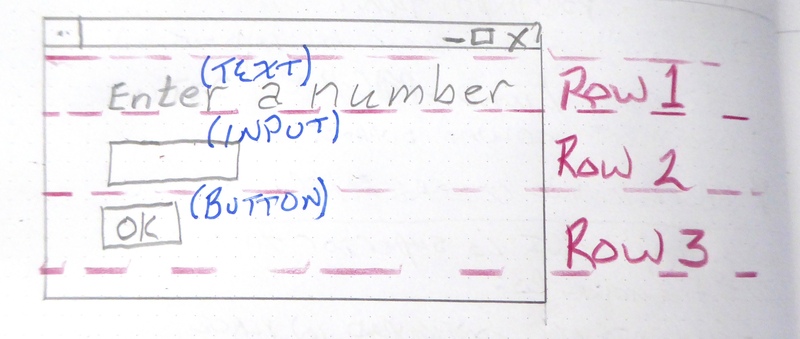
909
910Step 4 - Write the code
911The code we're writing is the layout of the GUI itself. This tutorial only focuses on getting the window code written, not the stuff to display it, get results.
912
913We have only 1 element on the first row, some text. Rows are written as a "list of elements", so we'll need [ ] to make a list. Here's the code for row 1
914
915```python
916[ sg.Text('Enter a number') ]
917```
918Row 2 has 1 elements, an input field.
919
920```python
921[ sg.Input() ]
922```
923Row 3 has an OK button
924
925```python
926[ sg.OK() ]
927```
928Now that we've got the 3 rows defined, they are put into a list that represents the entire window.
929
930```python
931layout = [ [sg.Text('Enter a Number')],
932 [sg.Input()],
933 [sg.OK()] ]
934```
935Finally we can put it all together into a program that will display our window.
936
937```python
938import PySimpleGUI as sg
939
940layout = [[sg.Text('Enter a Number')],
941 [sg.Input()],
942 [sg.OK()] ]
943
944event, (number,) = sg.Window('Enter a number example').Layout(layout).Read()
945
946sg.Popup(event, number)
947```
948### Example 2 - Get a filename
949Let's say you've got a utility you've written that operates on some input file and you're ready to use a GUI to enter than filename rather than the command line. Follow the same steps as the previous example - draw your window on paper, break it up into rows, label the elements.
950
951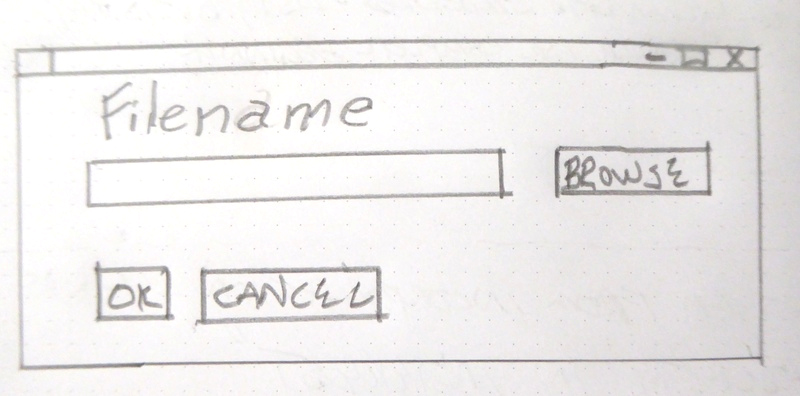
952
953
954Writing the code for this one is just as straightforward. There is one tricky thing, that browse for a file button. Thankfully PySimpleGUI takes care of associating it with the input field next to it. As a result, the code looks almost exactly like the window on the paper.
955
956```python
957import PySimpleGUI as sg
958
959layout = [[sg.Text('Filename')],
960 [sg.Input(), sg.FileBrowse()],
961 [sg.OK(), sg.Cancel()] ]
962
963event, (number,) = sg.Window('Get filename example').Layout(layout).Read()
964
965sg.Popup(event, number)
966```
967
968Read on for detailed instructions on the calls that show the window and return your results.
969
970
971
972# Copy these design patterns!
973
974All of your PySimpleGUI programs will utilize one of these 2 design patterns depending on the type of window you're implementing.
975
976
977## Pattern 1 - "One-shot Window" - Read into list or dictionary (**The Most Common** Pattern)
978
979This will be the most common pattern you'll follow if you are not using an "event loop" (not reading the window multiple times). The window is read and closes.
980
981It's unusual to assign the values returned from the read call directly into user variables. Usually the variables are grouped together into a list or dictionary of multiple return values.
982
983```python
984import PySimpleGUI as sg
985
986window_rows = [[sg.Text('SHA-1 and SHA-256 Hashes for the file')],
987 [sg.InputText(), sg.FileBrowse()],
988 [sg.Submit(), sg.Cancel()]]
989
990window = sg.Window('SHA-1 & 256 Hash').Layout(window_rows)
991
992event, values = window.Read()
993window.Close()
994
995source_filename = values[0]
996```
997
998## Pattern 2 A - Persistent window (multiple reads using an event loop)
999
1000Some of the more advanced programs operate with the window remaining visible on the screen. Input values are collected, but rather than closing the window, it is kept visible acting as a way to both output information to the user and gather input data.
1001
1002This code will present a window and will print values until the user clicks the exit button or closes window using an X.
1003
1004```python
1005import PySimpleGUI as sg
1006
1007layout = [[sg.Text('Persistent window')],
1008 [sg.Input(do_not_clear=True)],
1009 [sg.Button('Read'), sg.Exit()]]
1010
1011window = sg.Window('Window that stays open').Layout(layout)
1012
1013while True:
1014 event, values = window.Read()
1015 if event is None or event == 'Exit':
1016 break
1017 print(event, values)
1018
1019window.Close()
1020```
1021## Pattern 2 B - Persistent window (multiple reads using an event loop + updates data in window)
1022
1023This is a slightly more complex, but maybe more realistic version that reads input from the user and displays that input as text in the window. Your program is likely to be doing both of those activities so this will give you a big jump-start.
1024
1025Do not worry yet what all of these statements mean. Just copy it so you can begin to play with it, make some changes. Experiment to see how thing work.
1026
1027A final note... the parameter `do_not_clear` in the input call determines the action of the input field after a button event. If this value is True, the input value remains visible following button clicks. If False, then the input field is CLEARED of whatever was input. If you are building a "Form" type of window with data entry, you likely want False, the default setting (you can remove the parameter completely).
1028
1029```python
1030import sys
1031if sys.version_info[0] >= 3:
1032 import PySimpleGUI as sg
1033else:
1034 import PySimpleGUI27 as sg
1035
1036layout = [[sg.Text('Your typed chars appear here:'), sg.Text('', key='_OUTPUT_') ],
1037 [sg.Input(do_not_clear=True, key='_IN_')],
1038 [sg.Button('Show'), sg.Button('Exit')]]
1039
1040window = sg.Window('Window Title').Layout(layout)
1041
1042while True: # Event Loop
1043 event, values = window.Read()
1044 print(event, values)
1045 if event is None or event == 'Exit':
1046 break
1047 if event == 'Show':
1048 # change the "output" element to be the value of "input" element
1049 window.FindElement('_OUTPUT_').Update(values['_IN_'])
1050
1051window.Close()
1052```
1053
1054## How GUI Programming in Python Should Look? At least for beginners ?
1055
1056While one goal was making it simple to create a GUI another just as important goal was to do it in a Pythonic manner. Whether it achieved these goals is debatable, but it was an attempt just the same.
1057
1058The key to custom windows in PySimpleGUI is to view windows as ROWS of GUI Elements. Each row is specified as a list of these Elements. Put the rows together and you've got a window. This means the GUI is defined as a series of Lists, a Pythonic way of looking at things.
1059
1060Let's dissect this little program
1061
1062```python
1063import PySimpleGUI as sg
1064
1065layout = [[sg.Text('Rename files or folders')],
1066 [sg.Text('Source for Folders', size=(15, 1)), sg.InputText(), sg.FolderBrowse()],
1067 [sg.Text('Source for Files ', size=(15, 1)), sg.InputText(), sg.FolderBrowse()],
1068 [sg.Submit(), sg.Cancel()]]
1069
1070window = sg.Window('Rename Files or Folders')
1071
1072event, values = window.Layout(layout).Read()
1073```
1074
1075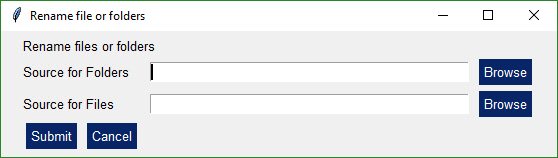
1076
1077Let's agree the window has 4 rows.
1078
1079The first row only has **text** that reads `Rename files or folders`
1080
1081The second row has 3 elements in it. First the **text** `Source for Folders`, then an **input** field, then a **browse** button.
1082
1083Now let's look at how those 2 rows and the other two row from Python code:
1084
1085```python
1086layout = [[sg.Text('Rename files or folders')],
1087 [sg.Text('Source for Folders', size=(15, 1)), sg.InputText(), sg.FolderBrowse()],
1088 [sg.Text('Source for Files ', size=(15, 1)), sg.InputText(), sg.FolderBrowse()],
1089 [sg.Submit(), sg.Cancel()]]
1090```
1091See how the source code mirrors the layout? You simply make lists for each row, then submit that table to PySimpleGUI to show and get values from.
1092
1093And what about those return values? Most people simply want to show a window, get the input values and do something with them. So why break up the code into button callbacks, etc, when I simply want my window's input values to be given to me.
1094
1095For return values the window is scanned from top to bottom, left to right. Each field that's an input field will occupy a spot in the return values.
1096
1097In our example window, there are 2 fields, so the return values from this window will be a list with 2 values in it.
1098
1099```python
1100event, values = window.Read()
1101folder_path, file_path = values
1102```
1103In one statement we both show the window and read the user's inputs. In the next the *list* of return values is split into individual variables `folder_path` and `file_path`.
1104
1105Isn't this what a Python programmer looking for a GUI wants? Something easy to work with to get the values and move on to the rest of the program, where the real action is taking place. Why write pages of GUI code when the same layout can be achieved with PySimpleGUI in 3 or 4 lines of code. 4 lines or 40? Most would choose 4.
1106
1107
1108## Return values
1109
1110 As of version 2.8 there are 2 forms of return values, list and dictionary.
1111
1112### Two Return Values
1113
1114All Window Read calls return 2 values. By convention a read statement is written:
1115```python
1116event, values = window.Read()
1117```
1118You don't HAVE to write your reads in this way. You can name your variables however you want. But if you want to code them in a way that other programmers using PySimpleGUI are used to, then use these statements.
1119
1120## Events
1121
1122The first parameter `event` describes **why** the read completed. Events are one of these:
1123
1124For all Windows:
1125
1126* Button click
1127* Window closed using X
1128
1129For Windows that have specifically enabled these. Please see the appropriate section in this document to learn about how to enable these and what the event return values are.
1130
1131* Keyboard key press
1132* Mouse wheel up/down
1133* Menu item selected
1134* An Element Changed (slider, spinner, etc)
1135* A list item was clicked
1136* Return key was pressed in input element
1137* Timeout waiting for event
1138* Text was clicked
1139* Combobox item chosen
1140* Table row selected
1141* etc
1142
1143***Most*** of the time the event will be a button click or the window was closed.
1144
1145### Window closed event
1146
1147Another convention to follow is the check for windows being closed with an X. This is an important event to catch. If you don't check for this and you attempt to use the window, your program will crash. Please check for closed window and exit your program gracefully.
1148
1149To check for a closed window use this line of code:
1150
1151```python
1152if event is None:
1153```
1154Putting it all together we end up with an "event loop" that looks something like this:
1155
1156
1157```python
1158while True:
1159 event, values = window.Read()
1160 if event is None:
1161 break
1162```
1163### Button Click Events
1164
1165By default buttons will always return a click event, or in the case of realtime buttons, a button down event. You don't have to do anything to enable button clicks. To disable the events, disable the button using its Update method.
1166
1167You can enable an additional "Button Modified" event by setting `enable_events=True` in the Button call. These events are triggered when something 'writes' to a button, ***usually*** it's because the button is listed as a "target" in another button.
1168
1169The button value from a Read call will be one of 2 values:
1170
1171 1. The Button's text - Default
1172 2. The Button's key - If a key is specified
1173
1174If a button has a key set when it was created, then that key will be returned. If no key is set, then the button text is returned. If no button was clicked, but the window returned anyway, the event value is None.
1175
1176### **None is returned when the user clicks the X to close a window.**
1177
1178If your window has an event loop where it is read over and over, remember to give your user an "out". You should ***always check for a None value*** and it's a good practice to provide an Exit button of some kind. Thus design patterns often resemble this Event Loop:
1179
1180
1181```python
1182while True:
1183 event, values = window.Read()
1184 if event is None or event == 'Quit':
1185 break
1186```
1187
1188### Element Events
1189
1190Some elements are capable of generating events when something happens to them. For example, when a slider is moved, or list item clicked on or table row clicked on. These events are not enabled by default. To enable events for an Element, set the parameter `enable_events=True`. This is the same as the older `click_submits` parameter. You will find the `click_submits` parameter still in the function definition. You can continue to use it. They are the same setting. An 'or' of the two values is used. In the future, click_submits will be removed so please migrate your code to using `enable_events`.
1191
1192|Element name| event|
1193|-|-|
1194| InputText | any change |
1195| Combo | item chosen |
1196| Option menu | item chosen |
1197| Listbox | selection changed |
1198| Radio | selection changed |
1199| Checkbox | selection changed |
1200| Spinner | new item selected |
1201| Multiline | any change |
1202| Text | clicked |
1203| Status Bar | clicked |
1204| Graph | clicked |
1205| TabGroup | tab clicked |
1206| Slider | slider moved |
1207| Table | row selected |
1208| Tree | node selected |
1209| ButtonMenu | menu item chosen |
1210| Right click menu | menu item chosen |
1211|||
1212
1213### Other Events
1214
1215#### Menubar menu item chosen for MenuBar menus and ButtonMenu menus
1216
1217You will receive the key for the MenuBar and ButtonMenu. Use that key to read the value in the return values dictionary. The value shown will be the full text plus key for the menu item chosen. Remember that you can put keys onto menu items. You will get the text and the key together as you defined it in the menu
1218 definition.
1219
1220#### Right Click menu item chosen
1221
1222Unlike menu bar and button menus, you will directly receive the menu item text and its key value. You will not do a dictionary lookup to get the value. It is the event code returned from WindowRead().
1223
1224
1225#### Windows - keyboard, mouse scroll wheel
1226
1227Windows are capable of returning keyboard events. These are returned as either a single character or a string if it's a special key. Experiment is all I can say. The mouse scroll wheel events are also strings. Put a print in your code to see what's returned.
1228
1229#### Timeouts
1230
1231If you set a timeout parameter in your read, then the system `TIMEOUT_KEY` will be returned. If you specified your own timeout key in the Read call then that value will be what's returned instead.
1232
1233### The `values` Variable - Return values as a list
1234
1235The second parameter from a Read call is either a list or a dictionary of the input fields on the Window.
1236
1237By default return values are a list of values, one entry for each input field.
1238
1239Each of the Elements that are Input Elements will have a value in the list of return values. You can unpack your GUI directly into the variables you want to use.
1240
1241```python
1242event, (filename, folder1, folder2, should_overwrite) = sg.Window('My title').Layout(window_rows).Read()
1243```
1244Or, more commonly, you can unpack the return results separately.
1245
1246```python
1247event, values = sg.Window('My title').Layout(window_rows).Read()
1248event, value_list = window.Layout(window_rows).Read()
1249value1 = value_list[0]
1250value2 = value_list[1]
1251...
1252```However, this method isn't good when you have a lot of input fields. If you insert a new element into your window then you will have to shuffle your unpacks down, modifying each of the statements to reference `value_list[x]`.
1253
1254The more common / advanced method is to request your values be returned as a dictionary.
1255
1256### `values` Variable - Return values as a dictionary
1257
1258For those of you that have not encountered a Python dictionary, don't freak out! Just copy and paste the sample code and modify it. Follow this design pattern and you'll be fine. And you might learn something along the way.
1259
1260For windows longer than 3 or 4 fields you will want to use a dictionary to help you organize your return values. In almost all (if not all) of the demo programs you'll find the return values being passed as a dictionary. It is not a difficult concept to grasp, the syntax is easy to understand, and it makes for very readable code.
1261
1262The most common window read statement you'll encounter looks something like this:
1263
1264```python
1265window = sg.Window("My title").Layout(layout).Read()
1266```
1267 To use a dictionary, you will need to:
1268 * Mark each input element you wish to be in the dictionary with the keyword `key`.
1269
1270If **any** element in the window has a `key`, then **all** of the return values are returned via a dictionary. If some elements do not have a key, then they are numbered starting at zero.
1271
1272Let's take a look at your first dictionary-based window.
1273
1274```python
1275import PySimpleGUI as sg
1276window = sg.Window('Simple data entry window')
1277layout = [
1278 [sg.Text('Please enter your Name, Address, Phone')],
1279 [sg.Text('Name', size=(15, 1)), sg.InputText('1', key='_name_')],
1280 [sg.Text('Address', size=(15, 1)), sg.InputText('2', key='_address_')],
1281 [sg.Text('Phone', size=(15, 1)), sg.InputText('3', key='_phone_')],
1282 [sg.Submit(), sg.Cancel()]
1283 ]
1284
1285event, values = window.Layout(layout).Read()
1286
1287sg.Popup(event, values, values['_name_'], values['_address_'], values['_phone_'])
1288```
1289To get the value of an input field, you use whatever value used as the `key` value as the index value. Thus to get the value of the name field, it is written as
1290
1291```python
1292values['name']
1293```
1294Think of the variable values in the same way as you would a list, however, instead of using 0,1,2, to reference each item in the list, use the values of the key. The Name field in the window above is referenced by `values['_name_']`.
1295
1296You will find the key field used quite heavily in most PySimpleGUI windows unless the window is very simple.
1297
1298Another convention you'll see in some of the demo programs is keys being named with an underscore at the beginning and the end. You don't HAVE to do this... your key value may look like this:
1299`key = 'name'`
1300
1301The reason for this naming convention is that when you are scanning the code, these key values jump out at you. You instantly know it's a key. Try scanning the code above and see if those keys pop out.
1302`key = '_name_'`
1303
1304## The Event Loop / Callback Functions
1305
1306All GUIs have one thing in common, an "event loop". Usually the GUI framework runs the event loop for you, but sometimes you want greater control and will run your own event loop. You often hear the term event loop when discussing embedded systems or on a Raspberry Pi.
1307
1308With PySimpleGUI if your window will remain open following button clicks, then your code will have an event loop. If your program shows a single "one-shot" window, collects the data and then has no other GUI interaction, then you don't need an event loop.
1309
1310There's nothing mysterious about event loops... they are loops where you take care of.... wait for it..... *events*. Events are things like button clicks, key strokes, mouse scroll-wheel up/down.
1311
1312Let's take a Pi demo program as an example. This program shows a GUI window, gets button presses, and uses them to control some LEDs. It loops, reading user input and doing something with it.
1313
1314This little program has a typical Event Loop
1315
1316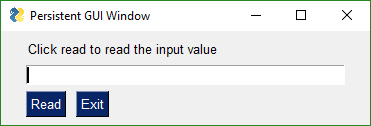
1317
1318```python
1319import PySimpleGUI as sg
1320
1321layout = [[sg.Text('Click read to read the input value')],
1322 [sg.Input()],
1323 [sg.RButton('Read'), sg.Exit()]]
1324
1325window = sg.Window('Persistent GUI Window').Layout(layout)
1326
1327while True:
1328 event, values = window.Read()
1329 if event is None or event == 'Exit':
1330 break
1331 print(event, values)
1332window.Close()
1333```
1334In the Event Loop we are reading the window and then doing a series of button compares to determine what to do based on the button that was clicks (value of `button` variable)
1335
1336The way buttons are presented to the caller in PySimpleGUI is ***not*** how *most* GUI frameworks handle button clicks. Most GUI frameworks, including tkinter, use ***callback*** functions, a function you define would be called when a button is clicked. This requires you to write asynchronous code, a concept beginners often stumble on and one that presents a barrier.
1337
1338There is a more communications that have to happen between parts of your program when using callbacks. Callbacks break apart your program's logic apart and scatter it. One of the larger hurdles for beginners to GUI programming are these callback functions.
1339
1340PySimpleGUI was specifically designed in a way so that callbacks would not be required. There is no coordination between one function and another required. You simply read your button click and take appropriate action at the same location in the code as when you read the button value.
1341
1342Whether or not this is a "proper" design for GUI programs can be debated. It's not a terrible trade-off to run your own event loop and having a functioning GUI application versus one that maybe never gets written because callback functions were too much to grasp.
1343
1344 ---
1345
1346## All Widgets / Elements
1347
1348This code utilizes many of the common Elements. It does not include Tabs/Tab Groups.
1349
1350```python
1351import PySimpleGUI as sg
1352
1353sg.ChangeLookAndFeel('GreenTan')
1354
1355# ------ Menu Definition ------ #
1356menu_def = [['File', ['Open', 'Save', 'Exit', 'Properties']],
1357 ['Edit', ['Paste', ['Special', 'Normal', ], 'Undo'], ],
1358 ['Help', 'About...'], ]
1359
1360# ------ Column Definition ------ #
1361column1 = [[sg.Text('Column 1', background_color='#F7F3EC', justification='center', size=(10, 1))],
1362 [sg.Spin(values=('Spin Box 1', '2', '3'), initial_value='Spin Box 1')],
1363 [sg.Spin(values=('Spin Box 1', '2', '3'), initial_value='Spin Box 2')],
1364 [sg.Spin(values=('Spin Box 1', '2', '3'), initial_value='Spin Box 3')]]
1365
1366layout = [
1367 [sg.Menu(menu_def, tearoff=True)],
1368 [sg.Text('All graphic widgets in one window!', size=(30, 1), justification='center', font=("Helvetica", 25), relief=sg.RELIEF_RIDGE)],
1369 [sg.Text('Here is some text.... and a place to enter text')],
1370 [sg.InputText('This is my text')],
1371 [sg.Frame(layout=[
1372 [sg.Checkbox('Checkbox', size=(10,1)), sg.Checkbox('My second checkbox!', default=True)],
1373 [sg.Radio('My first Radio! ', "RADIO1", default=True, size=(10,1)), sg.Radio('My second Radio!', "RADIO1")]], title='Options',title_color='red', relief=sg.RELIEF_SUNKEN, tooltip='Use these to set flags')],
1374 [sg.Multiline(default_text='This is the default Text should you decide not to type anything', size=(35, 3)),
1375 sg.Multiline(default_text='A second multi-line', size=(35, 3))],
1376 [sg.InputCombo(('Combobox 1', 'Combobox 2'), size=(20, 1)),
1377 sg.Slider(range=(1, 100), orientation='h', size=(34, 20), default_value=85)],
1378 [sg.InputOptionMenu(('Menu Option 1', 'Menu Option 2', 'Menu Option 3'))],
1379 [sg.Listbox(values=('Listbox 1', 'Listbox 2', 'Listbox 3'), size=(30, 3)),
1380 sg.Frame('Labelled Group',[[
1381 sg.Slider(range=(1, 100), orientation='v', size=(5, 20), default_value=25),
1382 sg.Slider(range=(1, 100), orientation='v', size=(5, 20), default_value=75),
1383 sg.Slider(range=(1, 100), orientation='v', size=(5, 20), default_value=10),
1384 sg.Column(column1, background_color='#F7F3EC')]])],
1385 [sg.Text('_' * 80)],
1386 [sg.Text('Choose A Folder', size=(35, 1))],
1387 [sg.Text('Your Folder', size=(15, 1), auto_size_text=False, justification='right'),
1388 sg.InputText('Default Folder'), sg.FolderBrowse()],
1389 [sg.Submit(tooltip='Click to submit this window'), sg.Cancel()]
1390]
1391
1392
1393window = sg.Window('Everything bagel', default_element_size=(40, 1), grab_anywhere=False).Layout(layout)
1394
1395event, values = window.Read()
1396
1397sg.Popup('Title',
1398 'The results of the window.',
1399 'The button clicked was "{}"'.format(event),
1400 'The values are', values)
1401```
1402This is a somewhat complex window with quite a bit of custom sizing to make things line up well. This is code you only have to write once. When looking at the code, remember that what you're seeing is a list of lists. Each row contains a list of Graphical Elements that are used to create the window.
1403
1404 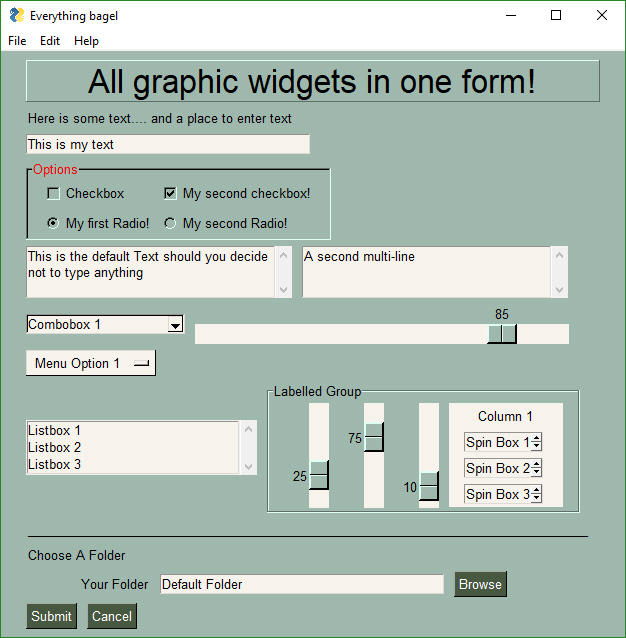
1405
1406Clicking the Submit button caused the window call to return. The call to Popup resulted in this window.
1407
1408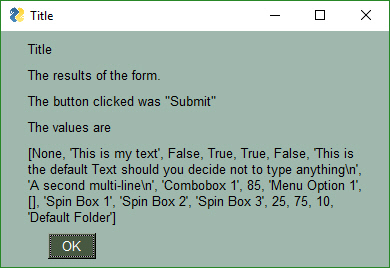
1409
1410
1411**`Note, button value can be None`**. The value for `button` will be the text that is displayed on the button element when it was created. If the user closed the window using something other than a button, then `button` will be `None`. It is ***vitally*** ***important*** that your code contain the proper checks for None. Always give your users a way out of the window. Otherwise you'll end up with windows that never properly close.
1412
1413You can see in the results Popup window that the values returned are a list. Each input field in the window generates one item in the return values list. All input fields return a `string` except for Check Boxes and Radio Buttons. These return `bool`.
1414
1415# Building Custom Windows
1416
1417You will find it ***much easier*** to write code using PySimpleGUI if you use an IDE such as PyCharm. The features that show you documentation about the API call you are making will help you determine which settings you want to change, if any. In PyCharm, two commands are particularly helpful.
1418
1419 Control-Q (when cursor is on function name) brings up a box with the function definition
1420 Control-P (when cursor inside function call "()") shows a list of parameters and their default values
1421
1422## Synchronous windows
1423The most common use of PySimpleGUI is to display and collect information from the user. The most straightforward way to do this is using a "blocking" GUI call. Execution is "blocked" while waiting for the user to close the GUI window/dialog box.
1424You've already seen a number of examples above that use blocking windows. A truly non-blocking Read call looks like this:
1425
1426```python
1427event, values = window.Read(timeout=0)
1428```
1429You can learn more about these async / non-blocking windows toward the end of this document.
1430
1431
1432# Window Object - Beginning a window
1433The first step is to create the window object using the desired window customization.
1434
1435This is the definition of the Window object:
1436
1437
1438```python
1439Window(title,
1440 default_element_size=DEFAULT_ELEMENT_SIZE,
1441 default_button_element_size=(None,None),
1442 auto_size_text=None,
1443 auto_size_buttons=None,
1444 location=(None,None),
1445 size=(None,None),
1446 element_padding=None,
1447 button_color=None,
1448 font=None,
1449 progress_bar_color=(None,None),
1450 background_color=None,
1451 border_depth=None,
1452 auto_close=False,
1453 auto_close_duration=DEFAULT_AUTOCLOSE_TIME,
1454 icon=DEFAULT_WINDOW_ICON,
1455 force_toplevel=False,
1456 alpha_channel=1,
1457 return_keyboard_events=False,
1458 use_default_focus=True,
1459 text_justification=None,
1460 no_titlebar=False,
1461 grab_anywhere=False,
1462 keep_on_top=False,
1463 resizable=False,
1464 disable_close=False,
1465 disable_minimize=False,
1466 right_click_menu=None):
1467```
1468Parameter Descriptions. You will find these same parameters specified for each `Element` and some of them in `Row` specifications. The `Element` specified value will take precedence over the `Row` and `window` values.
1469
1470```python
1471 default_element_size - Size of elements in window in characters (width, height)
1472 default_button_element_size - Size of buttons on this window
1473 auto_size_text - Bool. True if elements should size themselves according to contents. Defaults to True
1474 auto_size_buttons - Bool. True if button elements should size themselves according to their text label
1475 location - (x,y) Location to place window in pixels
1476 size - (w,h) forces a window to be a paricular size
1477 element_padding - (w,h) default padding amount for elements
1478 font - Font name and size for elements of the window
1479 button_color - Default color for buttons (foreground, background). Can be text or hex
1480 progress_bar_color - Foreground and background colors for progress bars
1481 background_color - Color of the window background
1482 border_depth - Amount of 'bezel' to put on input boxes, buttons, etc.
1483 auto_close - Bool. If True window will autoclose
1484 auto_close_duration - Duration in seconds before window closes
1485 icon - .ICO file that will appear on the Task Bar and end of Title Bar
1486 force_top_level - Bool. If set causes a tk.Tk window to be used as primary window rather than tk.TopLevel. Used to get around Matplotlib problem
1487 alpha_channel - Float 0 to 1. 0 is invisible, 1 is fully visible, Anything between will be semi-transparent
1488 return_keyboard_events - if True key presses are returned as buttons
1489 use_default_focus - if True and no focus set, then automatically set a focus
1490 text_justification - Justification to use for Text Elements in this window
1491 no_titlebar - Create window without a titlebar
1492 grab_anywhere - Grab any location on the window to move the window
1493 keep_on_top - if True then window will always stop on top of other windows on the screen. Great for floating toolbars.
1494 resizable - if True - user can manually changge the wize of the window. Defaults to False
1495 disable_close - if True user will not be able to close using the X.
1496 disable_minimize - if True user will not be able to minimize the window
1497 right_click_menu - menu definition that will be used on wall elements that support right click. If a definition is specified on an element then it will be used instead.
1498```
1499
1500### Window Location
1501PySimpleGUI computes the exact center of your window and centers the window on the screen. If you want to locate your window elsewhere, such as the system default of (0,0), if you have 2 ways of doing this. The first is when the window is created. Use the `location` parameter to set where the window. The second way of doing this is to use the `SetOptions` call which will set the default window location for all windows in the future.
1502
1503### Window Size
1504
1505You can get your window's size by access the `Size`property. The window has to be Read once or Finalized in order for the value to be correct. Note that it's a property, not a call.
1506
1507`my_windows_size = window.Size`
1508
1509To finalize your window:
1510
1511```python
1512window = Window('My Title').Layout(layout).Finalize()
1513```
1514
1515### Element Sizes
1516Note several variables that deal with "size". Element sizes are measured in characters. A Text Element with a size of 20,1 has a size of 20 characters wide by 1 character tall.
1517
1518The default Element size for PySimpleGUI is `(45,1)`.
1519
1520Sizes can be set at the element level, or in this case, the size variables apply to all elements in the window. Setting `size=(20,1)` in the window creation call will set all elements in the window to that size.
1521
1522There are a couple of widgets where one of the size values is in pixels rather than characters. This is true for Progress Meters and Sliders. The second parameter is the 'height' in pixels.
1523
1524### No Titlebar
1525
1526Should you wish to create cool looking windows that are clean with no windows titlebar, use the no_titlebar option when creating the window.
1527
1528Be sure an provide your user an "exit" button or they will not be able to close the window! When no titlebar is enabled, there will be no icon on your taskbar for the window. Without an exit button you will need to kill via taskmanager... not fun.
1529
1530Windows with no titlebar rely on the grab anywhere option to be enabled or else you will be unable to move the window.
1531
1532Windows without a titlebar can be used to easily create a floating launcher.
1533
1534Linux users! Note that this setting has side effects for some of the other Elements. Multi-line input doesn't work at all, for example So, use with caution.
1535
1536
1537
1538
1539
1540### Grab Anywhere
1541
1542This is a feature unique to PySimpleGUI.
1543
1544Note - there is a warning message printed out if the user closes a non-blocking window using a button with grab_anywhere enabled. There is no harm in these messages, but it may be distressing to the user. Should you wish to enable for a non-blocking window, simply get grab_anywhere = True when you create the window.
1545
1546### Always on top
1547
1548To keep a window on top of all other windows on the screen, set keep_on_top = True when the window is created. This feature makes for floating toolbars that are very helpful and always visible on your desktop.
1549
1550### Focus
1551
1552PySimpleGUI will set a default focus location for you. This generally means the first input field. You can set the focus to a particular element. If you are going to set the focus yourself, then you should turn off the automatic focus by setting `use_default_focus=False` in your Window call.
1553
1554
1555### Window Methods (things you can do with a Window object)
1556
1557There are a few methods (functions) that you will see in this document that act on Windows. The ones you will primarily be calling are:
1558
1559| Code | Meaning |
1560|-|-|
1561| window.Layout(layout) | Turns your definition of the Window into Window |
1562| window.Finalize() | creates the tkinter objects for the Window. Normally you do not call this |
1563| window.Read() | Read the Windows values and get the button / key that caused the Read to return. Can have an optional timeout |
1564| window.ReadNonBlocking() | NO LONGER USED! |
1565| window.Refresh() | Use if updating elements and want to show the updates prior to the nex Read |
1566| window.Fill(values_dict) | Fill each Element with entry from the dictionary passed in |
1567| window.SaveToDisk(filename) | Save the Window's values to disk |
1568| window.LoadFromDisk(filename) | Load the Window's values from disk |
1569| window.Close() | To close your window, if a button hasn't already closed it |
1570| window.Disable() | Use to disable the window inputwhen opening another window on top of the primnary Window |
1571| window.Enable() | Re-enable a Disabled window |
1572| window.FindElement(key, silent_on_error=False) | Returns the element that has a matching key value |
1573| window.Move(x,y) | Moves window to location x,y on screen' |
1574| window.SetAlpha(alpha) | Changes window transparency |
1575| window.BringToFront() | Brings the window to the top of other windows on the screen |
1576| window.Disappear(), Reappear() | Uses alpha channel to make window disappear |
1577| window.Hide(), UnHide() | Hides a window |
1578| window.CurrentLocation() | Returns current window location |
1579| window.Size = w, h | Forces a window to be a particular size. Note this is a property not a method |
1580| window.Size | Tuple (w, h) The size of the current window. Note this is a property |
1581| window.Minimize() | Minimizes window to taskbar |
1582|||
1583
1584## Window Methods
1585
1586There are a number of operations you can do on a window after you've created the window. You call these after creating your Windows object.
1587
1588#### Layout(rows)
1589
1590Call to set the window layout. Must be called prior to Read. Most likely "chained" in line with the Window creation.
1591
1592```python
1593window = sg.Window('My window title').Layout(layout)
1594```#### Finalize()
1595
1596Call to force a window to go through the final stages of initialization. This will cause the tkinter resources to be allocated so that they can then be modified. This also causes your window to appear. If you do not want your window to appear when Finalize is called, then set the Alpha to 0 in your window's creation parameters.
1597
1598If you want to call an element's Update method or call a Graph element's drawing primitives, you ***must*** either call `Read` or `Finalize` prior to making those calls.
1599
1600
1601#### Read(timeout=None, timeout_key='__TIMEOUT_ _ ')
1602
1603Read the Window's input values and button clicks in a blocking-fashion
1604
1605Returns event, values. Adding a timeout can be achieved by setting timeout=number of milliseconds before the Read times out after which a "timeout event" is returned. The value of timeout_key will be returned as the event. If you do not specify a timeout key, then the value `TIMEOUT_KEY` will be returned.
1606
1607If you set the timeout = 0, then the Read will immediately return rather than waiting for input or for a timeout. This is the same as the old ReadNonBlocking call.
1608
1609#### ReadNonBlocking() (NO LONGER USED)
1610
1611While this call will technically still work, it is being removed. If you want to get the same result, call Read with timeout = 0.
1612
1613Read the Window's input values and button clicks but without blocking. It will immediately return. **Consider using Read with non-zero timeout instead!**
1614
1615Will consume 100% of your CPU if you do not have other blocking calls in your event loop.
1616
1617#### Element(key, silent_on_error=False) (shorthand version)
1618#### FindElement(key, silent_on_error=False)
1619
1620Returns the Element that has a matching key. If the key is not found, an Error Element is returned so that the program will not crash should the user try to perform an "update". A Popup message will be shown
1621
1622|Other methods| meaning |
1623|-|-|
1624| FindElementWithFocus() | Returns the Element that currently has the focus. Returns None if no Elements were found. |
1625| Refresh() | Cause changes to the window to be displayed on the screen. Normally not needed unless the changes are immediately required or if it's going to be a while before another call to Read. |
1626| SetIcon(icon, pngbase64) | Sets the window's icon that will be shown on the titlebar. Can either be a filename or a base64 string. |
1627| Fill(values_dict) | Populates the windows fields with the values shown in the dictionary. |
1628| SaveToDisk(filename) | Saves the window's values to disk |
1629| LoadFromDisk(filename) | Fills in a window's fields based on previously saved file |
1630| GetScreenDimensions() | Returns the size (w,h) of the screen in pixels |
1631| CurrentLocation() | Returns current screen position (x,y) |
1632| Move(x, y) | Move window to (x,y) position on the screen |
1633| Minimize() | Sends the window to the taskbar |
1634| Close() | Closes a window, blocking or non-blocking |
1635| CloseNonBlocking() <br> (NO LONGER USED. <br> Use **Close()** instead) | Closes a non-blocking window |
1636| Disable() | Stops a window from responding until Enable is called |
1637| Enable() | Re-enables a previously disabled window |
1638| Hide() | Completely hides a window, including removing from the taskbar |
1639| UnHide() | Restores a window hidden using Hide |
1640| Disappear() | Makes a window disappear while leaving the icon on the taskbar |
1641| Reappear() | Makes a window reappear that was previously made to disappear using Disappear() |
1642| SetAlpha(alpha) | Sets the window's transparency. 0 is completely transparent. 1 is fully visible, normal . Can also use the property Window.AlphaChannel instead of method function call
1643|||
1644
1645
1646
1647# Elements
1648"Elements" are the building blocks used to create windows. Some GUI APIs use the term "Widget" to describe these graphic elements.
1649
1650 Text
1651 Single Line Input
1652 Buttons including these types:
1653 File Browse
1654 Folder Browse
1655 Calendar picker
1656 Date Chooser
1657 Read window
1658 Close window ("Button" & all shortcut buttons)
1659 Realtime
1660 Checkboxes
1661 Radio Buttons
1662 Listbox
1663 Slider
1664 Multi-line Text Input/Output
1665 Multi-line Text Output (Qt only)
1666 Scroll-able Output
1667 Vertical Separator
1668 Progress Bar
1669 Option Menu
1670 Menu
1671 ButtonMenu
1672 Frame
1673 Column
1674 Graph
1675 Image
1676 Table
1677 Tree
1678 Tab, TabGroup
1679 StatusBar
1680 Pane
1681 Stretch (Qt only)
1682
1683## Common Element Parameters
1684Some parameters that you will see on almost all Elements are:
1685
1686- key - Used with window.FindElement and with return values
1687- tooltip - Hover your mouse over the elemnt and you'll get a popup with this text
1688- size - (width, height) - usually measured in characters-wide, rows-high. Sometimes they mean pixels
1689- font - specifies the font family, size, etc
1690- colors - Color name or #RRGGBB string
1691- pad - Amount of padding to put around element
1692- enable_events - Turns on the element specific events
1693
1694#### Tooltip
1695Tooltips are text boxes that popup next to an element if you hold your mouse over the top of it. If you want to be extra kind to your window's user, then you can create tooltips for them by setting the parameter `tooltip` to some text string. You will need to supply your own line breaks / text wrapping. If you don't want to manually add them, then take a look at the standard library package `textwrap`.
1696
1697Tooltips are one of those "polish" items that really dress-up a GUI and show's a level of sophistication. Go ahead, impress people, throw some tooltips into your GUI.
1698
1699#### Size
1700Specifies the amount of room reserved for the Element. For elements that are character based, such a Text, it is (# characters, # rows). Sometimes it is a pixel measurement such as the Image element. And sometimes a mix like on the Slider element (characters long by pixels wide).
1701
1702#### Colors
1703A string representing color. Anytime colors are involved, you can specify the tkinter color name such as 'lightblue' or an RGB hex value '#RRGGBB'. For buttons, the color parameter is a tuple (text color, background color)
1704
1705#### Pad
1706The amount of room around the element in pixels. The default value is (5,3) which means leave 5 pixels on each side of the x-axis and 3 pixels on each side of the y-axis. You can change this on a global basis using a call to SetOptions, or on an element basis.
1707
1708If you want more pixels on one side than the other, then you can split the number into 2 number. If you want 200 pixels on the left side, and 3 pixels on the right, the pad would be ((200,3), 3). In this example, only the x-axis is split.
1709
1710#### Font
1711Specifies the font family, size, and style. Font families on Windows include:
1712* Arial
1713* Courier
1714* Comic,
1715* Fixedsys
1716* Times
1717* Verdana
1718* Helvetica (the default I think)
1719
1720The fonts will vary from system to system, however, Tk 8.0 automatically maps Courier, Helvetica and Times to their corresponding native family names on all platforms. Also, font families cannot cause a font specification to fail on Tk 8.0 and greater.
1721
1722If you wish to leave the font family set to the default, you can put anything not a font name as the family. The PySimpleGUI Demo programs and documentation use the family 'Any' to demonstrate this fact.. You could use "default" if that's more clear to you.
1723
1724There are 2 formats that can be used to specify a font... a string, and a tuple
1725Tuple - (family, size, styles)
1726String - "Family Size Styles"
1727
1728To specify an underlined, Helvetica font with a size of 15 the values:
1729
1730```python
1731('Helvetica', 15, 'underline italics')
1732'Helvetica 15 underline italics'
1733```
1734#### Key
1735
1736If you are going to do anything beyond the basic stuff with your GUI, then you need to understand keys.
1737Keys are a way for you to "tag" an Element with a value that will be used to identify that element. After you put a key in an element's definition, the values returned from Read will use that key to tell you the value. For example, if you have an input field:
1738
1739```python
1740Input(key='mykey')
1741```
1742And your read looks like this:
1743
1744```python
1745event, values = Read()
1746```
1747Then to get the input value from the read it would be:
1748
1749```python
1750values['mykey']
1751```
1752You also use the same key if you want to call Update on an element. Please see the section below on Updates to understand that usage.
1753
1754#### Visible
1755Beginning in version 3.17 you can create Elements that are initially invisible that you can later make visible.
1756
1757To create an invisible Element, place the element in the layout like you normally would and add the parameter `visible=False`.
1758
1759Later when you want to make that Element visible you simply call the Element's `Update` method and pass in the parameter `visible=True`
1760
1761This feature works best on Qt, but does work on the tkinter version as well. The visible parameter can also be used with the Column and Frame "container" Elements.
1762
1763
1764### Output Elements
1765Building a window is simply making lists of Elements. Each list is a row in the overall GUI dialog box. The definition looks something like this:
1766
1767 layout = [ [row 1 element, row 1 element],
1768 [row 2 element, row 2 element, row 2 element] ]
1769The code is a crude representation of the GUI, laid out in text.
1770## Shortcut Functions / Multiple Function Names
1771
1772Many of the main method calls and Element names have shortcuts. This enables you to code much quicker once you are used to using the SDK. The Text Element, for example, has 3 different names `Text`, `Txt` or`T`. InputText can also be written `Input` or `In` . `FindElement` was recently renamed to `Element` because it's a commonly used function.
1773
1774
1775## Text Element
1776
1777```python
1778layout = [[sg.Text('This is what a Text Element looks like')]]
1779```
1780
1781
1782
1783The most basic element is the Text element. It simply displays text. Many of the 'options' that can be set for a Text element are shared by other elements.
1784
1785```python
1786Text(text,
1787 size=(None, None),
1788 auto_size_text=None,
1789 click_submits=False,
1790 enable_events=False,
1791 relief=None,
1792 font=None,
1793 text_color=None,
1794 background_color=None,
1795 justification=None,
1796 pad=None,
1797 key=None,
1798 right_click_menu=None,
1799 tooltip=None,
1800 visible=True)
1801```<br>
1802
1803|Argument | Meaning |
1804|-|-|
1805| Text | The text that's displayed |
1806| size | Element's size |
1807| click_submits | if clicked will cause a read call to return the key value of the button |
1808| enable_events | same as click_submits |
1809| relief | relief to use around the text |
1810| auto_size_text | Bool. Change width to match size of text |
1811| font | Font name and size to use |
1812| text_color | text color |
1813| background_color | background color |
1814| justification | Justification for the text. String | 'left', 'right', 'center' |
1815| pad | (x,y) amount of padding in pixels to use around element when packing |
1816| key | used to identify element. This value will return as button if click_submits True |
1817| right_click_menu | menu definition to display if right clicked |
1818| tooltip | string representing tooltip |
1819|||
1820
1821Some commonly used elements have 'shorthand' versions of the functions to make the code more compact. The functions `T` and `Txt` are the same as calling `Text`.
1822
1823### Fonts
1824
1825 Already discussed in the common parameters section. Either string or a tuple.
1826
1827### Color in PySimpleGUI are in one of two formats - color name or RGB value.
1828
1829 Individual colors are specified using either the color names as defined in tkinter or an RGB string of this format:
1830
1831 "#RRGGBB" or "darkblue"
1832
1833### `auto_size_text`
1834A `True` value for `auto_size_text`, when placed on Text Elements, indicates that the width of the Element should be shrunk do the width of the text. The default setting is True.
1835
1836
1837### Chortcut functions
1838The shorthand functions for `Text` are `Txt` and `T`
1839
1840### Events `enable_events`
1841
1842 If you set the parameter `enable_events` or `click_submits` then you will get an event if the user clicks on the Text.
1843
1844
1845### Text Methods
1846
1847#### Update
1848
1849
1850If you want to change the text, font, or colors after the element has been created, then use the `Update` method.
1851
1852```python
1853Update(value=None, background_color=None, text_color=None, font=None, visible=None)
1854```value - new value to set text element to
1855background_color - new background color
1856text_color - text color to display
1857font - font to use to display
1858visible - visibility
1859
1860
1861## Multiline Text Element
1862
1863 layout = [[sg.Multiline('This is what a Multi-line Text Element looks like', size=(45,5))]]
1864
1865
1866
1867This Element doubles as both an input and output Element.
1868
1869```python
1870Multiline(default_text='',
1871 enter_submits=False,
1872 disabled=False,
1873 autoscroll=False,
1874 size=(None, None),
1875 auto_size_text=None,
1876 background_color=None,
1877 text_color=None,
1878 change_submits=False,
1879 enable_events=False,
1880 do_not_clear=False,
1881 key=None,
1882 focus=False,
1883 font=None,
1884 pad=None,
1885 tooltip=None
1886 right_click_menu=None,
1887 visible=True)
1888```<br>
1889
1890| Argument | Meaning |
1891|-|-|
1892| default_text | Text to display in the text box |
1893| change_submits | Bool. If True, pressing Enter key submits window |
1894| anable_events | Bool. same as change_submits|
1895| autoscroll | Bool. Causes "cursor" to always be at the end of the text |
1896| size | Element's size |
1897| right_click_menu | menu definition to displat if right clicked |
1898| auto_size_text | Bool. Change width to match size of text |
1899|||
1900
1901### Multiline Methods
1902```python
1903Update( value=None,
1904 disabled=None,
1905 append=False,
1906 font=None,
1907 text_color=None,
1908 background_color=None)
1909
1910Update(self, value=None, disabled=None, append=False, font=None, text_color=None, background_color=None)value=None, disabled=None, append=False):
1911```| Argument | Meaning |
1912|-|-|
1913| value | string to set the text field to |
1914| disabled | set to True to disable the element |
1915| append | rather than replacing the current text with new text, add the new text onto the end |
1916|||
1917
1918## Output Element
1919Output re-routes `Stdout` to a scrolled text box.
1920
1921Whatever you print will show up in this window.
1922
1923Note that you will NOT see what you print until you call either window.Read or window.Refresh. If you want to immediately see what was printed, call window.Refresh() immediately after your print statement.
1924
1925```python
1926layout = [[sg.Output(size=(80,10)]]
1927```
1928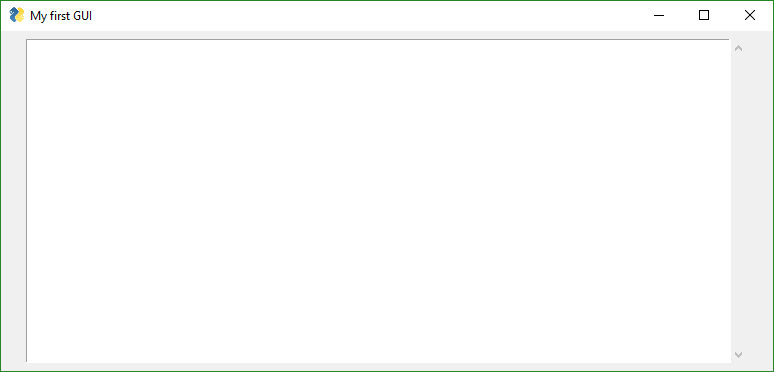
1929
1930```python
1931Output( size=(None, None),
1932 background_color=None,
1933 text_color=None,
1934 pad=None,
1935 font=None,
1936 tooltip=None,
1937 right_click_menu=None,
1938 key=None,
1939 visible=True)
1940```
1941size - Size of Output Element (width, height) in characters
1942You should be quite familiar with these parameters by now. If not, read able another element or read about common parameters.
1943
1944
1945
1946## Input Elements
1947 These make up the majority of the window definition. Optional variables at the Element level override the window level values (e.g. `size` is specified in the Element). All input Elements create an entry in the list of return values. A Text Input Element creates a string in the list of items returned.
1948
1949## Text Input Element Shortcuts (Input, In)
1950
1951```python
1952layout = [[sg.InputText('Default text')]]
1953```
1954
1955
1956```python
1957def InputText(default_text ='',
1958 size=(None, None),
1959 disabled=False,
1960 auto_size_text=None,
1961 password_char='',
1962 justification=None,
1963 background_color=None,
1964 text_color=None,
1965 font=None,
1966 tooltip=None,
1967 change_submits=False
1968 do_not_clear=False,
1969 key=None,
1970 focus=False,
1971 right_click_menu=None,
1972 pad=None,
1973 vitible=True):
1974```
1975<br>
1976
1977| Argument | Meaning |
1978|-|-|
1979|default_text | Text initially shown in the input box |
1980|size | (width, height) of element in characters |
1981|auto_size_text | Bool. True is element should be sized to fit text|
1982|disabled | Bool If True the input is disabled |
1983|password_char | Character that will be used to replace each entered character. Setting to a value indicates this field is a password entry field |
1984|background_color | color to use for the input field background |
1985|text_color | color to use for the typed text |
1986|font | font used for the element|
1987|tooltip | what is shown when hovered over element (doesn't appear to work)|
1988|change_submits | if True, will cause a Window.Read to return if a button fills in the value|
1989|do_not_clear | Bool. Normally windows clear when read, turn off clearing with this flag. |
1990| key | Dictionary key to use for return values|
1991| focus | Bool. True if this field should capture the focus (moves cursor to this field)|
1992|pad | amount of room in pixels to leave around the element|
1993|||
1994
1995 There are two methods that can be called:
1996
1997```python
1998Input.Update(new_Value) - sets the input to new_value
1999Input.Get() - returns the current value of the field.
2000```
2001
2002Shorthand functions that are equivalent to `InputText` are `Input` and `In`
2003
2004#### `do_not_clear` Parameter
2005
2006**Important** - This trips a lot of people up. If you do not set the `do_not_clear` parameter then the input field will clear when an event takes place. The behavior is a "forms" style window development. The assumption is that you want the field to clear. If you are writing a chat program then you're thankful. The rest of you, I'm sorry.
2007
2008### TextInput Methods
2009
2010```python
2011Update(value=None, disabled=None):
2012Get()
2013```Update - Change the Element
2014value - new value to display in field
2015disabled - if True will disable the element
2016
2017Get - Returns the current value for the element (you can get also from a call to Read)
2018
2019
2020## Combo Element
2021Also known as a drop-down list. Only required parameter is the list of choices. The return value is a string matching what's visible on the GUI.
2022
2023 layout = [[sg.InputCombo(['choice 1', 'choice 2'])]]
2024
2025
2026
2027```python
2028 InputCombo(values,
2029 default_value=None
2030 size=(None, None)
2031 auto_size_text=None
2032 background_color=None
2033 text_color=None
2034 change_submits=False
2035 enable_events=False
2036 readonly=True
2037 disabled=False
2038 key=None
2039 pad=None
2040 tooltip=None
2041 visible=True):
2042```
2043<br>
2044
2045|Arguments|Meaning|
2046|-|-|
2047|values | Choices to be displayed. List of strings |
2048|values | Choices to be displayed. List of strings |
2049|default_value | which value should be initially chosen |
2050|size | (width, height) of element in characters |
2051|auto_size_text | Bool. True if size should fit the text length |
2052|background_color | color to use for the input field background |
2053|text_color | color to use for the typed text |
2054|change_submits | Bool. If set causes Read to immediately return if the selected value changes |
2055|disabled | Bool. If set will disable changes |
2056|readonly | Bool. If set user cannot change the values to choose from |
2057|key | Dictionary key to use for return values |
2058|pad | (x,y) Amount of padding to put around element in pixels |
2059|tooltip | Text string. If set, hovering over field will popup the text |
2060|||
2061
2062Shortcut functions - Combo, DropDown, Drop
2063
2064### Combo Methods
2065```python
2066Update(value=None, values=None, set_to_index=None, disabled=None, readonly=None)
2067```value - change which value is current selected
2068values - change list of choices
2069set_to_index - change selection to a particular choice
2070disable - if True will disable element
2071readonly - if True will make element readonly
2072
2073## Listbox Element
2074The standard listbox like you'll find in most GUIs. Note that the return values from this element will be a ***list of results, not a single result***. This is because the user can select more than 1 item from the list (if you set the right mode).
2075
2076 layout = [[sg.Listbox(values=['Listbox 1', 'Listbox 2', 'Listbox 3'], size=(30, 6))]]
2077
2078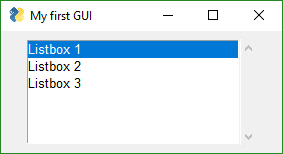
2079
2080
2081```python
2082Listbox(values
2083 default_values=None,
2084 select_mode=None,
2085 change_submits=False
2086 bind_return_key=False
2087 size=(None, None)
2088 disabled=False,
2089 auto_size_text=None,
2090 font=None,
2091 background_color=None,
2092 text_color=None,
2093 key=None,
2094 pad=None,
2095 right_click_menu=None,
2096 tooltip=None,
2097 visible=True):
2098```
2099<br>
2100
2101 values - Choices to be displayed. List of strings
2102 select_mode - Defines how to list is to operate.
2103 Choices include constants or strings:
2104 Constants version:
2105 LISTBOX_SELECT_MODE_BROWSE
2106 LISTBOX_SELECT_MODE_EXTENDED
2107 LISTBOX_SELECT_MODE_MULTIPLE
2108 LISTBOX_SELECT_MODE_SINGLE - the default
2109 Strings version:
2110 'browse'
2111 'extended'
2112 'multiple'
2113 'single'
2114 change_submits - if True, the window read will return with a button value of ''
2115 bind_return_key - if the focus is on the listbox and the user presses return key, or if the user double clicks an item, then the read will return
2116 size - (width, height) of element in characters
2117 disapled - Bool. If True element is disabled
2118 auto_size_text - Bool. True if size should fit the text length
2119 background_color - color to use for the input field background
2120 font - font to use for items in list
2121 text_color - color to use for the typed text
2122 key - Dictionary key to use for return values and to find element
2123 pad - amount of padding to use when packing
2124 tooltip - tooltip text
2125
2126The `select_mode` option can be a string or a constant value defined as a variable. Generally speaking strings are used for these kinds of options.
2127
2128ListBoxes can cause a window to return from a Read call. If the flag change_submits is set, then when a user makes a selection, the Read immediately returns.
2129Another way ListBoxes can cause Reads to return is if the flag bind_return_key is set. If True, then if the user presses the return key while an entry is selected, then the Read returns. Also, if this flag is set, if the user double-clicks an entry it will return from the Read.
2130
2131### Listbox Methods
2132```python
2133Update(values=None, disabled=None)
2134SetValue(values)
2135GetListValues()
2136
2137```Update - Change element
2138values - new list of choices
2139disabled - if True disables the element
2140
2141SetValue - Sets selection to one or more values
2142
2143GetListValues - Return the list of values to choose from
2144
2145
2146## Slider Element
2147
2148Sliders have a couple of slider-specific settings as well as appearance settings. Examples include the `orientation` and `range` settings.
2149
2150```python
2151layout = [[sg.Slider(range=(1,500), default_value=222, size=(20,15), orientation='horizontal', font=('Helvetica', 12))]]
2152```
2153
2154
2155```python
2156Slider(range=(None,None),
2157 default_value=None,
2158 resolution=None,
2159 orientation=None,
2160 border_width=None,
2161 relief=None,
2162 change_submits=False,
2163 disabled=False,
2164 size=(None, None),
2165 font=None,
2166 background_color=None,
2167 text_color=None,
2168 key=None,
2169 pad=None,
2170 tooltip=None,
2171 visible=True)
2172```
2173<br>
2174
2175 range - (min, max) slider's range
2176 default_value - default setting (within range)
2177 resolution - how much each 'tick' should represent. Default = 1
2178 orientation - 'horizontal' or 'vertical' ('h' or 'v' work)
2179 border_width - how deep the widget looks
2180 relief - relief style. Values are same as progress meter relief values. Can be a constant or a string:
2181 RELIEF_RAISED='raised'
2182 RELIEF_SUNKEN='sunken'
2183 RELIEF_FLAT='flat'
2184 RELIEF_RIDGE='ridge'
2185 RELIEF_GROOVE='groove'
2186 RELIEF_SOLID='solid'
2187 size - (width, height) of element in characters
2188 disabled - Bool If True slider is disabled
2189 auto_size_text - Bool. True if size should fit the text
2190 background_color - color to use for the input field background
2191 text_color - color to use for the typed text
2192 change_submits - causes window read to immediately return if the checkbox value changes
2193 key- Dictionary key to use for return values
2194 tooltip - Tooltip to display when hovered over wlement
2195
2196### Qt Sliders
2197
2198There is an important difference between Qt and tkinter sliders. On Qt, the slider values must be integer, not float. If you want your slider to go from 0.1 to 1.0, then make your slider go from 1 to 10 and divide by 10. It's an easy math thing to do and not a big deal. Just deal with it.... you're writing software after all. Presumably you know how to do these things. ;-)
2199
2200
2201### Slider Methods
2202```python
2203Update(self, value=None, range=(None, None), disabled=None, visible=None):
2204```value - set current selection to value
2205range - change range of valid values
2206disabled - if True disables element
2207
2208
2209## Radio Button Element
2210
2211Creates one radio button that is assigned to a group of radio buttons. Only 1 of the buttons in the group can be selected at any one time.
2212
2213 layout = [[sg.Radio('My first Radio!', "RADIO1", default=True), sg.Radio('My second radio!', "RADIO1")]]
2214
2215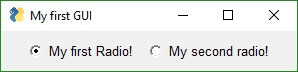
2216
2217```python
2218Radio(text,
2219 group_id,
2220 default=False,
2221 size=(None, None),
2222 disabled=False,
2223 auto_size_text=None,
2224 font=None,
2225 background_color=None,
2226 text_color=None,
2227 key=None,
2228 pad=None,
2229 tooltip=None,
2230 visible=True)
2231```
2232<br>
2233
2234 text - Text to display next to button
2235 group_id - Groups together multiple Radio Buttons. Can be any value
2236 default - Bool. Initial state
2237 size - (width, height) size of element in characters
2238 auto_size_text - Bool. True if should size width to fit text
2239 font - Font type and size for text display
2240 background_color - color to use for the background
2241 text_color - color to use for the text
2242 key - Dictionary key to use for return values
2243 pad - padding around element
2244 tooltip - tooltip to show when mouse hovered over element
2245
2246
2247### Radio Button Methods
2248```python
2249Update(value=None, disabled=None, visible=None)
2250```value - bool - if True change to selected
2251disabled - if True disables the element
2252
2253
2254## Checkbox Element
2255Checkbox elements are like Radio Button elements. They return a bool indicating whether or not they are checked.
2256
2257 layout = [[sg.Checkbox('My first Checkbox!', default=True), sg.Checkbox('My second Checkbox!')]]
2258
2259
2260
2261
2262```python
2263Checkbox(text,
2264 default=False,
2265 size=(None, None),
2266 auto_size_text=None,
2267 font=None,
2268 background_color=None,
2269 text_color=None,
2270 change_submits=False
2271 disabled=False,
2272 key=None,
2273 pad=None,
2274 tooltip=None,
2275 visible=True):
2276```
2277 text - Text to display next to checkbox
2278 default- Bool + None. Initial state. True = Checked, False = unchecked, None = Not available (grayed out)
2279 size - (width, height) size of element in characters
2280 auto_size_text- Bool. True if should size width to fit text
2281 disabled - Bool. If True element is disabled
2282 font- Font type and size for text display
2283 background_color - color to use for the background
2284 text_color - color to use for the typed text
2285 change_submits - causes window read to immediately return if the checkbox value changes
2286 key = Dictionary key to use for return values
2287 pad - Padding around element in window
2288 tooltip - text to show when mouse is hovered over element
2289
2290Shortcut functions - CBox, CB, Check
2291
2292### Checkbox Methods
2293```python
2294Update(value=None, disabled=None, visible=None)
2295Get()
2296```Update - changes the element
2297value - Bool if True checks the checkbox
2298disabled - if True disables the element
2299
2300Get - returns current state
2301
2302
2303## Spin Element
2304
2305An up/down spinner control. The valid values are passed in as a list.
2306
2307 layout = [[sg.Spin([i for i in range(1,11)], initial_value=1), sg.Text('Volume level')]]
2308
2309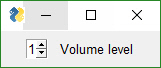
2310
2311```python
2312Spin(values,
2313 intiial_value=None,
2314 disabled=False,
2315 size=(None, None),
2316 change_submits=False,
2317 auto_size_text=None,
2318 font=None,
2319 background_color=None,
2320 text_color=None,
2321 key=None.
2322 pad=None,
2323 tooltip=None,
2324 visible=True):
2325```
2326
2327Parameter definitions
2328
2329 values - List of valid values
2330 initial_value - String with initial value
2331 size - (width, height) size of element in characters
2332 auto_size_text - Bool. True if should size width to fit text
2333 font - Font type and size for text display
2334 disabled - Bool. If True element is disabled
2335 background_color - color to use for the background
2336 text_color - color to use for the typed text
2337 change_submits - causes window read to immediately return if the spinner value changes
2338 key = Dictionary key to use for return values
2339 pad - padding around element in the window
2340 tooltip - text to show when mouse hovered over element
2341
2342
2343### Qt Differences - `values` is a range!
2344
2345Note that Qt does not allow arbitrary spinner values. With PySimpleGUI-tkinter you can have any values in your list. In Qt they must be integers. Yea, it kinda sucks. I'm working on it.
2346
2347On Qt values is a tuple representing a range. On plain PySimpleGUI this value is a list of items. Make sure on the plain version you specify items as a list using [] and not a generator using ().
2348
2349
2350### Spin Methods
2351```python
2352Update(value=None, values=None, disabled=None, visible=None)
2353```value - set the current value
2354values - set available choices
2355disabled - if True disables the element
2356
2357## Image Element
2358
2359Images can be placed in your window provide they are in PNG, GIF, PPM/PGM format. JPGs cannot be shown because tkinter does not naively support JPGs. You can use the Python Imaging Library (PIL) package to convert your image to PNG prior to calling PySimpleGUI if your images are in JPG format.
2360
2361```python
2362Image(filename=None,
2363 data=None,
2364 data_base64=None,
2365 background_color=None,
2366 size=(None,None),
2367 pad=None,
2368 key=None,
2369 tooltip=None,
2370 click_submits=False,
2371 enable_events=False,
2372 visible=True,
2373 right_click_menu=None,
2374 size_px=(None,None)
2375 visible=True)
2376```
2377Parameter definitions
2378
2379 filename - file name if the image is in a file
2380 data - if image is in RAM (PIL format?)
2381 data_base64 - image in base64 format
2382 background_color - Color of background
2383 size - Size (Width, Height) of image in pixels
2384 pad - Padding around Element in the window
2385 key - Key used to find the element
2386 tooltip - text to show when mouse if hovered over image
2387 click_submits, enable_events - if True returns event when image is clicked
2388 visible - if False will create image as hidden
2389 size_px - size of image in pixels
2390
2391### `Update` Method
2392
2393Like other Elements, the Image Element has an `Update` method. Call Update if you want to change the image.
2394
2395 def Update(self, filename=None, data=None, visible=None):
2396
2397
2398Choose **either** a filename or in-ram data image to use to replace current image
2399
2400### `UpdateAnimation` Method for Animated GIFs
2401
2402
2403
2404
2405Starting in version 3.23 you can specify an animated GIF as an image and can animate the GIF by calling `UpdateAnimation`. Exciting stuff!
2406
2407```python
2408UpdateAnimation(source,
2409 time_between_frames=0)
2410```
2411`source` can be a filename ***or*** a base64 bytes variable (unlike other calls that split out the filename parameter and base64 parameter into 2 parameters.
2412
2413`time_between_frames` is an optional parameter. It will keep track of the amount of time between frame changes for you to give you a smooth animation. With this parameter you can call the function as often as you want and it will advance to the next frame only after the correct amount of time has lapsed.
2414
2415You can call the method without setting the `time_between_frames` value and it will show a frame and immediately move on to the next frame. This enables you to do the inter-frame timing.
2416
2417
2418
2419
2420## Button Element
2421
2422**MAC USERS** - Macs suck when it comes to tkinter and button colors. It sucks so badly with colors that the `LookAndFeel` call is disabled. You cannot change button colors for Macs. You're stuck with the system default color if you are using the tkinter version of PySimpleGUI. The Qt version does not have this issue.
2423
2424Buttons are the most important element of all! They cause the majority of the action to happen. After all, it's a button press that will get you out of a window, whether it be Submit or Cancel, one way or another a button is involved in all windows. The only exception is to this is when the user closes the window using the "X" in the upper corner which means no button was involved.
2425
2426The Types of buttons include:
2427* Folder Browse
2428* File Browse
2429* Files Browse
2430* File SaveAs
2431* File Save
2432* Close window (normal button)
2433* Read window
2434* Realtime
2435* Calendar Chooser
2436* Color Chooser
2437
2438
2439Close window - Normal buttons like Submit, Cancel, Yes, No, do NOT close the window... they used to. Now to close a window you need to use a CloseButton / CButton.
2440
2441Folder Browse - When clicked a folder browse dialog box is opened. The results of the Folder Browse dialog box are written into one of the input fields of the window.
2442
2443File Browse - Same as the Folder Browse except rather than choosing a folder, a single file is chosen.
2444
2445Calendar Chooser - Opens a graphical calendar to select a date.
2446
2447Color Chooser - Opens a color chooser dialog
2448
2449Read window - This is a window button that will read a snapshot of all of the input fields, but does not close the window after it's clicked.
2450
2451Realtime - This is another async window button. Normal button clicks occur after a button's click is released. Realtime buttons report a click the entire time the button is held down.
2452
2453Most programs will use a combination of shortcut button calls (Submit, Cancel, etc), normal Buttons which leave the windows open and CloseButtons that close the window when clicked.
2454
2455Sometimes there are multiple names for the same function. This is simply to make the job of the programmer quicker and easier. Or they are old names that are no longer used but kept around so that existing programs don't break.
2456
2457The 4 primary windows of PySimpleGUI buttons and their names are:
2458
2459 1. `Button`= `ReadButton` = `RButton` = `ReadFormButton` (old style... use Button instead)
2460 2. `CloseButton` = `CButton`
2461 3. `RealtimeButton`
2462 4. `DummyButton`
2463
2464You will find the long-form names in the older programs. ReadButton for example.
2465
2466In Oct 2018, the definition of Button changed. Previously Button would CLOSE the window when clicked. It has been changed so the Button calls will leave the window open in exactly the same way as a ReadButton. They are the same calls now. To enables windows to be closed using buttons, a new button was added... `CloseButton` or `CButton`.
2467
2468The most basic Button element call to use is `Button`
2469
2470 Button(button_text=''
2471 button_type=BUTTON_TYPE_CLOSES_WIN
2472 target=(None, None)
2473 tooltip=None
2474 file_types=(("ALL Files", "*.*"),)
2475 initial_folder=None
2476 disabled=False
2477 image_filename=None
2478 image_data=None
2479 image_size=(None, None)
2480 image_subsample=None
2481 border_width=None
2482 size=(None, None)
2483 auto_size_button=None
2484 button_color=None
2485 default_value=None
2486 font=None
2487 bind_return_key=False
2488 focus=False
2489 pad=None
2490 key=None,
2491 visible=True):
2492
2493Parameters
2494
2495 button_text - Text to be displayed on the button
2496 button_type - You should NOT be setting this directly
2497 target - key or (row,col) target for the button
2498 tooltip - tooltip text for the button
2499 file_types - the filetypes that will be used to match files
2500 initial_folder - starting path for folders and files
2501 disabled = Bool If True button is disabled
2502 image_filename - image filename if there is a button image
2503 image_data - in-RAM image to be displayed on button
2504 image_size - size of button image in pixels
2505 image_subsample - amount to reduce the size of the image
2506 border_width - width of border around button in pixels
2507 size - size in characters
2508 auto_size_button - True if button size is determined by button text
2509 button_color - (text color, backound color)
2510 default_value - initial value for buttons that hold information
2511 font - font to use for button text
2512 bind_return_key - If True the return key will cause this button to fire
2513 focus - if focus should be set to this button
2514 pad - (x,y) padding in pixels for packing the button
2515 key - key used for finding the element
2516
2517### Shortcut, Pre-defined Buttons
2518These Pre-made buttons are some of the most important elements of all because they are used so much. They all basically do the same thing, set the button text to match the function name and set the parameters to commonly used values. If you find yourself needing to create a custom button often because it's not on this list, please post a request on GitHub. . They include:
2519
2520 OK
2521 Ok
2522 Submit
2523 Cancel
2524 Yes
2525 No
2526 Exit
2527 Quit
2528 Help
2529 Save
2530 SaveAs
2531 FileBrowse
2532 FilesBrowse
2533 FileSaveAs
2534 FolderBrowse
2535
2536**IMPORT NOTE ABOUT SHORTCUT BUTTONS**
2537Prior to release 3.11.0, these buttons closed the window. Starting with 3.11 they will not close the window. They act like RButtons (return the button text and do not close the window)
2538
2539If you are having trouble with these buttons closing your window, please check your installed version of PySimpleGUI by typing `pip list` at a command prompt. Prior to 3.11 these buttons close your window.
2540
2541Using older versions, if you want a Submit() button that does not close the window, then you would instead use RButton('Submit'). Using the new version, if you want a Submit button that closes the window like the sold Submit() call did, you would write that as `CloseButton('Submit')` or `CButton('Submit')`
2542
2543
2544 layout = [[sg.OK(), sg.Cancel()]]
2545
2546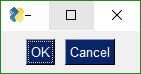
2547
2548
2549
2550### Button targets
2551
2552The `FileBrowse`, `FolderBrowse`, `FileSaveAs` , `FilesSaveAs`, `CalendarButton`, `ColorChooserButton` buttons all fill-in values into another element located on the window. The target can be a Text Element or an InputText Element. The location of the element is specified by the `target` variable in the function call.
2553
2554The Target comes in two forms.
25551. Key
25562. (row, column)
2557
2558Targets that are specified using a key will find its target element by using the target's key value. This is the "preferred" method.
2559
2560If the Target is specified using (row, column) then it utilizes a grid system. The rows in your GUI are numbered starting with 0. The target can be specified as a hard coded grid item or it can be relative to the button.
2561
2562The (row, col) targeting can only target elements that are in the same "container". Containers are the Window, Column and Frame Elements. A File Browse button located inside of a Column is unable to target elements outside of that Column.
2563
2564The default value for `target` is `(ThisRow, -1)`. `ThisRow` is a special value that tells the GUI to use the same row as the button. The Y-value of -1 means the field one value to the left of the button. For a File or Folder Browse button, the field that it fills are generally to the left of the button is most cases. (ThisRow, -1) means the Element to the left of the button, on the same row.
2565
2566If a value of `(None, None)` is chosen for the target, then the button itself will hold the information. Later the button can be queried for the value by using the button's key.
2567
2568Let's examine this window as an example:
2569
2570
2571
2572
2573
2574The `InputText` element is located at (1,0)... row 1, column 0. The `Browse` button is located at position (2,0). The Target for the button could be any of these values:
2575
2576 Target = (1,0)
2577 Target = (-1,0)
2578
2579The code for the entire window could be:
2580
2581 layout = [[sg.T('Source Folder')],
2582 [sg.In()],
2583 [sg.FolderBrowse(target=(-1, 0)), sg.OK()]]
2584
2585or if using keys, then the code would be:
2586
2587 layout = [[sg.T('Source Folder')],
2588 [sg.In(key='input')],
2589 [sg.FolderBrowse(target='input'), sg.OK()]]
2590
2591See how much easier the key method is?
2592
2593**Save & Open Buttons**
2594
2595There are 4 different types of File/Folder open dialog box available. If you are looking for a file to open, the `FileBrowse` is what you want. If you want to save a file, `SaveAs` is the button. If you want to get a folder name, then `FolderBrowse` is the button to use. To open several files at once, use the `FilesBrowse` button. It will create a list of files that are separated by ';'
2596
2597
2598
2599
2600
2601
2602
2603
2604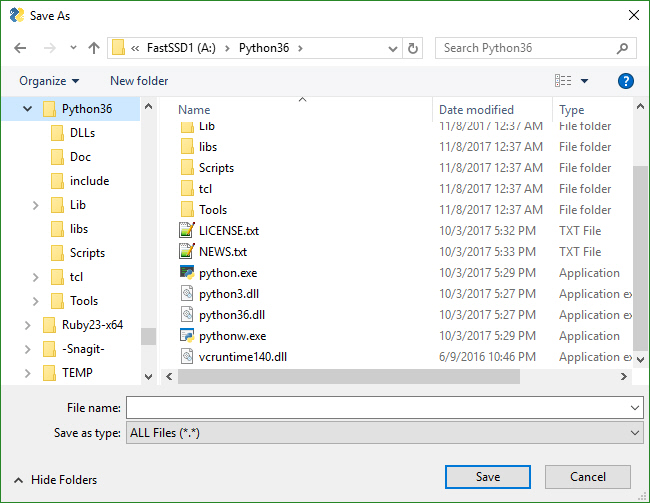
2605
2606
2607
2608**Calendar Buttons**
2609
2610These buttons pop up a calendar chooser window. The chosen date is returned as a string.
2611
2612
2613
2614**Color Chooser Buttons**
2615
2616These buttons pop up a standard color chooser window. The result is returned as a tuple. One of the returned values is an RGB hex representation.
2617
2618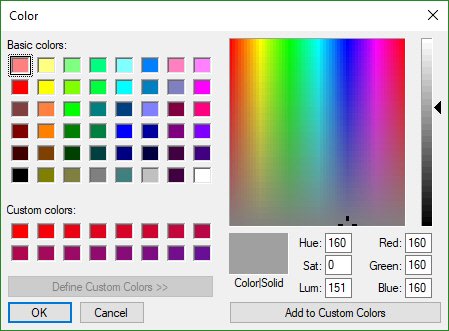
2619
2620
2621**Custom Buttons**
2622Not all buttons are created equal. A button that closes a window is different that a button that returns from the window without closing it. If you want to define your own button, you will generally do this with the Button Element `Button`, which closes the window when clicked.
2623
2624layout = [[sg.Button('My Button')]]
2625
2626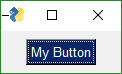
2627
2628All buttons can have their text changed by changing the `button_text` variable in the button call. It is this text that is returned when a window is read. This text will be what tells you which button is called so make it unique. Most of the convenience buttons (Submit, Cancel, Yes, etc) are all Buttons. Some that are not are `FileBrowse` , `FolderBrowse`, `FileSaveAs`. They clearly do not close the window. Instead they bring up a file or folder browser dialog box.
2629
2630**Button Images**
2631Now this is an exciting feature not found in many simplified packages.... images on buttons! You can make a pretty spiffy user interface with the help of a few button images.
2632
2633Your button images need to be in PNG or GIF format. When you make a button with an image, set the button background to the same color as the background. There's a button color TRANSPARENT_BUTTON that you can set your button color to in order for it to blend into the background. Note that this value is currently the same as the color as the default system background on Windows. If you want to set the button background color to the current system default, use the value COLOR_SYSTEM_DEFAULT as the background color.
2634
2635This example comes from the `Demo Media Player.py` example program. Because it's a non-blocking button, it's defined as `RButton`. You also put images on blocking buttons by using `Button`.
2636
2637
2638 sg.RButton('Restart Song', button_color=sg.TRANSPARENT_BUTTON,
2639 image_filename=image_restart, image_size=(50, 50), image_subsample=2, border_width=0)
2640
2641Three parameters are used for button images.
2642
2643 image_filename - Filename. Can be a relative path
2644 image_size - Size of image file in pixels
2645 image_subsample - Amount to divide the size by. 2 means your image will be 1/2 the size. 3 means 1/3
2646
2647Here's an example window made with button images.
2648
2649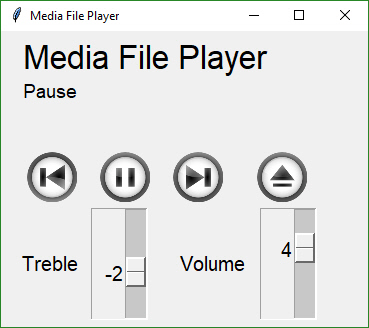
2650
2651You'll find the source code in the file Demo Media Player. Here is what the button calls look like to create media player window
2652 ```python
2653 sg.RButton('Pause', button_color=sg.TRANSPARENT_BUTTON,
2654 image_filename=image_pause,
2655 image_size=(50, 50),
2656 image_subsample=2,
2657 border_width=0)
2658 ```
2659This is one you'll have to experiment with at this point. Not up for an exhaustive explanation.
2660
2661 **Realtime Buttons**
2662
2663 Normally buttons are considered "clicked" when the mouse button is let UP after a downward click on the button. What about times when you need to read the raw up/down button values. A classic example for this is a robotic remote control. Building a remote control using a GUI is easy enough. One button for each of the directions is a start. Perhaps something like this:
2664
2665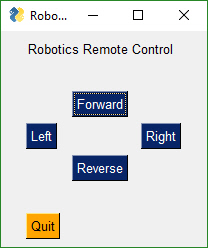
2666
2667
2668This window has 2 button types. There's the normal "Read Button" (Quit) and 4 "Realtime Buttons".
2669
2670Here is the code to make, show and get results from this window:
2671
2672```python
2673import PySimpleGUI as sg
2674
2675gui_rows = [[sg.Text('Robotics Remote Control')],
2676 [sg.T(' ' * 10), sg.RealtimeButton('Forward')],
2677 [sg.RealtimeButton('Left'), sg.T(' ' * 15), sg.RealtimeButton('Right')],
2678 [sg.T(' ' * 10), sg.RealtimeButton('Reverse')],
2679 [sg.T('')],
2680 [sg.Quit(button_color=('black', 'orange'))]
2681 ]
2682
2683window = sg.Window('Robotics Remote Control', auto_size_text=True).Layout(gui_rows)
2684
2685#
2686# Some place later in your code...
2687# You need to perform a Read or Refresh call on your window every now and then or
2688# else it will apprear as if the program has locked up.
2689#
2690# your program's main loop
2691while (True):
2692 # This is the code that reads and updates your window
2693 event, values = window.Read(timeout=0)
2694 if event is not None:
2695 print(event)
2696 if event == 'Quit' or values is None:
2697 break
2698
2699window.Close() # Don't forget to close your window!
2700```
2701This loop will read button values and print them. When one of the Realtime buttons is clicked, the call to `window.Read` will return a button name matching the name on the button that was depressed or the key if there was a key assigned to the button. It will continue to return values as long as the button remains depressed. Once released, the Read will return timeout events until a button is again clicked.
2702
2703**File Types**
2704The `FileBrowse` & `SaveAs` buttons have an additional setting named `file_types`. This variable is used to filter the files shown in the file dialog box. The default value for this setting is
2705
2706 FileTypes=(("ALL Files", "*.*"),)
2707
2708This code produces a window where the Browse button only shows files of type .TXT
2709
2710 layout = [[sg.In() ,sg.FileBrowse(file_types=(("Text Files", "*.txt"),))]]
2711
2712NOTE - Mac users will not be able to use the file_types parameter. tkinter has a bug on Macs that will crash the program is a file_type is attempted so that feature had to be removed. Sorry about that!
2713
2714 ***The ENTER key***
2715 The ENTER key is an important part of data entry for windows. There's a long tradition of the enter key being used to quickly submit windows. PySimpleGUI implements this by tying the ENTER key to the first button that closes or reads a window.
2716
2717The Enter Key can be "bound" to a particular button so that when the key is pressed, it causes the window to return as if the button was clicked. This is done using the `bind_return_key` parameter in the button calls.
2718If there are more than 1 button on a window, the FIRST button that is of type Close window or Read window is used. First is determined by scanning the window, top to bottom and left to right.
2719
2720
2721### Button Methods
2722```python
2723Update(text=None, button_color=(None, None), disabled=None, image_data=None, image_filename=None, visible=None)
2724
2725GetText()
2726```Update - Change the button element
2727
2728 text - sets button text
2729 button color - (text, background)
2730 disabled - if True disables the button
2731 image_data - sets button image to in-ram image
2732 image_filename - sets button image using a file
2733
2734GetText - Returns the current text shown on a button
2735
2736
2737## ButtonMenu Element
2738
2739The ButtonMenu element produces a unique kind of effect. It's a button, that when clicked, shows you a menu. It's like clicking one of the top-level menu items on a MenuBar. As a result, the menu definition take the format of a single menu entry from a normal menu definition. A normal menu definition is a list of lists. This definition is one of those lists.
2740
2741Here is a sample definition:
2742```python
2743 ['Menu', ['&Pause Graph', 'Menu item::optional_key']]
2744```
2745The very first string normally specifies what is shown on the menu bar. In this case, the value is **not used**. You set the text for the button using a different parameter, the `button_text` parm.
2746
2747
2748```python
2749ButtonMenu( button_text,
2750 menu_def,
2751 tooltip=None,
2752 disabled=False,
2753 image_filename=None,
2754 image_data=None,
2755 image_size=(None, None),
2756 image_subsample=None,
2757 border_width=None,
2758 size=(None, None),
2759 auto_size_button=None,
2760 button_color=None,
2761 font=None,
2762 pad=None,
2763 key=None,
2764 visible=True,
2765 size_px=(None,None)):
2766```
2767One use of this element is to make a "fake menu bar" that has a colored background. Normal menu bars cannot have their background color changed. Not so with ButtonMenus.
2768
2769This is the effect:
2770
2771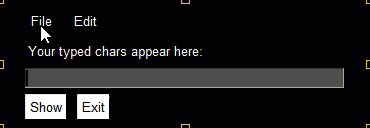
2772
2773Return values for ButtonMenus are sent via the return values dictionary. If a selection is made, then an event is generated that will equal the ButtonMenu's key value. Use that key value to look up the value selected by the user. This is the same mechanism as the Menu Bar Element, but differs from the pop-up (right click) menu.
2774
2775
2776
2777
2778
2779## Vertical Separator Element
2780This element has limited usefulness and is being included more for completeness than anything else. It will draw a line between elements.
2781```python
2782VerticalSeparator(pad=None)
2783```
2784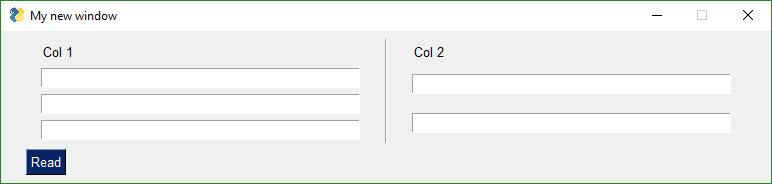
2785
2786It works best when placed between columns or elements that span multiple rows. If on a "normal" row with elements that are only 1 row high, then it will only span that one row.
2787
2788
2789
2790
2791## ProgressBar Element
2792The `ProgressBar` element is used to build custom Progress Bar windows. It is HIGHLY recommended that you use OneLineProgressMeter that provides a complete progress meter solution for you. Progress Meters are not easy to work with because the windows have to be non-blocking and they are tricky to debug.
2793
2794The **easiest** way to get progress meters into your code is to use the `OneLineProgressMeter` API. This consists of a pair of functions, `OneLineProgressMeter` and `OneLineProgressMeterCancel`. You can easily cancel any progress meter by calling it with the current value = max value. This will mark the meter as expired and close the window.
2795You've already seen OneLineProgressMeter calls presented earlier in this readme.
2796
2797 sg.OneLineProgressMeter('My Meter', i+1, 1000, 'key', 'Optional message')
2798
2799The return value for `OneLineProgressMeter` is:
2800`True` if meter updated correctly
2801`False` if user clicked the Cancel button, closed the window, or vale reached the max value.
2802
2803#### Progress Mater in Your window
2804Another way of using a Progress Meter with PySimpleGUI is to build a custom window with a `ProgressBar` Element in the window. You will need to run your window as a non-blocking window. When you are ready to update your progress bar, you call the `UpdateBar` method for the `ProgressBar` element itself.
2805
2806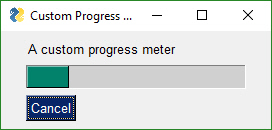
2807
2808 import PySimpleGUI as sg
2809
2810 # layout the window
2811 layout = [[sg.Text('A custom progress meter')],
2812 [sg.ProgressBar(10000, orientation='h', size=(20, 20), key='progressbar')],
2813 [sg.Cancel()]]
2814
2815 # create the window`
2816 window = sg.Window('Custom Progress Meter').Layout(layout)
2817 progress_bar = window.FindElement('progressbar')
2818 # loop that would normally do something useful
2819 for i in range(10000):
2820 # check to see if the cancel button was clicked and exit loop if clicked
2821 event, values = window.Read(timeout=0)
2822 if event == 'Cancel' or event is None:
2823 break
2824 # update bar with loop value +1 so that bar eventually reaches the maximum
2825 progress_bar.UpdateBar(i + 1)
2826 # done with loop... need to destroy the window as it's still open
2827 window.Close())
2828
2829
2830#### Output
2831The Output Element is a re-direction of Stdout. Anything "printed" will be displayed in this element.
2832
2833 Output(size=(None, None))
2834
2835Here's a complete solution for a chat-window using an Async window with an Output Element
2836
2837 import PySimpleGUI as sg
2838
2839 # Blocking window that doesn't close
2840 def ChatBot():
2841 layout = [[(sg.Text('This is where standard out is being routed', size=[40, 1]))],
2842 [sg.Output(size=(80, 20))],
2843 [sg.Multiline(size=(70, 5), enter_submits=True),
2844 sg.RButton('SEND', button_color=(sg.YELLOWS[0], sg.BLUES[0])),
2845 sg.Button('EXIT', button_color=(sg.YELLOWS[0], sg.GREENS[0]))]]
2846
2847 window = sg.Window('Chat Window', default_element_size=(30, 2)).Layout(layout)
2848
2849 # ---===--- Loop taking in user input and using it to query HowDoI web oracle --- #
2850 while True:
2851 event, value = window.Read()
2852 if event == 'SEND':
2853 print(value)
2854 else:
2855 break
2856
2857 ChatBot()
2858
2859### ProgressBar Methods
2860```python
2861UpdateBar(current_count, max=None)
2862```current_count - sets the current value
2863max - changes the max value
2864
2865
2866## Column Element
2867Starting in version 2.9 you'll be able to do more complex layouts by using the Column Element. Think of a Column as a window within a window. And, yes, you can have a Column within a Column if you want.
2868
2869Columns are specified in exactly the same way as a window is, as a list of lists.
2870
2871```python
2872Column( layout,
2873 background_color=None,
2874 size=(None, None),
2875 pad=None,
2876 scrollable=False,
2877 vertical_scroll_only=False,
2878 right_click_menu=None,
2879 key=None,
2880 visible=True)
2881```
2882
2883Columns are needed when you have an element that has a height > 1 line on the left, with single-line elements on the right. Here's an example of this kind of layout:
2884
2885
2886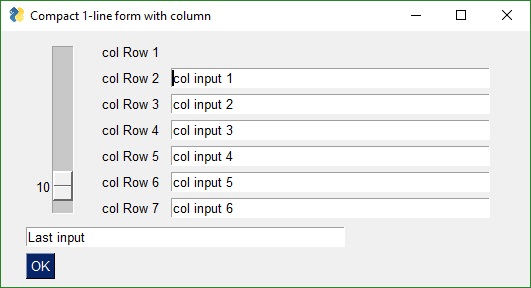
2887
2888
2889This code produced the above window.
2890
2891
2892 import PySimpleGUI as sg
2893
2894 # Demo of how columns work
2895 # window has on row 1 a vertical slider followed by a COLUMN with 7 rows
2896 # Prior to the Column element, this layout was not possible
2897 # Columns layouts look identical to window layouts, they are a list of lists of elements.
2898
2899 window = sg.Window('Columns') # blank window
2900
2901 # Column layout
2902 col = [[sg.Text('col Row 1')],
2903 [sg.Text('col Row 2'), sg.Input('col input 1')],
2904 [sg.Text('col Row 3'), sg.Input('col input 2')],
2905 [sg.Text('col Row 4'), sg.Input('col input 3')],
2906 [sg.Text('col Row 5'), sg.Input('col input 4')],
2907 [sg.Text('col Row 6'), sg.Input('col input 5')],
2908 [sg.Text('col Row 7'), sg.Input('col input 6')]]
2909
2910 layout = [[sg.Slider(range=(1,100), default_value=10, orientation='v', size=(8,20)), sg.Column(col)],
2911 [sg.In('Last input')],
2912 [sg.OK()]]
2913
2914 # Display the window and get values
2915 # If you're willing to not use the "context manager" design pattern, then it's possible
2916 # to collapse the window display and read down to a single line of code.
2917 event, values = sg.Window('Compact 1-line window with column').Layout(layout).Read()
2918
2919 sg.Popup(event, values, line_width=200)
2920
2921The Column Element has 1 required parameter and 1 optional (the layout and the background color). Setting the background color has the same effect as setting the window's background color, except it only affects the column rectangle.
2922
2923 Column(layout, background_color=None)
2924
2925The default background color for Columns is the same as the default window background color. If you change the look and feel of the window, the column background will match the window background automatically.
2926
2927
2928
2929----
2930## Frame Element (Labelled Frames, Frames with a title)
2931
2932Frames work exactly the same way as Columns. You create layout that is then used to initialize the Frame.
2933
2934```python
2935Frame( title,
2936 layout,
2937 title_color=None,
2938 background_color=None,
2939 title_location=None,
2940 relief=DEFAULT_FRAME_RELIEF,
2941 size=(None, None),
2942 font=None,
2943 pad=None,
2944 border_width=None,
2945 key=None,
2946 tooltip=None,
2947 right_click_menu=None,
2948 visible=True)
2949```
2950 def Frame(title - the label / title to put on frame
2951 layout - list of rows of elements the frame contains
2952 title_color - color of the title text
2953 background_color - color of background
2954 title_location - locations to put the title
2955 relief - type of relief to use
2956 size - size of Frame in characters. Do not use if you want frame to autosize
2957 font - font to use for title
2958 pad - element padding to use when packing
2959 border_width - how thick the line going around frame should be
2960 key - key used to location the element
2961 tooltip - tooltip text
2962
2963
2964
2965This code creates a window with a Frame and 2 buttons.
2966
2967 frame_layout = [
2968 [sg.T('Text inside of a frame')],
2969 [sg.CB('Check 1'), sg.CB('Check 2')],
2970 ]
2971 layout = [
2972 [sg.Frame('My Frame Title', frame_layout, font='Any 12', title_color='blue')],
2973 [sg.Submit(), sg.Cancel()]
2974 ]
2975
2976 window = sg.Window('Frame with buttons', font=("Helvetica", 12)).Layout(layout)
2977
2978
2979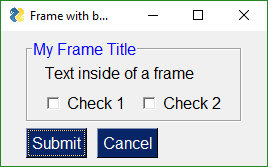
2980
2981
2982
2983Notice how the Frame layout looks identical to a window layout. A window works exactly the same way as a Column and a Frame. They all are "container elements". Elements that contain other elements.
2984
2985*These container Elements can be nested as deep as you want.* That's a pretty spiffy feature, right? Took a lot of work so be appreciative. Recursive code isn't trivial.
2986
2987## Canvas Element
2988
2989```python
2990Canvas(canvas=None,
2991 background_color=None,
2992 size=(None, None),
2993 pad=None,
2994 key=None,
2995 tooltip=None,
2996 right_click_menu=None,
2997 visible=True)
2998```
2999In my opinion, the tkinter Canvas Widget is the most powerful of the tkinter widget. While I try my best to completely isolate the user from anything that is tkinter related, the Canvas Element is the one exception. It enables integration with a number of other packages, often with spectacular results.
3000
3001### Matplotlib, Pyplot Integration
3002
3003One such integration is with Matploplib and Pyplot. There is a Demo program written that you can use as a design pattern to get an understanding of how to use the Canvas Widget once you get it.
3004
3005 def Canvas(canvas - a tkinter canvasf if you created one. Normally not set
3006 background_color - canvas color
3007 size - size in pixels
3008 pad - element padding for packing
3009 key - key used to lookup element
3010 tooltip - tooltip text
3011
3012The order of operations to obtain a tkinter Canvas Widget is:
3013
3014 figure_x, figure_y, figure_w, figure_h = fig.bbox.bounds
3015 # define the window layout
3016 layout = [[sg.Text('Plot test')],
3017 [sg.Canvas(size=(figure_w, figure_h), key='canvas')],
3018 [sg.OK(pad=((figure_w / 2, 0), 3), size=(4, 2))]]
3019
3020 # create the window and show it without the plot
3021 window = sg.Window('Demo Application - Embedding Matplotlib In PySimpleGUI').Layout(layout).Finalize()
3022
3023
3024 # add the plot to the window
3025 fig_photo = draw_figure(window.FindElement('canvas').TKCanvas, fig)
3026
3027 # show it all again and get buttons
3028 event, values = window.Read()
3029
3030To get a tkinter Canvas Widget from PySimpleGUI, follow these steps:
3031* Add Canvas Element to your window
3032* Layout your window
3033* Call `window.Finalize()` - this is a critical step you must not forget
3034* Find the Canvas Element by looking up using key
3035* Your Canvas Widget Object will be the found_element.TKCanvas
3036* Draw on your canvas to your heart's content
3037* Call `window.Read()` - Nothing will appear on your canvas until you call Read
3038
3039See `Demo_Matplotlib.py` for a Recipe you can copy.
3040
3041
3042### Canvas Methods
3043
3044TKCanvas - not a method but a property. Returns the tkinter Canvas Widget
3045
3046
3047
3048## Graph Element
3049
3050All you math fans will enjoy this Element... and all you non-math fans will enjoy it too.
3051
3052I've found nothing to be less fun than dealing with a graphic's coordinate system from a GUI Framework. It's always upside down from what I want. (0,0) is in the upper left hand corner. In short, it's a **pain in the ass**.
3053
3054Graph Element to the rescue. A Graph Element creates a pixel addressable canvas using YOUR coordinate system. *You* get to define the units on the X and Y axis.
3055
3056There are 3 values you'll need to supply the Graph Element. They are:
3057* Size of the canvas in pixels
3058* The lower left (x,y) coordinate of your coordinate system
3059* The upper right (x,y) coordinate of your coordinate system
3060
3061After you supply those values you can scribble all of over your graph by creating Graph Figures. Graph Figures are created, and a Figure ID is obtained by calling:
3062* DrawCircle
3063* DrawLine
3064* DrawPoint
3065* DrawRectangle
3066* DrawOval
3067* DrawImage
3068
3069You can move your figures around on the canvas by supplying the Figure ID the x,y amount to move.
3070
3071 graph.MoveFigure(my_circle, 10, 10)
3072
3073This Element is relatively new and may have some parameter additions or deletions. It shouldn't break your code however.
3074
3075```python
3076 Graph(canvas_size,
3077 graph_bottom_left,
3078 graph_top_right,
3079 background_color=None,
3080 pad=None,
3081 change_submits=False,
3082 drag_submits=False
3083 enable_events=False,
3084 key=None,
3085 tooltip=None,
3086 right_click_menu=None,
3087 visible=True)
3088```
3089### Graph Methods
3090```python
3091DrawLine(self, point_from, point_to, color='black', width=1)
3092DrawPoint(self, point, size=2, color='black')
3093DrawCircle(self, center_location, radius, fill_color=None, line_color='black')
3094DrawOval(self, top_left, bottom_right, fill_color=None, line_color=None)
3095DrawArc(self, top_left, bottom_right, extent, start_angle, style=None, arc_color='black')
3096DrawRectangle(self, top_left, bottom_right, fill_color=None, line_color=None)
3097DrawText(self, text, location, color='black', font=None, angle=0)
3098Erase(background_color)
3099DeleteFigure(figure_id)
3100Update()
3101Move(self, x_direction, y_direction)
3102MoveFigure(self, figure, x_direction, y_direction)
3103RelocateFigure(self, figure, x, y)
3104TKCanvas
3105```All of the Drawing methods return a "***figure***" that can be used move and delete the figure
3106
3107DrawLine - draws a line
3108DrawPoint - draws a single point
3109DrawCircle - draws a circle
3110DrawOval - draws an oval
3111DrawArc - draws an arc
3112DrawRectangle - draws a rectangle
3113DrawText - draws text
3114DrawImage - places an image onto the graph
3115Erase - erases entire graph
3116Update - changes background color
3117Move - moves everything an x,y direction
3118MoveFigure - moves an individual figure by some delta
3119RelocateFigure - moves figure to an absolute location
3120DeleteFigure - delete an individual figure
3121
3122
3123## Table Element
3124
3125Out of all of the Elements, it's the Table and the Tree that are the most "problematic" in the tkinter inter and Qt implementations. They're hard is my only defense.
3126
3127### Known visualization problem....
3128
3129If you click on the header, it can go into spasms for some tables. I don't understand what's causing it and it's been there evidently since the first release of Tables.
3130
3131```python
3132Table( values,
3133 headings=None,
3134 visible_column_map=None,
3135 col_widths=None,
3136 def_col_width=10,
3137 auto_size_columns=True,
3138 max_col_width=20,
3139 select_mode=None,
3140 display_row_numbers=False,
3141 num_rows=None,
3142 row_height=None,
3143 font=None,
3144 justification='right',
3145 text_color=None,
3146 background_color=None,
3147 alternating_row_color=None,
3148 row_colors=None,
3149 vertical_scroll_only=True,
3150 size=(None,None),
3151 change_submits=False,
3152 enable_events=False,
3153 bind_return_key=False,
3154 pad=None,
3155 key=None,
3156 tooltip=None,
3157 right_click_menu=None,
3158 visible=True):
3159
3160```
3161values - Your table's array
3162headings - list of strings representing your headings, if you have any
3163visible_column_map - list of bools. If True, column in that position is shown. Defaults to all columns
3164col_widths - list of column widths
3165def_col_width - default column width. defaults to 10
3166auto_size_columns - bool. If True column widths are determined by table contents
3167max_col_width - maximum width of a column. defaults to 25
3168select_mode - table rows can be selected, but doesn't currently do anything
3169display_row_numbers - bool. If True shows numbers next to rows
3170num_rows = the number of rows to display at a time (same as size[0])
3171row_height = number of pixels high a row should be. Normally left as default value
3172font - font for table entries
3173justification - left, right, center
3174text_color - color of text
3175alternating row color - if set will change background color for alternating rows
3176row_colors - list of tuples representing (row_number, color) e.g. row_colors = ((5, 'white', 'blue'), (0,'red'), (15,'yellow'))
3177vertical_scroll_only - if True will not show a horizontal scrollbar. NOTE - will have to disable to get horizontal scrollbars
3178background_color - cell background color
3179size - (None, number of rows) - don't use, use num_rows instead
3180enable_events - will return a 'row selected' event when row is selected
3181change_submits - the old way of indicating enable_events
3182bind_return_key - returns event if a double click or a return key is pressed while row is highlighted
3183pad - element padding for packing
3184key - key used to lookup element
3185tooltip - tooltip text
3186
3187### Read return values from Table Element
3188
3189The values returned from a `Window.Read` call for the Tree Element are a list of row numbers that are currently highlighted.
3190
3191### Update Call
3192
3193The Update method can be used to make changes to a table that's already been displayed. The call takes a single parameter, values, which is the new table to display. The entire table is replaced.
3194
3195```python
3196def Update(self, values=None):
3197```
3198`values` is a table containing your rows just like you passed in when creating the Table Element.
3199
3200## Tree Element
3201
3202The Tree Element and Table Element are close cousins. Many of the parameters found in the Table Element apply to Tree Elements. In particular the heading information, column widths, etc.
3203
3204```python
3205Tree( data=None,
3206 headings=None,
3207 visible_column_map=None,
3208 col_widths=None,
3209 col0_width=10,
3210 def_col_width=10,
3211 auto_size_columns=True,
3212 max_col_width=20,
3213 select_mode=None,
3214 show_expanded=False,
3215 change_submits=False,
3216 enable_events=False,
3217 font=None,
3218 justification='right',
3219 text_color=None,
3220 background_color=None,
3221 num_rows=None,
3222 row_height=None,
3223 pad=None,
3224 key=None,
3225 tooltip=None,
3226 right_click_menu=None,
3227 visible=True)
3228```
3229```class Tree(data=None - data in TreeData format
3230 headings=None - list of strings representing your headings
3231 visible_column_map=None - list of bools indicating which columns to display
3232 col_widths=None - list of column widths
3233 col0_width=10 - width of the first column which has the text data
3234 def_col_width=10 - default column width
3235 auto_size_columns=True - if true will autosize columns (currenly only sizes to col heading width)
3236 max_col_width=20 - max width for columns in characters
3237 select_mode=None - not yet used
3238 show_expanded - Bool - if True the tree will be fully expanded when shown
3239 font=None - the display font
3240 justification='right' - justification for data display
3241 text_color=None- color of text to display
3242 background_color=None - background color
3243 num_rows=None - number of rows to display
3244 row_height=None - height of rows in pixels
3245 pad=None - element padding
3246 key=None - key for element
3247 tooltip=None - tooltip
3248```
3249Unlike Tables there is no standard format for trees. Thus the data structure passed to the Tree Element must be constructed. This is done using the TreeData class. The process is as follows:
3250* Get a TreeData Object
3251* "Insert" data into the tree
3252* Pass the filled in TreeData object to Tree Element
3253
3254#### TreeData format
3255```python
3256def TreeData()
3257def Insert(self, parent, key, text, values, icon=None)
3258```
3259To "insert" data into the tree the TreeData method Insert is called.
3260
3261`Insert(parent_key, key, display_text, values)`
3262
3263To indicate insertion at the head of the tree, use a parent key of "". So, every top-level node in the tree will have a parent node = ""
3264
3265This code creates a TreeData object and populates with 3 values
3266```python
3267treedata = sg.TreeData()
3268
3269treedata.Insert("", '_A_', 'A', [1,2,3])
3270treedata.Insert("", '_B_', 'B', [4,5,6])
3271treedata.Insert("_A_", '_A1_', 'A1', ['can','be','anything'])
3272```
3273Note that you ***can*** use the same values for display_text and keys. The only thing you have to watch for is that you cannot repeat keys.
3274
3275When Reading a window the Table Element will return a list of rows that are selected by the user. The list will be empty is no rows are selected.
3276
3277#### Icons on Tree Entries
3278
3279If you wish to show an icon next to a tree item, then you specify the icon in the call to `Insert`. You pass in a filename or a Base64 bytes string using the optional `icon` parameter.
3280
3281Here is the result of showing an icon with a tree entry.
3282
3283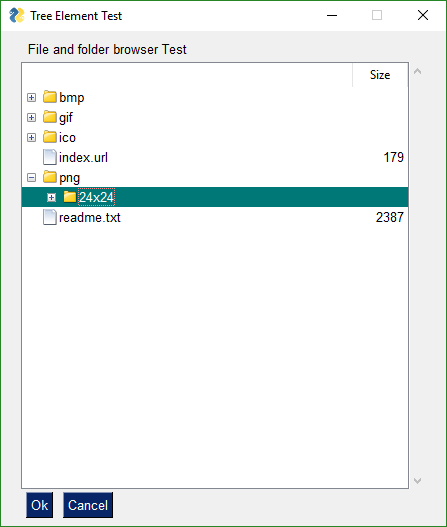
3284
3285
3286## Tab and Tab Group Elements
3287
3288Tabs have been a part of PySimpleGUI since the initial release. However, the initial implementation applied tabs at the top level only. The entire window had to be tabbed. There with other limitations that came along with that implementation. That all changed in version 3.8.0 with the new elements - Tab and TabGroup. The old implementation of Tabs was removed in version 3.8.0 as well.
3289
3290Tabs are another "Container Element". The other Container Elements include:
3291* Frame
3292* Column
3293
3294You layout a Frame in exactly the same way as a Frame or Column elements, by passing in a list of elements.
3295
3296How you place a Tab into a Window is different than Graph or Frame elements. You cannot place a tab directly into a Window's layout. It much first be placed into a TabGroup. The TabGroup can then be placed into the Window.
3297
3298Let's look at this Window as an example:
3299
3300
3301
3302View of second tab:
3303
3304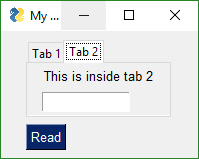
3305
3306
3307First we have the Tab layout definitions. They mirror what you see in the screen shots. Tab 1 has 1 Text Element in it. Tab 2 has a Text and an Input Element.
3308
3309
3310 tab1_layout = [[sg.T('This is inside tab 1')]]
3311
3312 tab2_layout = [[sg.T('This is inside tab 2')],
3313 [sg.In(key='in')]]
3314
3315The layout for the entire window looks like this:
3316
3317 layout = [[sg.TabGroup([[sg.Tab('Tab 1', tab1_layout), sg.Tab('Tab 2', tab2_layout)]])],
3318 [sg.RButton('Read')]]
3319
3320The Window layout has the TabGroup and within the tab Group are the two Tab elements.
3321
3322One important thing to notice about all of these container Elements... they all take a "list of lists" at the layout. They all have a layout that starts with `[[`
3323
3324You will want to keep this `[[ ]]` construct in your head a you're debugging your tabbed windows. It's easy to overlook one or two necessary ['s
3325
3326As mentioned earlier, the old-style Tabs were limited to being at the Window-level only. In other words, the tabs were equal in size to the entire window. This is not the case with the "new-style" tabs. This is why you're not going to be upset when you discover your old code no longer works with the new PySimpleGUI release. It'll be worth the few moments it'll take to convert your code.
3327
3328Check out what's possible with the NEW Tabs!
3329
3330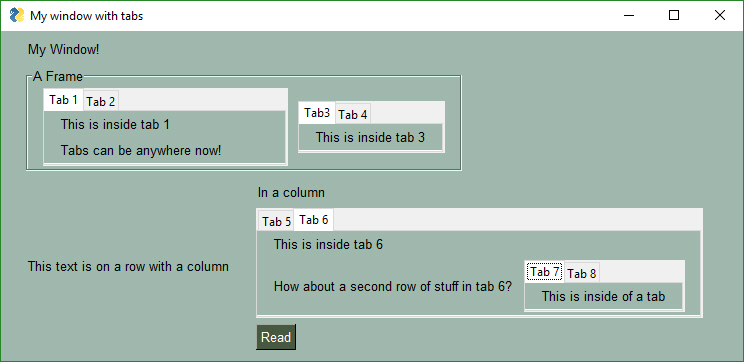
3331
3332
3333Check out Tabs 7 and 8. We've got a Window with a Column containing Tabs 5 and 6. On Tab 6 are... Tabs 7 and 8.
3334
3335As of Release 3.8.0, not all of *options* shown in the API definitions of the Tab and TabGroup Elements are working. They are there as placeholders.
3336
3337The definition of a TabGroup is
3338
3339 TabGroup(layout,
3340 title_color=None
3341 background_color=None
3342 font=None
3343 pad=None
3344 border_width=None
3345 change_submits=False
3346 key=None
3347 tooltip=None)
3348
3349The definition of a Tab Element is
3350
3351 Tab(title,
3352 layout,
3353 title_color=None,
3354 background_color=None,
3355 font=None,
3356 pad=None
3357 disabled=False
3358 border_width=None
3359 key=None
3360 tooltip=None)
3361
3362
3363### Reading Tab Groups
3364
3365Tab Groups now return a value when a Read returns. They return which tab is currently selected. There is also a change_submits parameter that can be set that causes a Read to return if a Tab in that group is selected / changed. The key or title belonging to the Tab that was switched to will be returned as the value
3366
3367
3368### Tab Element Methods
3369```python
3370Update(disabled=None, visible=None)
3371```
3372WARNING - This Update method may not be working correctly
3373
3374## Pane Element
3375
3376New in version 3.20 is the Pane Element, a super-cool tkinter feature. You won't find this one in PySimpleGUIQt, only PySimpleGUI. It's difficult to describe one of these things. Think of them as "Tabs without labels" that you can slide.
3377
3378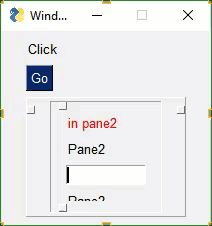
3379
3380```python
3381Pane(pane_list, background_color=None, size=(None, None), pad=None, orientation='vertical', show_handle=True, relief=RELIEF_RAISED, handle_size=None, border_width=None, key=None, visible=True):
3382```
3383***Each "Pane" of a Pane Element must be a Column Element***. The parameter `pane_list` is a list of Column Elements.
3384
3385Calls can get a little hairy looking if you try to declare everything in-line as you can see in this example.
3386
3387```python
3388sg.Pane([col5, sg.Column([[sg.Pane([col1, col2, col4], handle_size=15, orientation='v', background_color=None, show_handle=True, visible=True, key='_PANE_', border_width=0, relief=sg.RELIEF_GROOVE),]]),col3 ], orientation='h', background_color=None, size=(160,160), relief=sg.RELIEF_RAISED, border_width=0)
3389```
3390Combing these with *visibility* make for an interesting interface with entire panes being hidden from view until neded by the user. It's one way of producing "dynamic" windows.
3391
3392
3393## Colors
3394Starting in version 2.5 you can change the background colors for the window and the Elements.
3395
3396Your windows can go from this:
3397
3398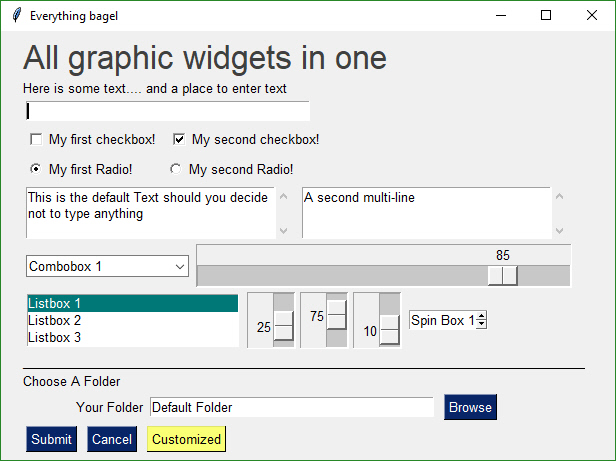
3399
3400
3401to this... with one function call...
3402
3403
3404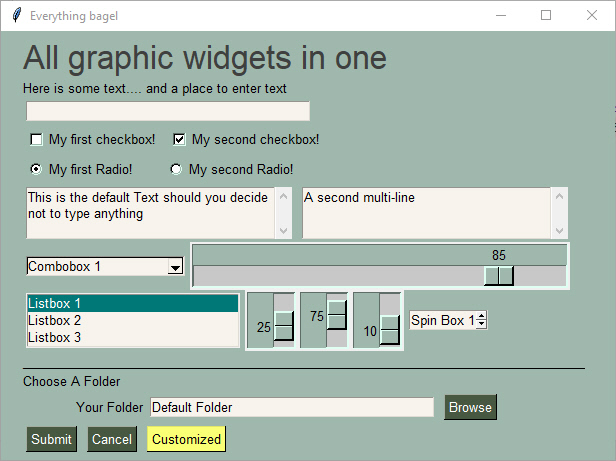
3405
3406
3407
3408While you can do it on an element by element or window level basis, the easiest way, by far, is a call to `SetOptions`.
3409
3410Be aware that once you change these options they are changed for the rest of your program's execution. All of your windows will have that look and feel, until you change it to something else (which could be the system default colors.
3411
3412This call sets all of the different color options.
3413
3414 SetOptions(background_color='#9FB8AD',
3415 text_element_background_color='#9FB8AD',
3416 element_background_color='#9FB8AD',
3417 scrollbar_color=None,
3418 input_elements_background_color='#F7F3EC',
3419 progress_meter_color=('green', 'blue')
3420 button_color=('white','#475841'))
3421
3422# SystemTray
3423
3424This is a PySimpleGUIQt and PySimpleGUIWx only feature. Don't know of a way to do it using tkinter. Your source code for SystemTray is identical for the Qt and Wx implementations. You can switch frameworks by simply changing your import statement.
3425
3426In addition to running normal windows, it's now also possible to have an icon down in the system tray that you can read to get menu events. There is a new SystemTray object that is used much like a Window object. You first get one, then you perform Reads in order to get events.
3427
3428Here is the definition of the SystemTray object.
3429
3430```python
3431SystemTray(menu=None, filename=None, data=None, data_base64=None, tooltip=None):
3432'''
3433 SystemTray - create an icon in the system tray
3434 :param menu: Menu definition
3435 :param filename: filename for icon
3436 :param data: in-ram image for icon
3437 :param data_base64: basee-64 data for icon
3438 :param tooltip: tooltip string '''
3439'''
3440```
3441You'll notice that there are 3 different ways to specify the icon image. The base-64 parameter allows you to define a variable in your .py code that is the encoded image so that you do not need any additional files. Very handy feature.
3442
3443## System Tray Design Pattern
3444
3445Here is a design pattern you can use to get a jump-start.
3446
3447This program will create a system tray icon and perform a blocking Read. If the item "Open" is chosen from the system tray, then a popup is shown.
3448
3449```python
3450import PySimpleGUIQt as sg
3451
3452menu_def = ['BLANK', ['&Open', '---', '&Save', ['1', '2', ['a', 'b']], '&Properties', 'E&xit']]
3453
3454tray = sg.SystemTray(menu=menu_def, filename=r'default_icon.ico')
3455
3456while True: # The event loop
3457 menu_item = tray.Read()
3458 print(menu_item)
3459 if menu_item == 'Exit':
3460 break
3461 elif menu_item == 'Open':
3462 sg.Popup('Menu item chosen', menu_item)
3463
3464```
3465The design pattern creates an icon that will display this menu:
3466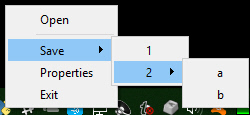
3467
3468### Icons
3469
3470When specifying "icons", you can use 3 different formats.
3471* `filename`- filename
3472* `data_base64` - base64 byte string
3473* '`data` - in-ram bitmap or other "raw" image
3474
3475You will find 3 parameters used to specify these 3 options on both the initialize statement and on the Update method.
3476
3477## Menu Definition
3478```python
3479menu_def = ['BLANK', ['&Open', '&Save', ['1', '2', ['a', 'b']], '!&Properties', 'E&xit']]
3480```
3481A menu is defined using a list. A "Menu entry" is a string that specifies:
3482* text shown
3483* keyboard shortcut
3484* key
3485
3486See section on Menu Keys for more information on using keys with menus.
3487
3488An entry without a key and keyboard shortcut is a simple string
3489`'Menu Item'`
3490
3491If you want to make the "M" be a keyboard shortcut, place an `&` in front of the letter that is the shortcut.
3492`'&Menu Item'`
3493
3494You can add "keys" to make menu items unique or as another way of identifying a menu item than the text shown. The key is added to the text portion by placing `::` after the text.
3495
3496`'Menu Item::key'`
3497
3498The first entry can be ignored.`'BLANK`' was chosen for this example. It's this way because normally you would specify these menus under some heading on a menu-bar. But here there is no heading so it's filled in with any value you want.
3499
3500**Separators**
3501If you want a separator between 2 items, add the entry `'---'` and it will add a separator item at that place in your menu.
3502
3503**Disabled menu entries**
3504
3505If you want to disable a menu entry, place a `!` before the menu entry
3506
3507
3508## SystemTray Methods
3509
3510### Read - Read the context menu or check for events
3511
3512```python
3513def Read(timeout=None)
3514'''
3515 Reads the context menu
3516 :param timeout: Optional. Any value other than None indicates a non-blocking read
3517 :return: String representing meny item chosen. None if nothing read.
3518'''
3519```
3520The `timeout` parameter specifies how long to wait for an event to take place. If nothing happens within the timeout period, then a "timeout event" is returned. These types of reads make it possible to run asynchronously. To run non-blocked, specify `timeout=0`on the Read call.
3521
3522Read returns the menu text, complete with key, for the menu item chosen. If you specified `Open::key` as the menu entry, and the user clicked on `Open`, then you will receive the string `Open::key` upon completion of the Read.
3523
3524#### Read special return values
3525
3526In addition to Menu Items, the Read call can return several special values. They include:
3527
3528EVENT_SYSTEM_TRAY_ICON_DOUBLE_CLICKED - Tray icon was double clicked
3529EVENT_SYSTEM_TRAY_ICON_ACTIVATED - Tray icon was single clicked
3530EVENT_SYSTEM_TRAY_MESSAGE_CLICKED - a message balloon was clicked
3531TIMEOUT_KEY is returned if no events are available if the timeout value is set in the Read call
3532
3533
3534### Hide
3535
3536Hides the icon. Note that no message balloons are shown while an icon is hidden.
3537
3538```python
3539def Hide()
3540```
3541### Close
3542
3543Does the same thing as hide
3544```python
3545def Close()
3546```
3547
3548### UnHide
3549
3550Shows a previously hidden icon
3551
3552```python
3553def UnHide()
3554```
3555### ShowMessage
3556
3557Shows a balloon above the icon in the system tray area. You can specify your own icon to be shown in the balloon, or you can set `messageicon` to one of the preset values.
3558
3559This message has a custom icon.
3560
3561
3562
3563The preset `messageicon` values are:
3564
3565 SYSTEM_TRAY_MESSAGE_ICON_INFORMATION
3566 SYSTEM_TRAY_MESSAGE_ICON_WARNING
3567 SYSTEM_TRAY_MESSAGE_ICON_CRITICAL
3568 SYSTEM_TRAY_MESSAGE_ICON_NOICON
3569
3570```python
3571ShowMessage(title, message, filename=None, data=None, data_base64=None, messageicon=None, time=10000):
3572'''
3573 Shows a balloon above icon in system tray
3574 :param title: Title shown in balloon
3575 :param message: Message to be displayed
3576 :param filename: Optional icon filename
3577 :param data: Optional in-ram icon
3578 :param data_base64: Optional base64 icon
3579 :param time: How long to display message in milliseconds :return:
3580'''
3581```
3582Note, on windows it may be necessary to make a registry change to enable message balloons to be seen. To fix this, you must create the DWORD you see in this screenshot.
3583
3584
3585
3586
3587### Update
3588
3589You can update any of these items within a SystemTray object
3590* Menu definition
3591* Icon
3592* Tooltip
3593
3594 Change them all or just 1.
3595
3596```python
3597Update(menu=None, tooltip=None,filename=None, data=None, data_base64=None,)
3598'''
3599 Updates the menu, tooltip or icon
3600 :param menu: menu defintion
3601 :param tooltip: string representing tooltip
3602 :param filename: icon filename
3603 :param data: icon raw image
3604 :param data_base64: icon base 64 image
3605 :return:
3606'''
3607```
3608
3609# Global Settings
3610**Global Settings**
3611Let's have some fun customizing! Make PySimpleGUI look the way you want it to look. You can set the global settings using the function `PySimpleGUI.SetOptions`. Each option has an optional parameter that's used to set it.
3612
3613```python
3614SetOptions(icon=None
3615 button_color=(None,None)
3616 element_size=(None,None),
3617 margins=(None,None),
3618 element_padding=(None,None)
3619 auto_size_text=None
3620 auto_size_buttons=None
3621 font=None
3622 border_width=None
3623 slider_border_width=None
3624 slider_relief=None
3625 slider_orientation=None
3626 autoclose_time=None
3627 message_box_line_width=None
3628 progress_meter_border_depth=None
3629 progress_meter_style=None
3630 progress_meter_relief=None
3631 progress_meter_color=None
3632 progress_meter_size=None
3633 text_justification=None
3634 text_color=None
3635 background_color=None
3636 element_background_color=None
3637 text_element_background_color=None
3638 input_elements_background_color=None
3639 element_text_color=None
3640 input_text_color=None
3641 scrollbar_color=None, text_color=None
3642 debug_win_size=(None,None)
3643 window_location=(None,None)
3644 tooltip_time=None
3645```
3646
3647Explanation of parameters
3648
3649 icon - filename of icon used for taskbar and title bar
3650 button_color - button color (foreground, background)
3651 element_size - element size (width, height) in characters
3652 margins - tkinter margins around outsize
3653 element_padding - tkinter padding around each element
3654 auto_size_text - autosize the elements to fit their text
3655 auto_size_buttons - autosize the buttons to fit their text
3656 font - font used for elements
3657 border_width - amount of bezel or border around sunken or raised elements
3658 slider_border_width - changes the way sliders look
3659 slider_relief - changes the way sliders look
3660 slider_orientation - changes orientation of slider
3661 autoclose_time - time in seconds for autoclose boxes
3662 message_box_line_width - number of characers in a line of text in message boxes
3663 progress_meter_border_depth - amount of border around raised or lowered progress meters
3664 progress_meter_style - style of progress meter as defined by tkinter
3665 progress_meter_relief - relief style
3666 progress_meter_color - color of the bar and background of progress meters
3667 progress_meter_size - size in (characters, pixels)
3668 background_color - Color of the main window's background
3669 element_background_color - Background color of the elements
3670 text_element_background_color - Text element background color
3671 input_elements_background_color - Input fields background color
3672 element_text_color - Text color of elements that have text, like Radio Buttons
3673 input_text_color - Color of the text that you type in
3674 scrollbar_color - Color for scrollbars (may not always work)
3675 text_color - Text element default text color
3676 text_justification - justification to use on Text Elements. Values are strings - 'left', 'right', 'center'
3677 debug_win_size - size of the Print output window
3678 window_location - location on the screen (x,y) of window's top left cornder
3679 tooltip_time - time in milliseconds to wait before showing a tooltip. Default is 400ms
3680
3681
3682These settings apply to all windows `SetOptions`. The Row options and Element options will take precedence over these settings. Settings can be thought of as levels of settings with the window-level being the highest and the Element-level the lowest. Thus the levels are:
3683
3684 - window level
3685 - Row level
3686 - Element level
3687
3688Each lower level overrides the settings of the higher level. Once settings have been changed, they remain changed for the duration of the program (unless changed again).
3689
3690# Persistent windows (Window stays open after button click)
3691
3692Apologies that the next few pages are perhaps confusing. There have been a number of changes recently in PySimpleGUI's Read calls that added some really cool stuff, but at the expense of being not so simple. Part of the issue is an attempt to make sure existing code doesn't break. These changes are all in the area of non-blocking reads and reads with timeouts.
3693
3694There are 2 ways to keep a window open after the user has clicked a button. One way is to use non-blocking windows (see the next section). The other way is to use buttons that 'read' the window instead of 'close' the window when clicked. The typical buttons you find in windows, including the shortcut buttons, close the window. These include OK, Cancel, Submit, etc. The Button Element also closes the window.
3695
3696The `RButton` Element creates a button that when clicked will return control to the user, but will leave the window open and visible. This button is also used in Non-Blocking windows. The difference is in which call is made to read the window. The normal `Read` call with no parameters will block, a call with a `timeout` value of zero will not block.
3697
3698Note that `InputText` and `MultiLine` Elements will be **cleared** when performing a `Read`. If you do not want your input field to be cleared after a `Read` then you can set the `do_not_clear` parameter to True when creating those elements. The clear is turned on and off on an element by element basis.
3699
3700The reasoning behind this is that Persistent Windows are often "forms". When "submitting" a form you want to have all of the fields left blank so the next entry of data will start with a fresh window. Also, when implementing a "Chat Window" type of interface, after each read / send of the chat data, you want the input field cleared. Think of it as a Texting application. Would you want to have to clear your previous text if you want to send a second text?
3701
3702The design pattern for Persistent Windows was already shown to you earlier in the document... here it is for your convenience.
3703
3704```python
3705import PySimpleGUI as sg
3706
3707layout = [[sg.Text('Persistent window')],
3708 [sg.Input()],
3709 [sg.RButton('Read'), sg.Exit()]]
3710
3711window = sg.Window('Window that stays open').Layout(layout)
3712
3713while True:
3714 event, values = window.Read()
3715 if event is None or event == 'Exit':
3716 break
3717 print(event, values)
3718
3719window.Close()
3720```
3721
3722## Read(timeout = t, timeout_key='timeout')
3723
3724Read with a timeout is a very good thing for your GUIs to use in a read non-blocking situation, if you can use them. If your device can wait for a little while, then use this kind of read. The longer you're able to add to the timeout value, the less CPU time you'll be taking.
3725
3726One way of thinking of reads with timeouts:
3727> During the timeout time, you are "yielding" the processor to do other tasks.
3728
3729But it gets better than just being a good citizen....**your GUI will be more responsive than if you used a non-blocking read**
3730
3731Let's say you had a device that you want to "poll" every 100ms. The "easy way out" and the only way out until recently was this:
3732
3733```python
3734# YOU SHOULD NOT DO THIS....
3735while True: # Event Loop
3736 event, values = window.ReadNonBlocking() # DO NOT USE THIS CALL ANYMORE
3737 read_my_hardware() # process my device here
3738 time.sleep(.1) # sleep 1/10 second
3739```
3740This program will quickly test for user input, then deal with the hardware. Then it'll sleep for 100ms, while your gui is non-responsive, then it'll check in with your GUI again. I fully realize this is a crude way of doing things. We're talking dirt simple stuff without trying to use threads, etc to 'get it right'. It's for demonstration purposes.
3741
3742The new and better way....
3743using the Read Timeout mechanism, the sleep goes away.
3744
3745```python
3746# This is the right way to poll for hardware
3747while True: # Event Loop
3748 event, values = window.Read(timeout = 100)
3749 read_my_hardware() # process my device here
3750```
3751This event loop will run every 100 ms. You're making a Read call, so anything that the use does will return back to you immediately, and you're waiting up to 100ms for the user to do something. If the user doesn't do anything, then the read will timeout and execution will return to the program.
3752
3753
3754## Non-Blocking Windows (Asynchronous reads)
3755
3756There are TWO ways to perform a non-blocking read.
3757
3758The "old way" was:
3759```python
3760event, values = sg.ReadNonBlocking()
3761```
3762The new way
3763```python
3764event, values = sg.Read(timeout=0)
3765```
3766You should use the new way if you're reading this for the first time.
3767
3768The difference in the 2 calls is in the value of event. For ReadNonBlocking, event will be `None` if there are no other events to report. There is a "problem" with this however. With normal Read calls, an event value of None signified the window was closed. For ReadNonBlocking, the way a closed window is returned is via the values variable being set to None.
3769
3770
3771## sg.TIMEOUT_KEY
3772
3773If you're using the new, timeout=0 method, then an event value of None signifies that the window was closed, just like a normal Read. That leaves the question of what it is set to when not other events are happening. This value will be the value of `timeout_key`. If you did not specify a timeout_key value in your call to read, then it will be set to a default value of:
3774TIMEOUT_KEY = '__timeout__'
3775
3776If you wanted to test for "no event" in your loop, it would be written like this:
3777```python
3778while True:
3779 event, value = window.Read(timeout=0)
3780 if event is None:
3781 break # the use has closed the window
3782 if event == sg.TIMEOUT_KEY:
3783 print("Nothing happened")
3784```
3785
3786Use async windows sparingly. It's possible to have a window that appears to be async, but it is not. **Please** try to find other methods before going to async windows. The reason for this plea is that async windows poll tkinter over and over. If you do not have a sleep in your loop, you will eat up 100% of the CPU time. It's important to be a good citizen. Don't chew up CPU cycles needlessly.
3787
3788Non-blocking is generally reserved as a "last resort". Too many times people use non-blocking reads when a blocking read will do just fine.
3789
3790There is a hybrid approach... a read with a timeout. You'll score much higher points on the impressive meter if you're able to use a lot less CPU time by using this type of read.
3791
3792The most legit time to use a non-blocking window is when you're working directly with hardware. Maybe you're driving a serial bus. If you look at the Event Loop in the Demo_OpenCV_Webcam.py program, you'll see that the read is a non-blocking read. However, there is a place in the event loop where blocking occurs. The point in the loop where you will block is the call to read frames from the webcam. When a frame is available you want to quickly deliver it to the output device, so you don't want your GUI blocking. You want the read from the hardware to block.
3793
3794Another example can be found in the demo for controlling a robot on a Raspberry Pi. In that application you want to read the direction buttons, forward, backward, etc, and immediately take action. If you are using RealtimeButtons, your only option at the moment is to use non-blocking windows. You have to set the timeout to zero if you want the buttons to be real-time responsive.
3795
3796However, with these buttons, adding a sleep to your event loop will at least give other processes time to execute. It will, however, starve your GUI. The entire time you're sleeping, your GUI isn't executing.
3797
3798
3799### Periodically Calling `Read`
3800
3801Let's say you do end up using non-blocking reads... then you've got some housekeeping to do. It's up to you to periodically "refresh" the visible GUI. The longer you wait between updates to your GUI the more sluggish your windows will feel. It is up to you to make these calls or your GUI will freeze.
3802
3803There are 2 methods of interacting with non-blocking windows.
38041. Read the window just as you would a normal window
38052. "Refresh" the window's values without reading the window. It's a quick operation meant to show the user the latest values
3806
3807 With asynchronous windows the window is shown, user input is read, but your code keeps right on chugging. YOUR responsibility is to call `PySimpleGUI.Read` on a periodic basis. Several times a second or more will produce a reasonably snappy GUI.
3808
3809 ## Exiting (Closing) a Persistent Window
3810
3811If your window has a button that closes the window, then PySimpleGUI will automatically close the window for you. If all of your buttons are ReadButtons, then it'll be up to you to close the window when done.
3812To close a window, call the `Close` method.
3813```python
3814window.Close()
3815```
3816## Persistent Window Example - Running timer that updates
3817
3818See the sample code on the GitHub named Demo Media Player for another example of Async windows. We're going to make a window and update one of the elements of that window every .01 seconds. Here's the entire code to do that.
3819
3820```python
3821import PySimpleGUI as sg
3822import time
3823
3824# ---------------- Create Form ----------------
3825sg.ChangeLookAndFeel('Black')
3826sg.SetOptions(element_padding=(0, 0))
3827
3828layout = [[sg.Text('')],
3829 [sg.Text('', size=(8, 2), font=('Helvetica', 20), justification='center', key='text')],
3830 [sg.ReadButton('Pause', key='button', button_color=('white', '#001480')),
3831 sg.ReadButton('Reset', button_color=('white', '#007339'), key='Reset'),
3832 sg.Exit(button_color=('white', 'firebrick4'), key='Exit')]]
3833
3834window = sg.Window('Running Timer', no_titlebar=True, auto_size_buttons=False, keep_on_top=True, grab_anywhere=True).Layout(layout)
3835
3836# ---------------- main loop ----------------
3837current_time = 0
3838paused = False
3839start_time = int(round(time.time() * 100))
3840while (True):
3841 # --------- Read and update window --------
3842 event, values = window.Read(timeout=10)
3843 current_time = int(round(time.time() * 100)) - start_time
3844 # --------- Display timer in window --------
3845 window.FindElement('text').Update('{:02d}:{:02d}.{:02d}'.format((current_time // 100) // 60,
3846```
3847
3848Previously this program was implemented using a sleep in the loop to control the clock tick. This version uses the new timeout parameter. The result is a window that reacts quicker then the one with the sleep and the accuracy is just as good.
3849
3850
3851## Instead of a Non-blocking Read --- Use `change_submits = True` or return_keyboard_events = True
3852
3853Any time you are thinking "I want an X Element to cause a Y Element to do something", then you want to use the `change_submits` option.
3854
3855***Instead of polling, try options that cause the window to return to you.*** By using non-blocking windows, you are *polling*. You can indeed create your application by polling. It will work. But you're going to be maxing out your processor and may even take longer to react to an event than if you used another technique.
3856
3857**Examples**
3858
3859One example is you have an input field that changes as you press buttons on an on-screen keypad.
3860
3861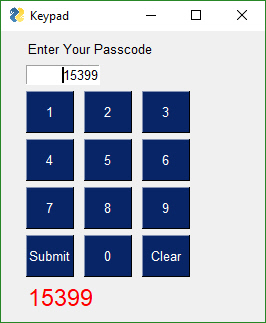
3862
3863
3864
3865
3866# Updating Elements (changing elements in active window)
3867
3868If you want to change Elements in your window after the window has been created, then you will call the Element's Update method.
3869
3870**NOTE** a window **must be Read or Finalized** before any Update calls can be made.
3871
3872Here is an example of updating a Text Element
3873
3874```python
3875import PySimpleGUI as sg
3876
3877layout = [ [sg.Text('My layout', key='_TEXT_')],
3878 [sg.Button('Read')]]
3879
3880window = sg.Window('My new window').Layout(layout)
3881
3882while True: # Event Loop
3883 event, values = window.Read()
3884 if event is None:
3885 break
3886 window.Element('_TEXT_').Update('My new text value')
3887```
3888Notice the placement of the Update call. If you wanted to Update the Text Element *prior* to the Read call, outside of the event loop, then you must call Finalize on the window first.
3889
3890In this example, the Update is done prior the Read. Because of this, the Finalize call is added to the Window creation.
3891```python
3892import PySimpleGUI as sg
3893
3894layout = [ [sg.Text('My layout', key='_TEXT_')],
3895 [sg.Button('Read')]
3896 ]
3897
3898window = sg.Window('My new window').Layout(layout).Finalize()
3899
3900window.Element('_TEXT_').Update('My new text value')
3901
3902while True: # Event Loop
3903 event, values = window.Read()
3904 if event is None:
3905 break
3906```
3907
3908Persistent windows remain open and thus continue to interact with the user after the Read has returned. Often the program wishes to communicate results (output information) or change an Element's values (such as populating a List Element).
3909
3910You can use Update to do things like:
3911* Have one Element (appear to) make a change to another Element
3912* Disable a button, slider, input field, etc
3913* Change a button's text
3914* Change an Element's text or background color
3915* Add text to a scrolling output window
3916* Change the choices in a list
3917* etc
3918
3919The way this is done is via an Update method that is available for nearly all of the Elements. Here is an example of a program that uses a persistent window that is updated.
3920
3921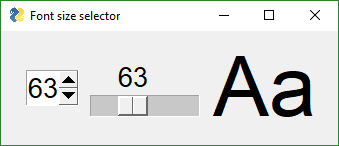
3922
3923
3924In some programs these updates happen in response to another Element. This program takes a Spinner and a Slider's input values and uses them to resize a Text Element. The Spinner and Slider are on the left, the Text element being changed is on the right.
3925
3926
3927 # Testing async window, see if can have a slider
3928 # that adjusts the size of text displayed
3929
3930```python
3931import PySimpleGUI as sg
3932fontSize = 12
3933layout = [[sg.Spin([sz for sz in range(6, 172)], font=('Helvetica 20'), initial_value=fontSize, change_submits=True, key='spin'),
3934 sg.Slider(range=(6,172), orientation='h', size=(10,20),
3935 change_submits=True, key='slider', font=('Helvetica 20')),
3936 sg.Text("Aa", size=(2, 1), font="Helvetica " + str(fontSize), key='text')]]
3937
3938sz = fontSize
3939window = sg.Window("Font size selector", grab_anywhere=False).Layout(layout)
3940# Event Loop
3941while True:
3942 event, values= window.Read()
3943 if event is None:
3944 break
3945 sz_spin = int(values['spin'])
3946 sz_slider = int(values['slider'])
3947 sz = sz_spin if sz_spin != fontSize else sz_slider
3948 if sz != fontSize:
3949 fontSize = sz
3950 font = "Helvetica " + str(fontSize)
3951 window.FindElement('text').Update(font=font)
3952 window.FindElement('slider').Update(sz)
3953 window.FindElement('spin').Update(sz)
3954
3955print("Done.")
3956```
3957
3958Inside the event loop we read the value of the Spinner and the Slider using those Elements' keys.
3959For example, `values['slider']` is the value of the Slider Element.
3960
3961This program changes all 3 elements if either the Slider or the Spinner changes. This is done with these statements:
3962
3963```python
3964 window.FindElement('text').Update(font=font)
3965 window.FindElement('slider').Update(sz)
3966 window.FindElement('spin').Update(sz)
3967```
3968Remember this design pattern because you will use it OFTEN if you use persistent windows.
3969
3970It works as follows. The call to `window.FindElement` returns the Element object represented by they provided `key`. This element is then updated by calling it's `Update` method. This is another example of Python's "chaining" feature. We could write this code using the long-form:
3971
3972 text_element = window.FindElement('text')
3973 text_element.Update(font=font)
3974
3975The takeaway from this exercise is that keys are key in PySimpleGUI's design. They are used to both read the values of the window and also to identify elements. As already mentioned, they are used as targets in Button calls.
3976
3977### Locating Elements
3978
3979The Window method call that's used to find an element is:
3980`FindElement`
3981or the shortened version
3982`Element`
3983
3984When you see a call to window.FindElement or window.Element, then you know an element is being addressed. Normally this is done so you can call the element's Update method.
3985
3986
3987### ProgressBar / Progress Meters
3988
3989Note that to change a progress meter's progress, you call UpdateBar, not Update. It's an old naming convention that's left over from before the Update calls were implemented.
3990
3991
3992
3993# Keyboard & Mouse Capture
3994Beginning in version 2.10 you can capture keyboard key presses and mouse scroll-wheel events. Keyboard keys can be used, for example, to detect the page-up and page-down keys for a PDF viewer. To use this feature, there's a boolean setting in the Window call `return_keyboard_events` that is set to True in order to get keys returned along with buttons.
3995
3996Keys and scroll-wheel events are returned in exactly the same way as buttons.
3997
3998For scroll-wheel events, if the mouse is scrolled up, then the `button` text will be `MouseWheel:Up`. For downward scrolling, the text returned is `MouseWheel:Down`
3999
4000Keyboard keys return 2 types of key events. For "normal" keys (a,b,c, etc), a single character is returned that represents that key. Modifier and special keys are returned as a string with 2 parts:
4001
4002 Key Sym:Key Code
4003
4004Key Sym is a string such as 'Control_L'. The Key Code is a numeric representation of that key. The left control key, when pressed will return the value 'Control_L:17'
4005
4006```python
4007import PySimpleGUI as sg
4008
4009# Recipe for getting keys, one at a time as they are released
4010# If want to use the space bar, then be sure and disable the "default focus"
4011
4012with sg.Window("Keyboard Test", return_keyboard_events=True, use_default_focus=False) as window:
4013 text_elem = sg.Text("", size=(18, 1))
4014 layout = [[sg.Text("Press a key or scroll mouse")],
4015 [text_elem],
4016 [sg.Button("OK")]]
4017
4018 window.Layout(layout)
4019 # ---===--- Loop taking in user input --- #
4020while True:
4021 event, value = window.Read()
4022
4023 if event == "OK" or event is None:
4024 print(event, "exiting")
4025 break
4026 text_elem.Update(event)
4027```
4028
4029You want to turn off the default focus so that there no buttons that will be selected should you press the spacebar.
4030
4031### Realtime Keyboard Capture
4032Use realtime keyboard capture by calling
4033
4034```python
4035
4036import PySimpleGUI as sg
4037
4038with sg.Window("Realtime Keyboard Test", return_keyboard_events=True, use_default_focus=False) as window:
4039 layout = [[sg.Text("Hold down a key")],
4040 [sg.Button("OK")]]
4041
4042 window.Layout(layout)
4043
4044 while True:
4045 event, value = window.Read(timeout=0)
4046 if event == "OK" or event is None:
4047 print(event, value, "exiting")
4048 break
4049 if event != sg.TIMEOUT_KEY:
4050 print(event)
4051```
4052# Menus
4053
4054## MenuBar
4055
4056Beginning in version 3.01 you can add a MenuBar to your window. You specify the menus in much the same way as you do window layouts, with lists. Menu selections are returned as events and as of 3.17, also as in the values dictionary. The value returned will be the entire menu entry, including the key if you specified one.
4057
4058
4059This definition:
4060
4061```python
4062menu_def = [['File', ['Open', 'Save', 'Exit',]],
4063 ['Edit', ['Paste', ['Special', 'Normal',], 'Undo'],],
4064 ['Help', 'About...'],]
4065```
4066Note the placement of ',' and of []. It's tricky to get the nested menus correct that implement cascading menus. See how paste has Special and Normal as a list after it. This means that Paste has a cascading menu with items Special and Normal.
4067
4068They menu_def layout produced this window:
4069
4070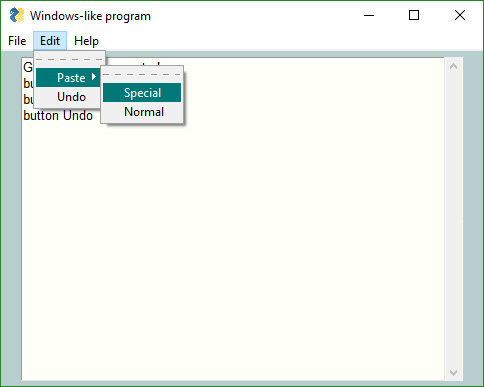
4071
4072
4073To add a menu to a Window place the `Menu` or `MenuBar` element into your layout.
4074
4075```python
4076 layout = [[sg.Menu(menu_def)]]
4077```
4078It doesn't really matter where you place the Menu Element in your layout as it will always be located at the top of the window.
4079
4080## ButtonMenus
4081
4082Button menus were introduced in version 3.21, having been previously released in PySimpleGUIQt. They work exactly the same and are source code compatible between PySimpleGUI and PySimpleGUIQt. These types of menus take a single menu entry where a Menu Bar takes a list of menu entries.
4083
4084## Right Click Menus
4085
4086Right Click Menus were introduced in version 3.21. Almost every element has a right_click_menu parameter and there is a window-level setting for rich click menu that will attach a right click menu to all elements in the window.
4087
4088The menu definition is the same a s the button menu definition, a single menu entry.
4089
4090```python
4091right_click_menu = ['&Right', ['Right', '!&Click', '&Menu', 'E&xit', 'Properties']]
4092```
4093The first string in a right click menu and a button menu is ***ignored***. It is not used. Normally you would put the string that is shown on the menu bar in that location.
4094
4095**Return values for right click menus are different than menu bars and button menus.** Instead of the value being returned through the values dictionary, it is instead sent back as an Event. You will not
4096
4097## Menu Shortcut keys
4098You have used ALT-key in other Windows programs to navigate menus. For example Alt-F+X exits the program. The Alt-F pulls down the File menu. The X selects the entry marked Exit.
4099
4100The good news is that PySimpleGUI allows you to create the same kind of menus! Your program can play with the big-boys. And, it's trivial to do.
4101
4102All that's required is for your to add an "&" in front of the letter you want to appear with an underscore. When you hold the Alt key down you will see the menu with underlines that you marked.
4103
4104One other little bit of polish you can add are separators in your list. To add a line in your list of menu choices, create a menu entry that looks like this: ` '---'`
4105
4106This is an example Menu with underlines and a separator.
4107
4108```python
4109# ------ Menu Definition ------ #
4110menu_def = [['&File', ['&Open', '&Save', '---', 'Properties', 'E&xit' ]],
4111 ['&Edit', ['Paste', ['Special', 'Normal',], 'Undo'],],
4112 ['&Help', '&About...'],]
4113```
4114 And this is the spiffy menu it produced:
4115 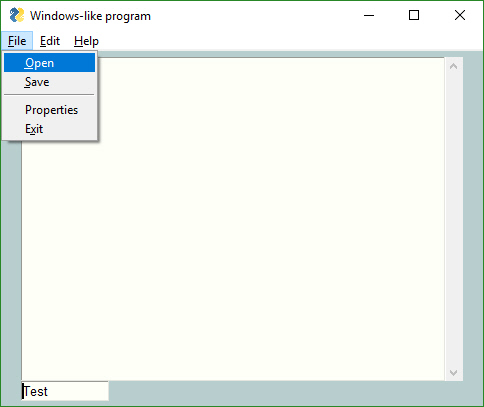
4116
4117
4118## Disabled Menu Entries
4119
4120If you want one of your menu items to be disabled, then place a '!' in front of the menu entry. To disable the Paste menu entry in the previous examples, the entry would be:
4121`['!&Edit', ['Paste', ['Special', 'Normal',], 'Undo'],]`
4122
4123If your want to change the disabled menu item flag / character from '!' to something else, change the variable `MENU_DISABLED_CHARACTER`
4124
4125## Keys for Menus
4126
4127Beginning in version 3.17 you can add a `key` to your menu entries. The `key` value will be removed prior to be inserted into the menu. When you receive Menu events, the entire menu entry, including the `key` is returned. A key is indicated by adding `::` after a menu entry, followed by the key.
4128
4129To add the `key` `_MY_KEY_` to the Special menu entry, the code would be:
4130
4131`['&Edit', ['Paste', ['Special::_MY_KEY_', 'Normal',], 'Undo'],]`
4132
4133 If you want to change the characters that indicate a key follows from '::' to something else, change the variable `MENU_KEY_SEPARATOR`
4134
4135
4136# Running Multiple Windows
4137
4138If you wish to run multiple windows in your event loop, then there are 2 methods for doing this.
4139
41401. First window does not remain active while second window is visible
41412. First window remains active while second window is visible
4142
4143You will find the 2 design matters in 2 demo programs in the Demo Program area of the GitHub (http://www.PySimpleGUI.com)
4144
4145***Critically important***
4146When creating a new window you must use a "fresh" layout every time. You cannot reuse a layout from a previous window. As a result you will see the layout for window 2 being defined inside of the larger event loop.
4147
4148A rule of thumb to follow:
4149
4150> If you are calling `Window` then you should define your window layout
4151> in the statement just prior to the `Window` call.
4152
4153
4154## Multi-Window Design Pattern 1 - both windows active
4155
4156```python
4157import PySimpleGUI as sg
4158
4159# Design pattern 2 - First window remains active
4160
4161layout = [[ sg.Text('Window 1'),],
4162 [sg.Input(do_not_clear=True)],
4163 [sg.Text('', key='_OUTPUT_')],
4164 [sg.Button('Launch 2'), sg.Button('Exit')]]
4165
4166win1 = sg.Window('Window 1').Layout(layout)
4167
4168win2_active = False
4169while True:
4170 ev1, vals1 = win1.Read(timeout=100)
4171 win1.FindElement('_OUTPUT_').Update(vals1[0])
4172 if ev1 is None or ev1 == 'Exit':
4173 break
4174
4175 if not win2_active and ev1 == 'Launch 2':
4176 win2_active = True
4177 layout2 = [[sg.Text('Window 2')],
4178 [sg.Button('Exit')]]
4179
4180 win2 = sg.Window('Window 2').Layout(layout2)
4181
4182 if win2_active:
4183 ev2, vals2 = win2.Read(timeout=100)
4184 if ev2 is None or ev2 == 'Exit':
4185 win2_active = False
4186 win2.Close()
4187```
4188
4189## Multi-Window Design Pattern 2 - only 1 active window
4190
4191```python
4192import PySimpleGUIQt as sg
4193
4194# Design pattern 1 - First window does not remain active
4195
4196layout = [[ sg.Text('Window 1'),],
4197 [sg.Input(do_not_clear=True)],
4198 [sg.Text('', key='_OUTPUT_')],
4199 [sg.Button('Launch 2')]]
4200
4201win1 = sg.Window('Window 1').Layout(layout)
4202win2_active=False
4203while True:
4204 ev1, vals1 = win1.Read(timeout=100)
4205 if ev1 is None:
4206 break
4207 win1.FindElement('_OUTPUT_').Update(vals1[0])
4208
4209 if ev1 == 'Launch 2' and not win2_active:
4210 win2_active = True
4211 win1.Hide()
4212 layout2 = [[sg.Text('Window 2')], # note must create a layout from scratch every time. No reuse
4213 [sg.Button('Exit')]]
4214
4215 win2 = sg.Window('Window 2').Layout(layout2)
4216 while True:
4217 ev2, vals2 = win2.Read()
4218 if ev2 is None or ev2 == 'Exit':
4219 win2.Close()
4220 win2_active = False
4221 win1.UnHide()
4222 break
4223```
4224# Sample Applications
4225
4226There are too many to list!!
4227
4228There are over 130 sample programs to give you a jump start.
4229
4230## Packages Used In Demos
4231
4232
4233 While the core PySimpleGUI code does not utilize any 3rd party packages, some of the demos do. They add a GUI to a few popular packages. These packages include:
4234 * [Chatterbot](https://github.com/gunthercox/ChatterBot)
4235 * [Mido](https://github.com/olemb/mido)
4236 * [Matplotlib](https://matplotlib.org/)
4237 * [PyMuPDF](https://github.com/rk700/PyMuPDF)
4238
4239
4240# Creating a Windows .EXE File
4241
4242It's possible to create a single .EXE file that can be distributed to Windows users. There is no requirement to install the Python interpreter on the PC you wish to run it on. Everything it needs is in the one EXE file, assuming you're running a somewhat up to date version of Windows.
4243
4244Installation of the packages, you'll need to install PySimpleGUI and PyInstaller (you need to install only once)
4245
4246```
4247pip install PySimpleGUI
4248pip install PyInstaller
4249
4250```
4251To create your EXE file from your program that uses PySimpleGUI, `my_program.py`, enter this command in your Windows command prompt:
4252
4253```
4254pyinstaller -wF my_program.py
4255
4256```
4257You will be left with a single file, `my_program.exe`, located in a folder named `dist` under the folder where you executed the `pyinstaller` command.
4258
4259That's all... Run your `my_program.exe` file on the Windows machine of your choosing.
4260
4261> "It's just that easy."
4262
4263(famous last words that screw up just about anything being referenced)
4264
4265Your EXE file should run without creating a "shell window". Only the GUI window should show up on your taskbar.
4266
4267If you get a crash with something like:
4268```
4269ValueError: script '.......\src\tkinter' not found
4270```
4271Then try adding **`--hidden-import tkinter`** to your command
4272
4273# Creating a Mac App File
4274
4275There are reports that PyInstaller can be used to create App files. It's not been officially tested.
4276
4277Run this command on your Mac
4278
4279> pyinstaller --onefile --add-binary='/System/Library/Frameworks/Tk.framework/Tk':'tk' --add-binary='/System/Library/Frameworks/Tcl.framework/Tcl':'tcl' your_program.py
4280
4281
4282This info was located on Reddit with the source traced back to:
4283https://github.com/pyinstaller/pyinstaller/issues/1350
4284
4285
4286## Fun Stuff
4287Here are some things to try if you're bored or want to further customize
4288
4289**Debug Output**
4290Be sure and check out the EasyPrint (Print) function described in the high-level API section. Leave your code the way it is, route your stdout and stderror to a scrolling window.
4291
4292For a fun time, add these lines to the top of your script
4293
4294 import PySimpleGUI as sg
4295 print = sg.Print
4296
4297This will turn all of your print statements into prints that display in a window on your screen rather than to the terminal.
4298
4299**Look and Feel**
4300Dial in the look and feel that you like with the `SetOptions` function. You can change all of the defaults in one function call. One line of code to customize the entire GUI.
4301Or beginning in version 2.9 you can choose from a look and feel using pre-defined color schemes. Call ChangeLookAndFeel with a description string.
4302
4303 sg.ChangeLookAndFeel('GreenTan')
4304
4305Valid values for the description string are:
4306
4307 GreenTan
4308 LightGreen
4309 BluePurple
4310 Purple
4311 BlueMono
4312 GreenMono
4313 BrownBlue
4314 BrightColors
4315 NeutralBlue
4316 Kayak
4317 SandyBeach
4318 TealMono
4319
4320To see the latest list of color choices, take a look at the bottom of the `PySimpleGUI.py` file where you'll find the `ChangLookAndFeel` function.
4321
4322You can also combine the `ChangeLookAndFeel` function with the `SetOptions` function to quickly modify one of the canned color schemes. Maybe you like the colors but was more depth to your bezels. You can dial in exactly what you want.
4323
4324**ObjToString**
4325Ever wanted to easily display an objects contents easily? Use ObjToString to get a nicely formatted recursive walk of your objects.
4326This statement:
4327
4328 print(sg.ObjToSting(x))
4329
4330And this was the output
4331
4332 <class '__main__.X'>
4333 abc = abc
4334 attr12 = 12
4335 c = <class '__main__.C'>
4336 b = <class '__main__.B'>
4337 a = <class '__main__.A'>
4338 attr1 = 1
4339 attr2 = 2
4340 attr3 = three
4341 attr10 = 10
4342 attrx = x
4343
4344You'll quickly wonder how you ever coded without it.
4345
4346---
4347# Known Issues
4348While not an "issue" this is a ***stern warning***
4349
4350## **Do not attempt** to call `PySimpleGUI` from multiple threads! It's `tkinter` based and `tkinter` has issues with multiple threads
4351
4352**Progress Meters** - the visual graphic portion of the meter may be off. May return to the native tkinter progress meter solution in the future. Right now a "custom" progress meter is used. On the bright side, the statistics shown are extremely accurate and can tell you something about the performance of your code. If you are running 2 or more progress meters at the same time using `OneLineProgressMeter`, you need to close the meter by using the "Cancel" button rather than the X
4353
4354**Async windows** - these include the 'easy' windows (`OneLineProgressMeter` and EasyPrint/Print). If you start overlapping having Async windows open with normal windows then things get a littler squirrelly. Still tracking down the issues and am making it more solid every day possible. You'll know there's an issue when you see blank window.
4355
4356**EasyPrint** - EasyPrint is a new feature that's pretty awesome. You print and the output goes to a window, with a scroll bar, that you can copy and paste from. Being a new feature, it's got some potential problems. There are known interaction problems with other GUI windows. For example, closing a Print window can also close other windows you have open. For now, don't close your debug print window until other windows are closed too.
4357
4358## Contributing
4359
4360A MikeTheWatchGuy production... entirely responsible for this code.... unless it causes you trouble in which case I'm not at all responsible.
4361
4362## Versions
4363|Version | Description |
4364|--|--|
4365| 1.0.9 | July 10, 2018 - Initial Release |
4366| 1.0.21 | July 13, 2018 - Readme updates |
4367| 2.0.0 | July 16, 2018 - ALL optional parameters renamed from CamelCase to all_lower_case
4368| 2.1.1 | July 18, 2018 - Global settings exposed, fixes
4369| 2.2.0| July 20, 2018 - Image Elements, Print output
4370| 2.3.0 | July 23, 2018 - Changed form.Read return codes, Slider Elements, Listbox element. Renamed some methods but left legacy calls in place for now.
4371| 2.4.0 | July 24, 2018 - Button images. Fixes so can run on Raspberry Pi
4372| 2.5.0 | July 26, 2018 - Colors. Listbox scrollbar. tkinter Progress Bar instead of homegrown.
4373| 2.6.0 | July 27, 2018 - auto_size_button setting. License changed to LGPL 3+
4374| 2.7.0 | July 30, 2018 - realtime buttons, window_location default setting
4375| 2.8.0 | Aug 9, 2018 - New None default option for Checkbox element, text color option for all elements, return values as a dictionary, setting focus, binding return key
4376| 2.9.0 | Aug 16,2018 - Screen flash fix, `do_not_clear` input field option, `autosize_text` defaults to `True` now, return values as ordered dict, removed text target from progress bar, rework of return values and initial return values, removed legacy Form.Refresh() method (replaced by Form.ReadNonBlockingForm()), COLUMN elements!!, colored text defaults
4377| 2.10.0 | Aug 25, 2018 - Keyboard & Mouse features (Return individual keys as if buttons, return mouse scroll-wheel as button, bind return-key to button, control over keyboard focus), SaveAs Button, Update & Get methods for InputText, Update for Listbox, Update & Get for Checkbox, Get for Multiline, Color options for Text Element Update, Progess bar Update can change max value, Update for Button to change text & colors, Update for Image Element, Update for Slider, Form level text justification, Turn off default focus, scroll bar for Listboxes, Images can be from filename or from in-RAM, Update for Image). Fixes - text wrapping in buttons, msg box, removed slider borders entirely and others
4378| 2.11.0 | Aug 29, 2018 - Lots of little changes that are needed for the demo programs to work. Buttons have their own default element size, fix for Mac default button color, padding support for all elements, option to immediately return if list box gets selected, FilesBrowse button, Canvas Element, Frame Element, Slider resolution option, Form.Refresh method, better text wrapping, 'SystemDefault' look and feel settin
4379| 2.20.0 | Sept 4, 2018 - Some sizable features this time around of interest to advanced users. Renaming of the MsgBox functions to Popup. Renaming GetFile, etc, to PopupGetFile. High-level windowing capabilities start with Popup, PopupNoWait/PopupNonblocking, PopupNoButtons, default icon, change_submits option for Listbox/Combobox/Slider/Spin/, New OptionMenu element, updating elements after shown, system defaul color option for progress bars, new button type (Dummy Button) that only closes a window, SCROLLABLE Columns!! (yea, playing in the Big League now), LayoutAndShow function removed, form.Fill - bulk updates to forms, FindElement - find element based on key value (ALL elements have keys now), no longer use grid packing for row elements (a potentially huge change), scrolled text box sizing changed, new look and feel themes (Dark, Dark2, Black, Tan, TanBlue, DarkTanBlue, DarkAmber, DarkBlue, Reds, Green)
4380| 2.30.0 | Sept 6, 2018 - Calendar Chooser (button), borderless windows, load/save form to disk
4381| 3.0.0 | Sept 7, 2018 - The "fix for poor choice of 2.x numbers" release. Color Chooser (button), "grab anywhere" windows are on by default, disable combo boxes, Input Element text justification (last part needed for 'tables'), Image Element changes to support OpenCV?, PopupGetFile and PopupGetFolder have better no_window option
4382| 3.01.01 | Sept 10, 2018 - Menus! (sort of a big deal)
4383| 3.01.02 | Step 11, 2018 - All Element.Update functions have a `disabled` parameter so they can be disabled. Renamed some parameters in Update function (sorry if I broke your code), fix for bug in Image.Update. Wasn't setting size correctly, changed grab_anywhere logic again,added grab anywhere option to PupupGetText (assumes disabled)
4384| 3.02.00 | Sept 14, 2018 - New Table Element (Beta release), MsgBox removed entirely, font setting for InputText Element, **packing change** risky change that allows some Elements to be resized,removed command parameter from Menu Element, new function names for ReadNonBlocking (Finalize, PreRead), change to text element autosizing and wrapping (yet again), lots of parameter additions to Popup functions (colors, etc).
4385| 3.03.00 | New feature - One Line Progress Meters, new display_row_numbers for Table Element, fixed bug in EasyProgresssMeters (function will soon go away), OneLine and Easy progress meters set to grab anywhere but can be turned off.
4386| 03,04.00 | Sept 18, 2018 - New features - Graph Element, Frame Element, more settings exposed to Popup calls. See notes below for more.
4387| 03.04.01 | Sept 18, 2018 - See release notes
4388| 03.05.00 | Sept 20, 2018 - See release notes
4389| 03.05.01 | Sept 22, 2018 - See release notes
4390| 03.05.02 | Sept 23, 2018 - See release notes
4391| 03.06.00 | Sept 23, 2018 - Goodbye FlexForm, hello Window
4392| 03.08.00 | Sept 25, 2018 - Tab and TabGroup Elements\
4393| 01.00.00 for 2.7 | Sept 25, 2018 - First release for 2.7
4394| 03.08.04 | Sept 30, 2018 - See release notes
4395| 03.09.00 | Oct 1, 2018 |
4396| 2.7 01.01.00 | Oct 1, 2018
4397| 2.7 01.01.02 | Oct 8, 2018
4398| 03.09.01 | Oct 8, 2018
4399| 3.9.3 & 1.1.3 | Oct 11, 2018
4400| 3.9.4 & 1.1.4 | Oct 16, 2018
4401| 3.10.1 & 1.2.1 | Oct 20, 2018
4402| 3.10.3 & 1.2.3 | Oct 23, 2018
4403| 3.11.0 & 1.11.0 | Oct 28, 2018
4404| 3.12.0 & 1.12.0 | Oct 28, 2018
4405| 3.13.0 & 1.13.0 | Oct 29, 2018
4406| 3.14.0 & 1.14.0 | Nov 2, 2018
4407| 3.15.0 & 1.15.0 | Nov 20, 2018
4408| 3.16.0 & 1.16.0 | Nov 26, 2018
4409| 3.17.0 & 1.17.0 | Dec 1, 2018
4410
4411## Release Notes
44122.3 - Sliders, Listbox's and Image elements (oh my!)
4413
4414If using Progress Meters, avoid cancelling them when you have another window open. It could lead to future windows being blank. It's being worked on.
4415
4416New debug printing capability. `sg.Print`
4417
44182.5 Discovered issue with scroll bar on `Output` elements. The bar will match size of ROW not the size of the element. Normally you never notice this due to where on a form the `Output` element goes.
4419
4420Listboxes are still without scrollwheels. The mouse can drag to see more items. The mouse scrollwheel will also scroll the list and will `page up` and `page down` keys.
4421
44222.7 Is the "feature complete" release. Pretty much all features are done and in the code
4423
44242.8 More text color controls. The caller has more control over things like the focus and what buttons should be clicked when enter key is pressed. Return values as a dictionary! (NICE addition)
4425
44262.9 COLUMNS! This is the biggest feature and had the biggest impact on the code base. It was a difficult feature to add, but it was worth it. Can now make even more layouts. Almost any layout is possible with this addition.
4427
4428.................. insert releases 2.9 to 2.30 .................
4429
44303.0 We've come a long way baby! Time for a major revision bump. One reason is that the numbers started to confuse people the latest release was 2.30, but some people read it as 2.3 and thought it went backwards. I kinda messed up the 2.x series of numbers, so why not start with a clean slate. A lot has happened anyway so it's well earned.
4431
4432One change that will set PySimpleGUI apart is the parlor trick of being able to move the window by clicking on it anywhere. This is turned on by default. It's not a common way to interact with windows. Normally you have to move using the titlebar. Not so with PySimpleGUI. Now you can drag using any part of the window. You will want to turn off for windows with sliders. This feature is enabled in the Window call.
4433
4434Related to the Grab Anywhere feature is the no_titlebar option, again found in the call to Window. Your window will be a spiffy, borderless window. It's a really interesting effect. Slight problem is that you do not have an icon on the taskbar with these types of windows, so if you don't supply a button to close the window, there's no way to close it other than task manager.
4435
44363.0.2 Still making changes to Update methods with many more ahead in the future. Continue to mess with grab anywhere option. Needed to disable in more places such as the PopupGetText function. Any time these is text input on a form, you generally want to turn off the grab anywhere feature.
4437
4438#### 3.2.0
4439 Biggest change was the addition of the Table Element. Trying to make changes so that form resizing is a possibility but unknown if will work in the long run. Removed all MsgBox, Get* functions and replaced with Popup functions. Popups had multiple new parameters added to change the look and feel of a popup.
4440
4441#### 3.3.0
4442OneLineProgressMeter function added which gives you not only a one-line solution to progress meters, but it also gives you the ability to have more than 1 running at the same time, something not possible with the EasyProgressMeterCall
4443
4444#### 3.4.0
4445
4446* Frame - New Element - a labelled frame for grouping elements. Similar
4447 to Column
4448* Graph (like a Canvas element except uses the caller's
4449 coordinate system rather than tkinter's).
4450* initial_folder - sets starting folder for browsing type buttons (browse for file/folder).
4451* Buttons return key value rather than button text **If** a `key` is specified,
4452*
4453 OneLineProgressMeter! Replaced EasyProgressMeter (sorry folks that's
4454 the way progress works sometimes)
4455 * Popup - changed ALL of the Popup calls to provide many more customization settings
4456 * Popup
4457 * PopupGetFolder
4458 * PopupGetFile
4459 * PopupGetText
4460 * Popup
4461 * PopupNoButtons
4462 * PopupNonBlocking
4463 * PopupNoTitlebar
4464 * PopupAutoClose
4465 * PopupCancel
4466 * PopupOK
4467 * PopupOKCancel
4468 * PopupYesNo
4469
4470#### 3.4.1
4471* Button.GetText - Button class method. Returns the current text being shown on a button.
4472* Menu - Tearoff option. Determines if menus should allow them to be torn off
4473* Help - Shorcut button. Like Submit, cancel, etc
4474* ReadButton - shortcut for ReadFormButton
4475
4476#### 3.5.0
4477* Tool Tips for all elements
4478* Clickable text
4479* Text Element relief setting
4480* Keys as targets for buttons
4481* New names for buttons:
4482 * Button = SimpleButton
4483 * RButton = ReadButton = ReadFormButton
4484* Double clickable list entries
4485* Auto sizing table widths works now
4486* Feature DELETED - Scaling. Removed from all elements
4487
4488#### 3.5.1
4489* Bug fix for broken PySimpleGUI if Python version < 3.6 (sorry!)
4490* LOTS of Readme changes
4491
4492#### 3.5.2
4493* Made `Finalize()` in a way that it can be chained
4494* Fixed bug in return values from Frame Element contents
4495
4496#### 3.6.0
4497* Renamed FlexForm to Window
4498* Removed LookAndFeel capability from Mac platform.
4499
4500#### 3.8.0
4501* Tab and TabGroup Elements - awesome new capabilities
4502
4503#### 1.0.0 Python 2.7
4504It's official. There is a 2.7 version of PySimpleGUI!
4505
4506#### 3.8.2
4507* Exposed `TKOut` in Output Element
4508* `DrawText` added to Graph Elements
4509* Removed `Window.UpdateElements`
4510* `Window.grab_anywere` defaults to False
4511
4512#### 3.8.3
4513* Listbox, Slider, Combobox, Checkbox, Spin, Tab Group - if change_submits is set, will return the Element's key rather than ''
4514* Added change_submits capability to Checkbox, Tab Group
4515* Combobox - Can set value to an Index into the Values table rather than the Value itself
4516* Warnings added to Drawing routines for Graph element (rather than crashing)
4517* Window - can "force top level" window to be used rather than a normal window. Means that instead of calling Tk to get a window, will call TopLevel to get the window
4518* Window Disable / Enable - Disables events (button clicks, etc) for a Window. Use this when you open a second window and want to disable the first window from doing anything. This will simulate a 'dialog box'
4519* Tab Group returns a value with Window is Read. Return value is the string of the selected tab
4520* Turned off grab_anywhere for Popups
4521* New parameter, default_extension, for PopupGetFile
4522* Keyboard shortcuts for menu items. Can hold ALT key to select items in men
4523* Removed old-style Tabs - Risky change because it hit fundamental window packing and creation. Will also break any old code using this style tab (sorry folks this is how progress happens)
4524
4525#### 3.8.6
4526
4527* Fix for Menus.
4528* Fixed table colors. Now they work
4529* Fixed returning keys for tabs
4530* Window Hide / UnHide methods
4531* Changed all Popups to remove context manager
4532* Error checking for Graphing objects and for Element Updates
4533
4534### 3.9.0 & 1.1.0
4535* The FIRST UNIFIED version of the code!
4536* Python 2.7 got a TON of features . Look back to 1.0 release for the list
4537* Tab locations - Can place Tabs on top, bottom, left, right now instead of only the top
4538
4539### 3.9.1 & 1.1.2
4540* Tab features
4541 * Themes
4542 * Enable / Disable
4543 * Tab text colors
4544 * Selected tab color
4545* New GetListValues method for Listbox
4546* Can now have multiple progress bars in 1 window
4547* Fix for closing debug-output window with other windows open
4548* Topanga Look and Feel setting
4549* User can create new look and feel settings / can access the look and feel table
4550* New PopupQuick call. Shows a non-blocking popup window with auto-close
4551* Tree Element partially done (don't use despite it showing up)
4552
4553### 3.9.3 & 1.1.3
4554
4555* Disabled setting when creating element for:
4556 * Input
4557 * Combo
4558 * Option Menu
4559 * Listbox
4560 * Radio
4561 * Checkbox
4562 * Spinner
4563 * Multiline
4564 * Buttons
4565 * Slider
4566* Doc strings on all Elements updated
4567* Buttons can take image data as well as image files
4568* Button Update can change images
4569* Images can have background color
4570* Table element new num_rows parameter
4571* Table Element new alternating_row_color parameter
4572* Tree Element
4573* Window Disappear / Reappear methods
4574* Popup buttons resized to same size
4575* Exposed look and feel table
4576
4577### 3.9.4 & 1.1.4
4578
4579* Parameter order change for Button.Update so that new button ext is at front
4580* New Graph.DrawArc method
4581* Slider tick interval parameter for labeling sliders
4582* Menu tearoff now disabled by default
4583* Tree Data printing simplified and made prettier
4584* Window resizable parameter. Defaults to not resizable
4585* Button images can have text over them now
4586* BUG fix in listbox double-click. First bug fix in months
4587* New Look And Feel capability. List predefined settings using ListOfLookAndFeelValues
4588
4589### 3.10.1 & 1.2.1
4590* Combobox new readonly parameter in init and Update
4591* Better default sizes for Slider
4592* Read of Tables now returns which rows are selected (big damned deal feature)
4593* PARTIAL support of Table.Update with new values (use at your own peril)
4594* Alpha channel setting for Windows
4595* Timeout setting for Window.Read (big damned deal feature)
4596* Icon can be base64 image now in SetIcon call
4597* Window.FindElementWithFocus call
4598* Window.Move allows moving window anywhere on screen
4599* Window.Minimize will minimize to taskbar
4600* Button background color can be set to system default (i.e. not changed)
4601
4602### 3.10.2 & 1.2.2
4603Emergency patch release... going out same day as previous release
4604* The timeout timer for the new Read with timer wasn't being properly shut down
4605* The Image.Update method appears to not have been written correctly. It didn't handle base64 images like the other elements that deal with images (buttons)
4606
4607
4608### 3.10.3 & 1.2.3
4609
4610* New element - Vertical Separator
4611* New parameter for InputText - change_submits. If True will cause Read to return when a button fills in the InputText element
4612* Read with timeout = 0 is same as read non blocking and is the new preferred method
4613 * Will return event == None if window closed
4614* New Close method will close all window types
4615* Scrollbars for Tables automatically added (no need for a Column Element)
4616* Table Update method complete
4617* Turned off expand when packing row frame... was accidentally turned on (primary reason for this release)
4618* Try added to Image Update so won't crash if bad image passed in
4619
4620### 3.11.0 & 1.11.0
4621* Syncing up the second digit of the releases so that they stay in sync better. the 2.7 release is built literally from the 3.x code so they really are the same
4622* Reworked Read call... significantly.
4623* Realtime buttons work with timeouts or blocking read
4624* Removed default value parm on Buttons and Button Updates
4625* New Tree Element parm show_expanded. Causes Tree to be shown as fully expanded
4626* Tree Element now returns which rows are selected when Read
4627* New Window method BringToFront
4628* Shortcut buttons no longer close windows!
4629* Added CloseButton, CButton that closes the windows
4630
4631### 3.12.0 & 1.12.0
4632* Changed Button to be the same as ReadButton which means it will no longer close the window
4633* All shortcut buttons no longer close the window
4634* Updating a table clears selected rows information in return values
4635* Progress meter uses new CloseButton
4636* Popups use new CloseButton
4637
4638### 3.13.0 & 1.13.0
4639* Improved multiple window handling of Popups when the X is used to close
4640* Change submits added for:
4641 * Multiline
4642 * Input Text
4643 * Table
4644 * Tree
4645 * Option to close calendar chooser when date selected
4646 * Update for Tree Element
4647 * Scroll bars for Trees
4648
4649
4650### 3.14.0 & 1.14.0
4651* More windowing changes...
4652 * using a hidden root windowing (Tk())
4653 * all children are Toplevel() windows
4654* Read only setting for:
4655 * Input Text
4656 * Multiline
4657* Font setting for InputCombo, Multiline
4658* change_submits setting for Radio Element
4659* SetFocus for multiline, input elements
4660* Default mon, day, year for calendar chooser button
4661* Tree element update, added ability to change a single key
4662* Message parm removed from ReadNonBlocking
4663* Fix for closing windows using X
4664* CurrentLocation method for Windows
4665* Debug Window options
4666 * location
4667 * font
4668 * no_button
4669 * no_titlebar
4670 * grab_anywhere
4671 * keep_on_top
4672* New Print / EasyPrint options
4673 * location
4674 * font
4675 * no_button
4676 * no_titlebar
4677 * grab_anywhere
4678 * keep_on_top
4679* New popup, PopupQuickMessage
4680* PopupGetFolder, PopupGetFile new initial_folder parm
4681
4682
4683### 3.15.0 & 1.15.0
4684
4685* Error checking for InputText.Get method
4686* Text color, background color added to multiline element.Update
4687* Update method for Output Element - gives ability to clear the output
4688* Graph Element - Read returns values if new flages set
4689 * Change submits, drag submits
4690 * Returns x,y coordinates
4691* Column element new parm vertical_scroll_only
4692* Table element new parm - bind return key - returns if return or double click
4693* New Window parms - size, disable_close
4694* "Better" multiwindow capabilities
4695* Window.Size property
4696* Popups - new title parm, custom_text
4697 * title sets the window title
4698 * custom_text - single string or tuple string sets text on button(s)
4699
4700### 3.16.0 & 1.16.0
4701* Bug fix in PopupScrolled
4702* New `Element` shortcut function for `FindElement`
4703* Dummy Stretch Element made for backwards compatibility with Qt
4704* Timer function prints in milliseconds now, was seconds
4705
4706### 3.17.0 &1.17.0 2-Dec-2018
47073.17.0 2-Dec-2017
4708* Tooltip offset now programmable. Set variable DEFAULT_TOOLTIP_OFFSET. Defaults to (20,-20)
4709* Tooltips are always on top now
4710* Disable menu items
4711* Menu items can have keys
4712* StatusBar Element (preparing for a real status bar in Qt)
4713* enable_events parameter added to ALL Elements capable of generating events
4714* InputText.Update select parameter will select the input text
4715* Listbox.Update - set_to_index parameter will select a single items
4716* Menus can be updated!
4717* Menus have an entry in the return values
4718* LayoutAndRead depricated
4719* Multi-window support continues (X detection)
4720* PopupScrolled now has a location parameter
4721* row_height parameter to Table Element
4722* Stretch Element (DUMMY) so that can be source code compatible with Qt
4723* ButtonMenu Element (DUMMY) so can be source code compat with Qt. Will implement eventually
4724
4725## 3.18.0 11-Dec-2018
4726
4727 NOTE - **Menus are broken** on version 2.7. Don't know how long they've been this way. Please get off legacy Python if that's what you're running.
4728
4729* Default progress bar length changed to shorter
4730* Master window and tracking of num open windows moved from global to Window class variable
4731* Element visibility setting (when created and when Updating element)
4732* Input text visiblity
4733* Combo visiblity
4734* Combo replaces InputCombo as the primary class name
4735* Option menu visibility
4736* Listbox visiblity
4737* Listbox new SetFocus method
4738* Radio visibility
4739* Checkbox visibility
4740* Spin visiblity
4741* Spin new Get method returns current value
4742* Multiline visiblity
4743* Text visibility
4744* StatusBar visiblity
4745* Output visibility
4746* Button visibility
4747* Button SetFocus
4748* ProgressBar - New Update method (used only for visibility)
4749* Image - clickable images! enable_events parameter
4750* Image visibility
4751* Canvas visibility
4752* Graph visibility
4753* Graph - new DrawImage capability (finally)
4754* Frame visibility
4755* Tab visibility (may not be fully functional)
4756* TabGroup visibility
4757* Slider visibility
4758* Slider - new disable_number_display parameter
4759* Column visibilty
4760* Menu visibility - Not functional
4761* Table visibility
4762* Table - new num_rows parm for Update - changes number of visible rows
4763* Tree visiblity
4764* Window - New element_padding parameter will get padding for entire window
4765* OneLineProgressMeter - Completely REPLACED the implementation
4766* OneLineProgressMeter - can get reason for the cancellation (cancel button versus X)
4767* EasyProgressMeter - completely removed. Use OneLineProgressMeter instead
4768* Debug window, EasyPrint, Print - debug window will re-open if printed to after being closed
4769* SetOptions - can change the error button color
4770* Much bigger window created when running PySimpleGUI.py by itself. Meant to help with regression testing
4771
4772## 3.19.2 13-Dec-2018
4773
4774* Warning for Mac's when trying to change button color
4775* New parms for Button.Update - image_size and image_subsample
4776* Buttons - remove highlight when border depth == 0
4777* OneLineProgressMeter - better layout implementation
4778
4779## 3.20.0 & 1.20.0 18-Dec-2018
4780
4781* New Pane Element
4782* Graph.DeleteFigure method
4783* disable_minimize - New parameter for Window
4784* Fix for 2.7 menus
4785* Debug Window no longer re-routes stdout by default
4786* Can re-route by specifying in Print / EasyPrint call
4787* New non-blocking for PopupScrolled
4788* Can set title for PopupScrolled window
4789
4790
4791## 3.21.0 & 1.21.0 28-Dec-2018
4792
4793* ButtonMenu Element
4794* Embedded base64 default icon
4795* Input Text Right click menu
4796* Disabled Input Text are now 'readonly' instead of disabled
4797* Listbox right click menu
4798* Multiline right click menu
4799* Text right click menu
4800* Output right click menu
4801* Image right click menu
4802* Canvas right click menu
4803* Graph right click menu
4804* Frame right click menu
4805* Tab, tabgroup right click menu (unsure if works correctly)
4806* Column right click menu
4807* Table right click menu
4808* Tree right click menu
4809* Window level right click menu
4810* Window icon can be filename or bytes (Base64 string)
4811* Window.Maximize method
4812* Attempted to use Styles better with Combobox
4813* Fixed bug blocking setting bar colors in OneLineProgressMeter
4814
4815# 3.22.0 PySimpleGUI / 1.22.0 PySimpleGUI27
4816
4817* Added type hints to some portions of the code
4818* Output element can be made invisible
4819* Image sizing and subsample for Button images
4820* Invisibility for ButtonMenusup
4821* Attempt at specifying size of Column elements (limited success)
4822* Table Element
4823 * New row_colors parameter
4824 * New vertical_scroll_only parameter - NOTE - will have to disable to get horizontal scrollbars
4825* Tree Element
4826 * New row_height parameter
4827 * New feature - Icons for tree entries using filename or Base64 images
4828* Fix for bug sending back continuous mouse events
4829* New parameter silence_on_error for FindElement / Element calls
4830* Slider returns float now
4831* Fix for Menus when using Python 2.7
4832* Combobox Styling (again)
4833
4834
4835# 3.2.0 PySimpleGUI / 1.23.0 PySimpleGUI27 16-Jan-2019
4836
4837* Animated GIFs!
4838* Calendar Chooser stays on top of other windows
4839* Fixed bug of no column headings for Tables
4840* Tables now use the font parameter
4841
4842# 3.24.0 1.24.0 16-Jan-2019
4843
4844* PopupAnimated - A popup call for showing "loading" type of windows
4845
4846# 3.25 & 1.25 20-Feb-2019
4847
4848* Comments :-)
4849* Convert Text to string right away
4850* Caught exceptions when main program shut down with X
4851* Caught exceptions in all of the graphics primitives
4852* Added parameter exportselection=False to Listbox so can use multiple listboxes
4853* OneLineProgressMeter - Can now change the text on every call if desired
4854
4855
4856## 3.27.0 PySimpleGUI 31-Mar-2019
4857
4858Mixup.... 3.26 changes don't appear to have been correctly released so releasing in 3.27 now
4859
4860* do_not_clear now defaults to TRUE!!!
4861 * Input Element
4862 * Multiline Element
4863* Enable Radio Buttons to be in different containers
4864* Ability to modify Autoscroll setting in Multiline.Update call
4865* PopupGetFolder, PopupGetFile, PopupGetText - title defaults to message if none provided
4866* PopupAnimated - image_source can be a filename or bytes (base64)
4867* Option Menu can now have values updated
4868
4869## 3.28.0 11-Apr-2019 PySimpleGUI
4870
4871* NEW Window Parameter - layout - second parameter. Can pass in layout directly now!
4872* New shortcuts
4873 * I = InputText
4874 * B = Btn = Butt = Button
4875* Convert button text to string when creating buttons
4876* Buttons are returned now as well as input fields when searching for element with focus
4877
4878## 3.29 22-Apr-2019
4879
4880* New method for `Graph` - `RelocateFigure`
4881* Output Element no longer accepts focus
4882
4883### Upcoming
4884Make suggestions people! Future release features
4885
4886
4887## Code Condition
4888
4889 Make it run
4890 Make it right
4891 Make it fast
4892
4893It's a recipe for success if done right. PySimpleGUI has completed the "Make it run" phase. It's far from "right" in many ways. These are being worked on. The module is particularly poor for PEP 8 compliance. It was a learning exercise that turned into a somewhat complete GUI solution for lightweight problems.
4894
4895While the internals to PySimpleGUI are a tad sketchy, the public interfaces into the SDK are more strictly defined and comply with PEP 8 for the most part.
4896
4897Please log bugs and suggestions in the GitHub! It will only make the code stronger and better in the end, a good thing for us all, right?
4898
4899## Design
4900
4901A moment about the design-spirit of `PySimpleGUI`. From the beginning, this package was meant to take advantage of Python's capabilities with the goal of programming ease.
4902
4903**Single File**
4904While not the best programming practice, the implementation resulted in a single file solution. Only one file is needed, PySimpleGUI.py. You can post this file, email it, and easily import it using one statement.
4905
4906**Functions as objects**
4907In Python, functions behave just like object. When you're placing a Text Element into your form, you may be sometimes calling a function and other times declaring an object. If you use the word Text, then you're getting an object. If you're using `Txt`, then you're calling a function that returns a `Text` object.
4908
4909**Lists**
4910It seemed quite natural to use Python's powerful list constructs when possible. The form is specified as a series of lists. Each "row" of the GUI is represented as a list of Elements. When the form read returns the results to the user, all of the results are presented as a single list. This makes reading a form's values super-simple to do in a single line of Python code.
4911
4912**Dictionaries**
4913Want to view your form's results as a dictionary instead of a list... no problem, just use the `key` keyword on your elements. For complex forms with a lot of values that need to be changed frequently, this is by far the best way of consuming the results.
4914
4915You can also look up elements using their keys. This is an excellent way to update elements in reaction to another element. Call `form.FindElement(key)` to get the Element.
4916
4917**Named / Optional Parameters**
4918This is a language feature that is featured **heavily** in all of the API calls, both functions and classes. Elements are configured, in-place, by setting one or more optional parameters. For example, a Text element's color is chosen by setting the optional `text_color` parameter.
4919
4920**tkinter**
4921tkinter is the "official" GUI that Python supports. It runs on Windows, Linux, and Mac. It was chosen as the first target GUI framework due to its ***ubiquity***. Nearly all Python installations, with the exception of Ubuntu Linux, come pre-loaded with tkinter. It is the "simplest" of the GUI frameworks to get up an running (among Qt, WxPython, Kivy, etc).
4922
4923From the start of the PSG project, tkinter was not meant to be the only underlying GUI framework for PySimpleGUI. It is merely a starting point. All journeys begin with one step forward and choosing tkinter was the first of many steps for PySimpleGUI. Now there are 4 ports up and running - tkinter, WxPython, Qt and Remi (web support)
4924
4925
4926## Author
4927Mike - who wrote PySimpleGUI is not important. It's the software that's important
4928
4929
4930## License
4931
4932GNU Lesser General Public License (LGPL 3) +
4933
4934## Acknowledgments
4935
4936#### SORRY!! Will add these back. Lost due to file length limitation
4937<!--stackedit_data:
4938eyJoaXN0b3J5IjpbMTIxNjg5MDM1Niw4NjQ5Nzg3NjUsLTEwNj
4939U5NzgxMjYsNTE5MDU1OTQsMjA1MzEyNTE0OSwtMTU3ODc0NjU4
4940OCwyNjA1ODQ4MTQsMTEwMjA4ODMzMywxNjc5ODUwOTkyLC0xND
4941YxNDI4MSwtNjA2MzcxMTgsLTUwOTM1OTEyMywtMjQ4OTc2Mjks
4942MTMwNzY5MjU5LC0yOTY3ODM1NSwtNzc0MDc0MjMwLDI2NjM2ND
4943QxNyw0NDk0MzMyNDMsLTExNDg0OTA2MjNdfQ==
4944-->